Economically, but with Lots of Frills
|
Outfitting a 50 Year Old 14' Aluminum River / Lake Boat, Economically, but with Lots of Frills
|
 |
This may well
be my last boat endeavor, (well that is what I
said on the last one also) but now at age 86 and with
bad lower back and hip issues which are curtailing a lot of my
movements, I have to now concentrate to
work on my bucket list. My mind thinks I
am still 40, but my body knows that I am an IDIOT. This boat is an 1974 14' aluminum
StarCraft Sea Scamp. It came with a
trailer, so that was a plus, (well sort of, as you
will find out later) compared to some of my previous small boat purchases.
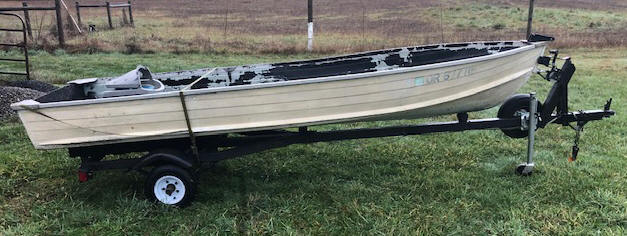
This boat was in not to bad a shape for being as old as it is. It appears that at one time there was damage to the Port gunnel between the front and center bench seat, that has been pretty much been structurally straightened out. I had to do minor body/fender straightening that side with pop rivets and Bondo body putty there, and on other locations filling minor dents. The bottom has minor dents but lots of scratches indicating this boat was used as a fishing boat during it's lifetime and not yard art. Other than that, almost no major dents or scrapes are visible, (one on the bottom. but it was readily fixable). This boat's hull rivets are surprisingly solid, indicating (to me at least) that this boat was used but not abused that badly. The floor ribs are about 2" closer than its 12' little brother, so is a bit more solidly built.
The ID plate was partly faded out, and somewhat unreadable along with not being attached, because the previous owner had replaced the inner transom plywood (which the plate was attached to). There is still the HIV number attached to the outer Starboard side of the transom. On the ID plate, I saved the info off this, and reconstructed a new aluminum plate that was screwed in place on the inside of the new transom, thereby satisfying any possible Law Enforcement/Coast Guard inspection.
This boat is rated at 4 persons or 700# maximum weight and with a engine's maximum horsepower of 20hp. Four persons ??? Maybe if they only weighed 125# each, and no motor. In my book, maybe only two persons along with what gear I normally carry aboard.
I do also own a 18' aluminum convertible North River ocean / bay boat with a 75hp motor, but I wanted something smaller that could be towed by my small SUV and to fish smaller waters with. Initially a few years ago, I was really looking for a 14' aluminum boat, but in the year or so that I spent looking I could not find a used one that was either in a condition that I would accept. OR they were considerably new enough where it was priced way out of my limited income price range. Therefore I settled on a 12'er SHOWN HERE. However after using the 12'er a few times, (at my age and agility, along with it being really too small for an older partner also) my original idea of a 14' had more credibility. My mistake for not waiting a bit longer.
Even though I had got the 12'er pretty well modified (seats and storage) to my liking, however, I somewhat continued looking for a 14'er. These seem to be considerably scarcer than 12'ers (in my area at least). Finally early January 2023 during a rare peek on Facebook Marketplace, one popped up locally and I quickly picked it up. Here the guy was moving clear across the country into eastern Canada, had sold his house and needed to get rid of a lot of stuff thrown in. I got it at a fair, but decent price along with a 1996 8hp Mercury along with a lot of other boating associated stuff. One of the real reasons I wanted THIS PARTICULAR boat was because it was a big brother to the 12'er I already had done some modifications to, and I should be able to transfer most of my additions onto this longer - wider boat. Then I sold the 12'er to a younger fisherman, who happened to only be 76.
This 14' version is 4" wider and 2" deeper in the center than the 12'er, not a lot, but in the right places, and the extra 2 ' in length, this makes a great difference.
Just What Are YOUR Requirements ? It seems that everyone has different ideas as to what they would like, or need in a boat, no matter the size. Some are satisfied with anything that floats and with a means of propulsion for it. I personally totally dislike clutter, especially in any of my boats. Then there are those goofy guys like me that have owned numerous boats about all their life, may have a bit of engineering background and understand what is possible. And we want some safety, comfort, or other useful ideas incorporated a boat that enable us to enjoy the short amount of time that we have in it while on the water.
What I have found, is in formulating your ideas, DO NOT lock your mind in your first thoughts, many of which may be over, OR under engineered. Sleep on your idea, sketch it out on paper, sleep on it again. I have solved many of my idea issues at 2 or 3 AM when I could not go back to sleep after getting up to go to the bathroom.
First off, you need to keep it simple, can your concept be accomplished in a easier, or simpler manner? Also by this I also mean, do you have the means to do a complicated design by yourself, or do you have to "Farm" it out? Either way, MAKE IT SIMPLE because if you have to "farm it out" your concept/plans need to be to where there is no misunderstandings. And, if you are a somewhat newbie to boating/fishing, and need ideas, the Internet is a very valuable source.
However, DO NOT try to redesign a boat into something that is beyond reason, AND it's capabilities. It would be stretching things to try to make a semi-full blown bass boat out of a 10' Jon boat. Yes, it could be used for bass fishing, but not anywhere near what the modern day bass boats are. To get more ideas, take a few afternoons and walk the docks in the summer time, or visit busy boat launches, ask questions and take photos of the interesting ones. A small boat is still a small boat no matter how much you modify it. AND practice safety afloat.
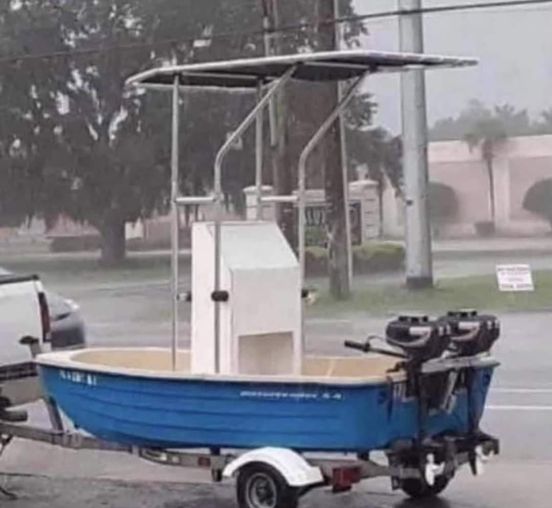
| Shown here is an example, as this is NOT a twin engine offshore boat |
 |
Boat Repairs ;
The previous owner had replaced the
inner rotted transom, laminated (glued and bolted
together) 2 sheets of 3/4" plywood, but he made them
the full transom depth (now being considerably
deeper than the original), this giving considerably more
transom support. His boat building
skills was not the greatest, as there was gaps of
1/2" all around the bottom and sides of the transom.
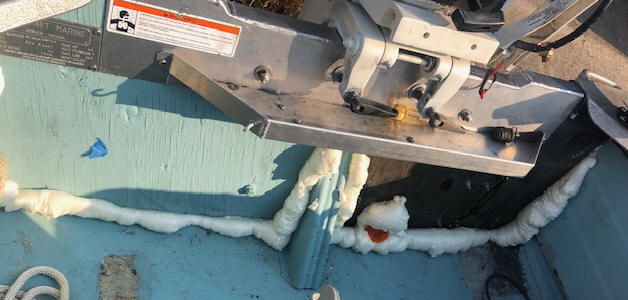
I rectified this by using a can of spray foam, let
it cure as seen in the photo below on the left, and
then cut off the excess with a fillet knife, then
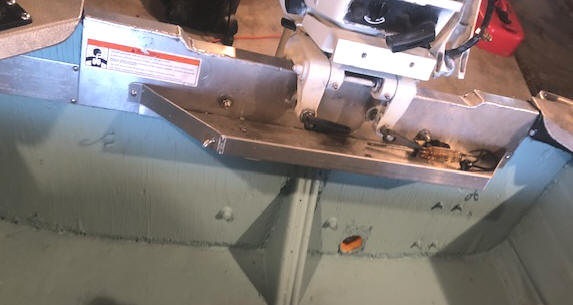
painted to match my new interior color in the RH
photo below.
OH
yes, I utilized one of my empty plastic pill
bottles, to fit over the drain plug location, cutting
the bottom out and then when the foam was cured, cut
the top off to match the inside of the transom, as
seen in the RH photo below.
| Shown here
is the spray foam filling the cracks of the transom project |
Shown
here the spray foam has cured & trimmed, then painted |
 |
 |
I finished this
transom project
by having my tin bender friend fabricate a aluminum cover that also
served as a motor clamp base covering/protecting the
plywood transom.
The outside of this boat had been repainted at one time in a almond color (but not
prepped), with more of a cream
original color underneath.
He
tried to repaint the interior with trailer bed liner
paint (apparently for durability), which failed miserably in that now it looks
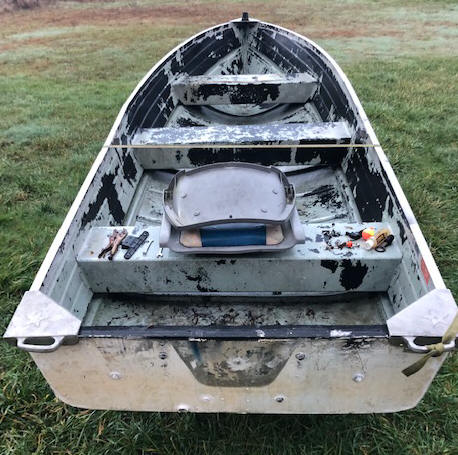
like a pinto pony, as seen in the photo below.
I tried to pressure wash this to see if more will
come off, but my efforts were almost a total failure.
In my quest find a paint to cover this
botched job, I decided that a Navy Gray would work.
However the hardware store that I went to did not
have that color, so he said he could mix what-ever I
wanted, (well maybe). They were geared toward
mixing house paint, therefore that color was not a
house color and not in his computer. I did not
have a sample of this color (as this color was also
something I had gotten in a rattle can to restore my
old Stihl power-saw), so we guessed at the color,
which
came out way too light of a Gray. The
next day I took it back to see if they could add
some color but the different employee said no, he
would have to start all over. Why not
use the new code off this mixed paint, scan the new
sample that I now had, and mix accordingly.
No - it does not work that way. My
comment was "Well and it did not need a
exact match", -- but probably beyond his
capability ???
Me being a bullheaded Swiss/German, I purchased a couple of
small cans (1/2 pints) of the same brand paint in
Royal Blue and Hunter Green, then added them to the
already mixed paint.
It did not come out what I was shooting for, but
acceptable. Now probably near an Aqua
color.
| Shown here
is the 14' aluminum StarCraft as I got it home, before I started any modifications. Notice the inside paint job. |
 |
In the photo below you can see
the finished boat, with hand rails, after the Coast
Guard numbers and the boat manufacturer name also applied.
And you will notice the orange flags mounted on the
top of the trailer loading guide rollers. Along with the 15hp Johnson outboard
mounted on the transom.
| Shown here is the 14' aluminum StarCraft after my modifications & ready to fish |
 |
Seats ; Just setting on those hard aluminum bench seats for any length of time don't cut it for this old duffer. If possible, versatility and some comfort are the name of the game here. You need a somewhat comfortable lightweight, but yet compact seat as you will be probably be confined here for considerable length of time if you are a dedicated fisherman. And when you get these old duffers with chronic back pain, that compounds the issue.
Therefore, I chose folding mid grade swivel seats, not ideal, if we want to go fishing, you may have to have to suffer somewhat. I had one seat that I was using on a boat that I had just sold, but the new owner was not going to use it for fishing, but crabbing, so I kept my movable skippers seat and used it here.
Here, I took a note off the 12'er that I had preciously worked owned. This 12' ers aluminum bench seat had a 3/4" lip on top, both the front and rear of each bench seat. By using that lip, I had fashioned a non permanent, movable, but secure mounting system that simply clamps a 3/4" plywood adapter plate onto the upper outer edge lips of the existing aluminum bench seats.
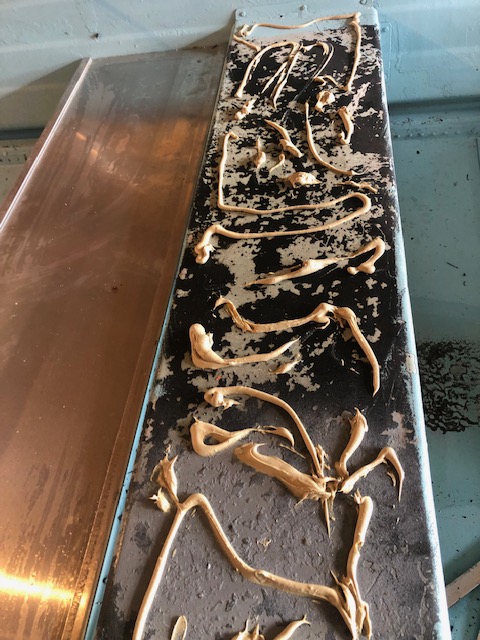
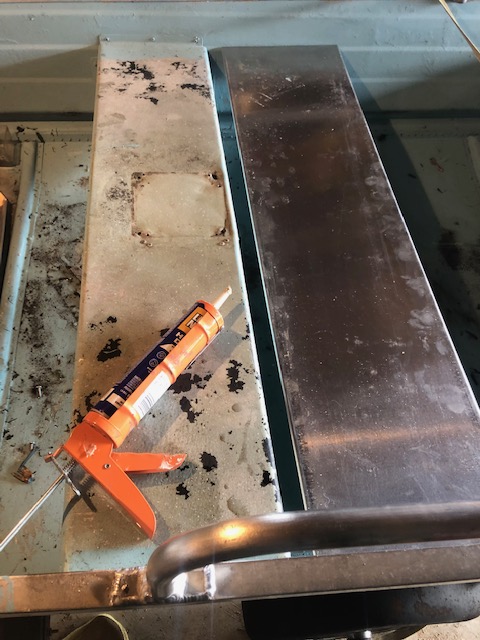
For this 14' boat, the tops of the bench seats did not have that lip, AND they were pretty damaged (because it being very thin material) and by previously bolted on attempts to hold folding seats that over time wore/damaged the holes to the point that I even had issues even removing the old rusted steel bolts on these seats. So, I had new top covers made of .080" aluminum, matching the top configuration of the 12' er's bench seats. This accomplished 2 things, (1) It covered up the damaged old bench seat tops. (2) It provided a secure mount for the new folding seats that I was using on the 12'er. In securing these top covers to the seats, I used Liquid Nails very liberally along with (8) 3/16" Pop Rivets per seat.
| Shown here
are the new seat top cover ready to install, LIBERALLY using Liquid Nails as a partial adheasive |
Here
is the damaged old seat on the left, and it's new top to be next to it. Notice it is
1 1/2" wider |
 |
 |
After the first shake down run of the 12'er (with me doing it solo) I found that my initial thoughts of placing the seats on opposite sides to distribute the weight when 2 persons were aboard, may have had some merit (IF the boat had a considerably wider bottom). BUT NOT on this small boat, with only me aboard (weighing 240#), AND with the low freeboard of this boat, it was quite an awakening (when I leaned to far outward) only to see lots of water pouring over the gunnel near the transom. It became very apparent that I needed to replace the hex nuts (needing wrenches to loosen) on the underside seat clamps with wing nuts, so that at least the rear seat could be readily adjusted (without tools) toward the center for better balance under these conditions. However on this 14'er it seems that that center balance is not as critical.
The forward partners fishing seat came from a friend who used to be a sporting goods sales rep. before he retired, and this was a left over sample that he had stashed for a number of years. It was still in the now dilapidated cardboard factory box. This one is not as high a back as my skippers seat is, but more of a clamshell type, the price was right (like free) and it should work quite well. This seat clamp nuts were also replaced with wing nuts, (as with the rear seats) where they could easily be repositioned sideways.
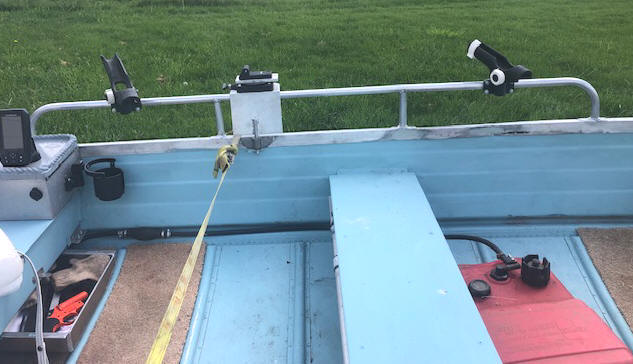
Side Railing ; These boats, typically being not a deep sided boat, I decided that I would add some raised 3/4" aluminum pipe side rails, (as I had done on some other previous small boats). With these, it provides a way better grab bar, along with an easy location to install rod holders as needed. Initially on inspecting the gunnels, they seemed rather thin to bolt the bases of these rails to, so just weld a angle piece to the ends and I would bolt them on. I approached my welder/fabrication friend, who assured me that he could weld the rails to the gunnels. FINE WITH ME.
These were placed so that a person could enter the boat at the front, but not having to step over the new rails. The rail at rear seat is a little far back for this, but doable, where entering could be to the rear and then step over. There are 5" high and about 5 1/2 feet long, with two center supports. Mounted on them are clamp on type Fish-On rod holder bases, and the readily removable Scotty downrigger base units.
| Shown here are the side hand rails with all the trimmings |
 |
Floor Covering ; The FULL floor covering was abandoned here, as on the 12'er initially it seemed a good thing, and I am sure that it cuts down the "on the water noise", but it is a PITA if it was raining (in Washington?). Also another PITA trying to remove those fishing lure hooks from it when they get dropped on the floor. Therefore on this boat, I just laid a small section of old carpet between the ribs in front of the rear seat and behind the front seat, which can be readily removed if need be. Also one short piece was laid under the front seat as a pad for the anchor to lay.
Storage Space ;
There is not a lot of room in/on boats this size for storage of about
anything, and being somewhat inventive, I devised a aluminum box about
10" X 12" and 6" deep that
is pop
riveted to the top of the rear bench seat on the
Port side. A hinged (from the front) 3/4" pine lid was attached to this box. On top of this
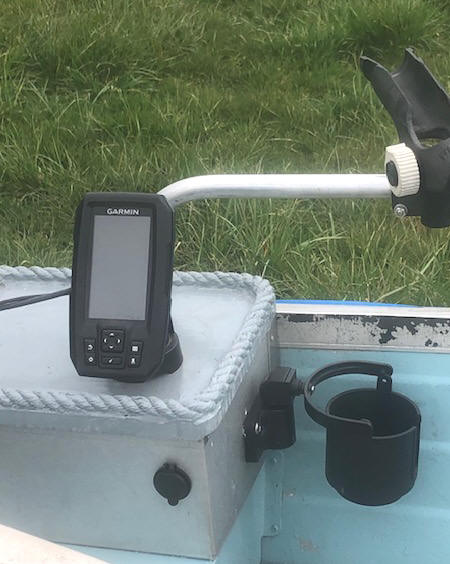
lid the sonar is
mounted. When not in use, this small sonar unit can
readily be removed and stored inside this box. There is
also enough room in this box for a small fire
extinguisher, a small pair of binoculars, handheld
VHF radio, small waterproof First Aid Kit, handheld
compass, PWC Freon horn, medium sized flashlight, fillet knife, along with
sunglasses, bug dope and a few
small miscellaneous items. And this box can also be
locked, when unattended.
The hinge here is a 1" stainless steel piano type
hinge. But in attaching it to the lid, I used
#6 X 5/8" long flat head screws so they would not go
through the lid. However an issue popped
up in that the heads of these screws were marginally
large enough, so that some after usage, some of the heads pulled
through the holes in the hinge. Well now
as mentioned below, the lid's top lid rope lip
allowed me to change screws to a size #10 X 1 1/4",
giving me a larger head, longer threads for better
gripping even into the rope lip. But now
these larger heads protruded inward enough to bind
the hinge from allowing fully closure the lid.
OK, I got out my trusty drill motor and Harbor
Freight's multi drill tool, and drilling recess
holes in line with the screw heads on the top hinge flange
of the box. Now it closes, and is more secure
to boot.
On top of this box's lid, I wanted a low outer ridge so that this top could also serve as sort of a temporary catch-all for small fishing tackle etc. After a lot of considerations, I purchased enough 3/4" twisted Nylon rope to attach around the outer top edge of the lid. This was accomplished by using small finishing nails to initially secure it in place, and then using a hot glue gun, to generously secure the rope to the top. Then on the inside of this rope lip, I did a thin layer of Bondo, using my finger to smooth it out and rounded it to form a smooth inner corner at the junction of the lid top to the rope lip. I then sanded the Bondo and painted it to preserve the wood.
On the upper rear of this box, near the hull, the exit hole for the sonar wiring was covered by a small stainless steel clamshell, to help protect and keep the inner contents dry.
In the photo below, you will also note the skippers cup holder on front AND the under seat shallow drawers/trays.
Then almost as an afterthought, but in today's age, why not add a 12 volt USB outlet on this box to ensure my cell phone had the capability to be recharged if needed?
| Shown here is my storage box with the sonar unit mounted on top with cup holder, USB port & fuel line. | Shown here the storage box is open showing contents |
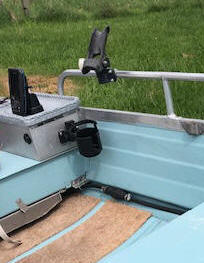 |
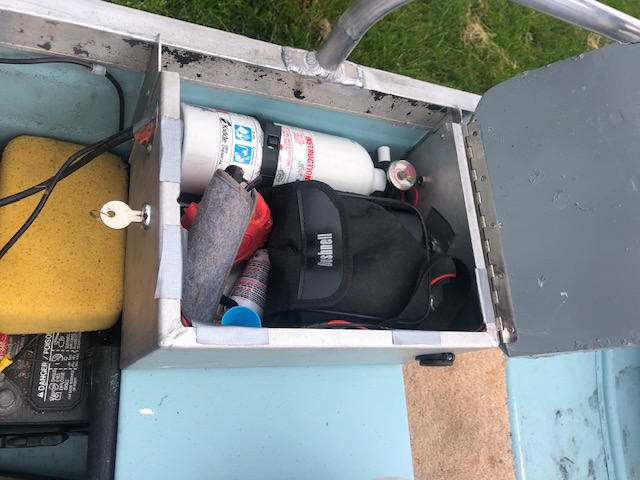 |
Under Seat Storage Trays ; And at 2 AM, another thought popped out of my head, which was placing shallow (2" and 3" deep) slider drawers UNDER both sides of the rear and middle bench seats. This should be enough room to store rain gear (ponchos), fillet knife, Sonar info manual, fishing regulations etc. The seams and ends were all Heli-Arc welded together.
Numerous tries failed to attach the rails UNDER
the existing bench seats for these drawers.
The issue was lack of room underneath to drill or
secure the lips even with pop-rivets. And I
DID NOT want to remove the riveted in seats to gain
access. Finally at plan E or F succeeded,
(which was to pop rivet these lip brackets onto the OUTSIDE
of the lower seat material), however not as neat
or pretty as I had hoped, but functional.
Here I
use no handles or drawer pulls, but have drilled
(2), 1" round holes on the front underside of the
bottom of each of these drawers.
I then attached a sheet of flat
1/8"
rubber gasket material on top of, and on one side of
each hole (similar to a reed valve in an 2 cycle
outboard motor). In use, just reach under the
drawer, locate the hole in the bottom with my
fingers, push up on the inside rubber cover, and I am able to then pull the drawer out. When your
finger is not in the hole, the rubber falls down and
somewhat seals the hole.
| Shown here are the drawer finger holes & the rubber hole covers, with one moved out of the way for show | Shown here are the drawers are pulled part way out |
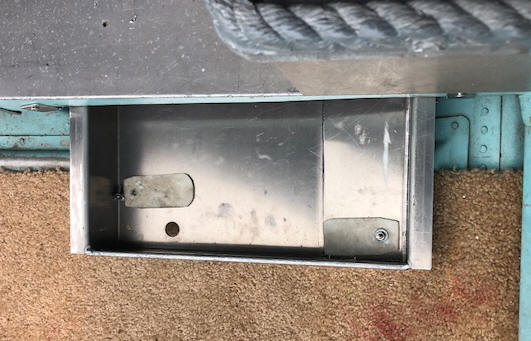 |
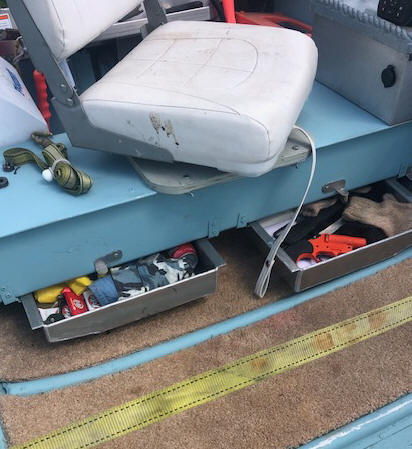 |
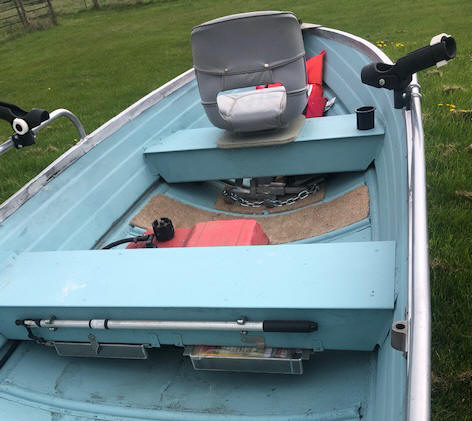
Boat Hook ; I then installed two broom handle spring clips to the rear of the middle seat for attaching the extendable boat hook, thereby being readily available.
| Boat hook attached to mid bench seat, also showing the anchor nesting under the front seat |
 |
Sonar/Battery ; For sonar, I chose a Garmin Striker 4 unit, (purchased using my Cabelas points) which is mounted on top of the storage lid, but readily removed when needed. For the sonar's battery, a trip to WalMart and a riding lawnmower battery (EverStart U1-7) which should be enough power for this unit, and meet my needs here. This battery sits in a wooden leveling base behind the rear bench, and secured by a 1" Nylon web/buckle system, where the web tie down loops are pop riveted to the rear of this bench seat. There is no charging capacity on any of the motors that I may use on this boat, but with only this sonar unit pulling power from the battery, it lasts a long time, and when the voltage gets down to below 12 Volts, I recharge the battery at night.
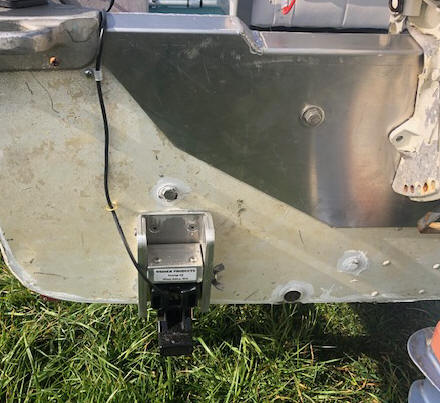
In mounting the transducer unit, I wanted it adjustable to the point that IF I had to drag the boat over/off a river sand/gravel bar, OR load it onto this tilt trailer from a shallow ramp, that I could easily raise the transducer up and out of the way of being damaged. Here, I devised heavy duty a compact aluminum bracket mounted to the transom. This base has an internal vertical slider for the transducer, which can be locked in 3 locations (one up, two down, with the down ones close for final adjustment). This slider block that the transducer is attached to, slides in a 1/4" slot at the forward inside of the base, and can be totally removed from this base and laid inside the boat if desired. In attaching this base, caulking was then used between the base and the hull to seal it, as the lower attachment bolts had to go through the aluminum/plywood transom below the waterline.
| Shown here is my adjustable transducer mount in the down position | Here you see the transducer mounted on the transom |
 |
 |
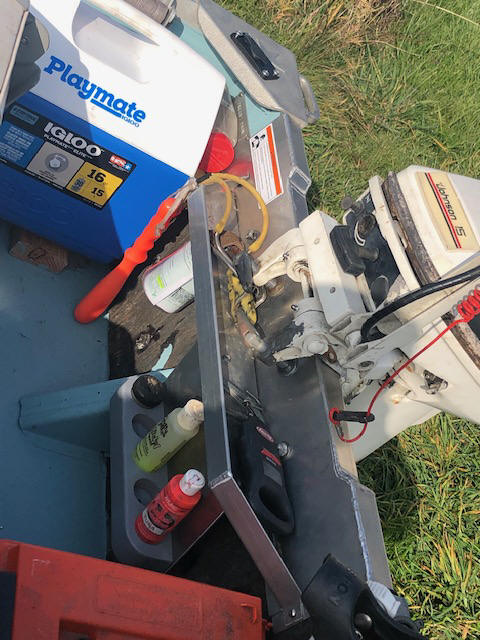
Then another idea that I have used for years on small boats, is a catch-all tray attached to the inside near top of the transom below the motor mount clamps, this being close, but yet out of the way. Here, I can lay my slingshot, hook remover pliers, digital fish scale, etc. This tray is again fabricated out of 1/16" aluminum, and with a few 1/8" holes drilled close to the transom to allow any accumulated rain water to drain out.
Also under the front Port side and under this transom tray, I added a 2" x 4" wooden block with numerous holes, (5 to be exact) to accommodate scent bottles. In the center of these 1 5/16" holes I drilled all the way through the wood with a 1/4' bit as a rain water drain, as seen in the photo below.
Then I found just enough room at the Starboard rear for an Igloo 16 quart cooler to fit between the transom and rear bench seat. It being held in place by a short Ell shaped aluminum mounted to the rear of the rear seat, along with sponges used as shims front, back and outer side to keep it secure and from rattling. This took measuring the space available and then a lot of looking/measuring/comparing in retail stores of existing coolers before I found one that would fit and function.
And on the other (Port) side, an MTM plastic waterproof dry box balanced things out. This was held in location by a couple of 9" bungee ball cords. Also there was just enough room between this dry box and the rear of the seat to mount the lawn mower battery to run the sonar. Then on the rear of the bench seat behind the skippers swivel seat, more spring clips to retain a extendable gaff hook (OK, I know, but being prepared never hurts).
Also underneath this tray on the starboard side, I screwed the lid off a plastic Skippers cocktail sauce jar. This now houses a waterproof container to store the boat and trailer registration, along with the spare storage box key and spare sonar fuses.
And in front of this container, a hook was installed to retain the small rope on the handle of the (bright red) fish bonker as seen in the photo below. And you will notice the scent bottle holder there also.
| Shown here is this rear tray and the 15 hp motor |
 |
Propulsion ; This boat came with a 1996 8hp 2 stroke Mercury motor, which could at least be my initial power plant as it was "supposed" to be a runner. However after much looking for something larger and that I was more accustomed to working on (I admit that I am not a Mercury man). So maybe I may gravitate to something that I am more familiar with, as I recently purchased a non running 1990 15hp Johnson that I WILL get running, as it has GOOD compression, but needs converted to a short shaft, some carburetor repair, a good cleaning and some paint, and it will be a good match for this boat. So I will at least have it an option (plan B) here.
In initially checking this Johnson motor out, the restart clip was missing (on
the kill button) on the
end of the tiller handle, effectively acting like
the ignition was turned off. With that fixed, there was
still no spark, so I took off
the coils, cleaned underneath the ground
connections, bolted them back on and tried again.
BINGO it now has fire, and next was to add fuel and see
if it will start. Again, it popped a couple of
times, but with it dry, (not being on muffs), I was
happy with knowing it may be made runnable. In
looking into the carburetor, I found some debris
inside, a missing idle knob and broken linkage
parts, which was an easy fix as parts were still
available, now things look promising. I
wanted to use this motor, but time was getting close
for the fishing I wanted to do, so I let it set, and
got the 8hp Mercury operational.
Then the next
week, I was gifted from an estate, a 1959 18hp
electric start Johnson
(that was running when it was put away) that may share
some run time on this boat with the other vintage motors mentioned below.
One of this boat's purposes will be used as a test project
for the dozen or more small, old restored to running
condition outboard motors that I have worked on, if
I want to recall times of yore. For a link
to those articles
CLICK HERE.
And IF I will be using it on a impoundment or lake where internal combustion type motors are restricted, then my Minn-Kota12 volt, 46# thrust electric motor will be used, and of course then a larger marine type battery.
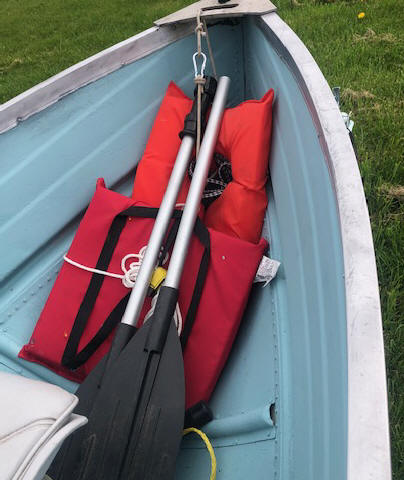
Currently, as an emergency propulsion, I have added a couple of used aluminum handled plastic paddles, which I have added them to the bow area where the throw cushion, spare PFD, bow line, and anchor rope is located.
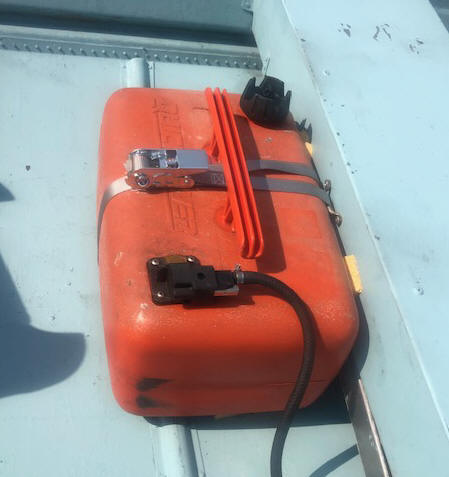
Then where to put the remote gas tank, (a 6 gallon Mercury QuickSilver poly tank) with a lot of stuff in the rear, about the only logical location is in front of the middle seat. This also helps balance things out if I am going solo.
Then the fuel line, laying on the floor, needs to be
out of the way and secured. Here, on the
outer bottoms of the bench seats where the fuel line
lays, I made provisions to captivate this line.
For the rear, a 1" X 1" aluminum angle was pop
riveted to the outer bottom of the bench seat and
the fuel line was secured under it using a 3/4" U
bolt. For the front, (rear of the middle bench
seat) at the outer inside edge, the same aluminum
angle was screwed to the rear of the seat using self
tapping screws. But here it was just as a
retainer to keep the fuel line near the inner edge
of the boat and out of the way.
Now to make a Nylon strap that will secure the fuel
tank to the front seat, but I could not find any
webbing locally WITH the matching buckle. So I
just bought a cheap ratchet strap. The strap's metal
tie down anchor was pop riveted to the front of the seat.
A couple pieces of 3/4" wood under the rear of the
tank to level
it, as the front was sitting on a rib, along with a
couple of small sponges as a shim between the tank
and seat.
Then there is a need to be able to measure the fuel inside the tank, or at least to be aware of how much is left. This was accomplished by purchasing a 4' length of 1/2" wood dowel. Cut it in half, and when filling the tank the first time, add one gallon at a time and mark those locations on the dowel. Now, knowing how much was used from the original 6 gallons, I can calculate how much TWC-3 two cycle oil to mix as I top it off.
| Shown
here is the gas tank, sitting forward of the middle seat |
 |
Bailing Device ;
Here, there is
no room, nor real need for a permanently mounted
bilge pump, but do need some source to bail out
rainwater. My experience in small flat
bottomed boats like this, is that if you purchase a
flat bottomed pet/cattle feed scoop, you can usually
bail out rainwater quite easily. Round buckets
do not work effectively here. And with what carpet is just
laying on the floor, that can be removed of need be
for a more complete bailing.
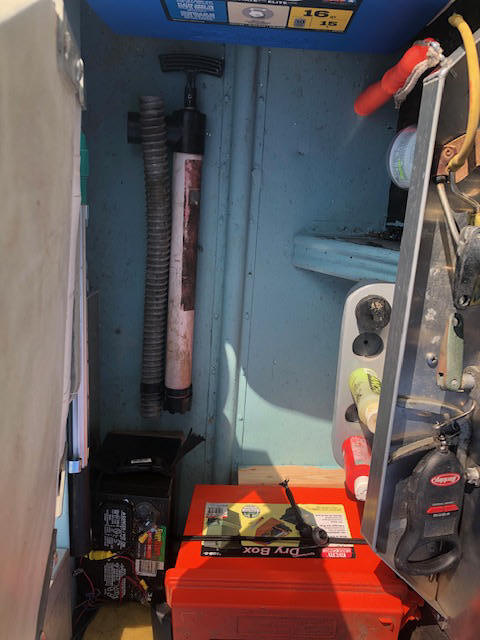
However this boat came with a manual bilge pump. Then as a backup, a trip to Ace Hardware and for
$3.95, I came home with a synthetic sponge 2 1/2" x
4 1/2" x 7" which does quite well once the bulk of
the water has been removed. But this boat does
have a drain plug in the transom.
| Shown here is the hand bilge pump behind & below the skippers seat |
 |
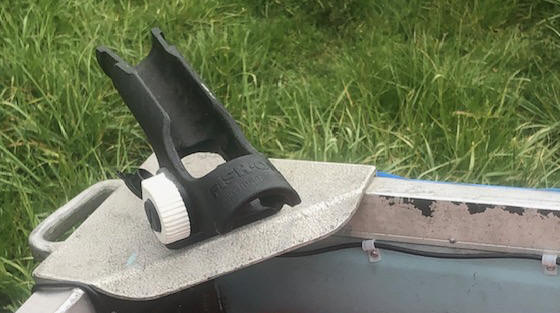
Rod Holders ; I have used Tempress brand "Fish-On" brand for years, and do have a few of these spare holder bases that I mounted in the few locations (2 on the inside corners of the transom and another 4 on the pipe hand rails midsection) in locations that would be desirable for 2 people fishing. The 2 on the outer edges of the transom are flush mount units, while the other 4 are side mounts on the pipe railing. To keep the railing holders from slipping (rotating), I sprinkled some Silica Sand on the plastic mount before clamping them onto the pipe.
You will notice in the photo below, that the outer ends have been modified, by removing the rotational keeper and tapering those ends. Also, not visible, they were widened on the mid section enough to allow a salmon rod fore cork to easily pass thru, as these seem to be made more for trout sized rods.
| Shown here is one of the modified rod holders on the stern for the skipper's use |
 |
Downriggers ;
And
I still have a set of "SPARE BACKUP" manual Scotty
downriggers if one of my bigger boat's electric ones fail.
And
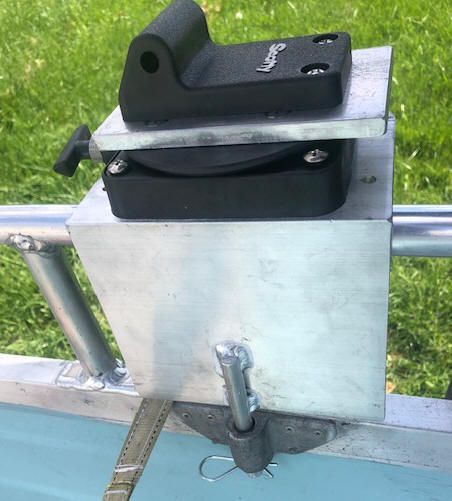
I think that I have come up with how to make/attach bases
to fit this boat. They will mount/clamp onto
the hand rails, with a 1/2" rod going down through
the oar lock bases for stability. These would
be used when I fish the Sound for salmon. Here
I happened to have just enough 1/4" x 4" X 6" angle
aluminum left over from a jack plate project on a
previous boat.
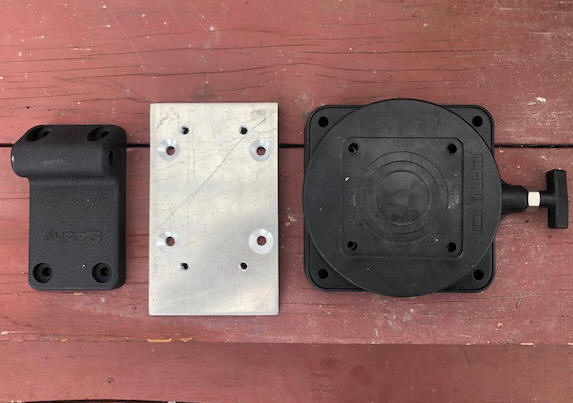
By cutting it in two equal pieces as a base that will sit on top of the railings with a Cannon low profile
swivel downrigger base on top and an adapter to
Scotty bases will be the basis for my new readily
removable downrigger
mounts.
This adapter was made from 3/8"
aluminum plate, the holes for bolting it to the
Cannon swivel mount had to be countersunk, (to clear
the Scotty base) and use flat head 1/4" bolts.
The holes for bolting the Scotty base to were
threaded to 1/4" NC threads.
Then to keep it up against the pipe railing, I cut off part of a 1"
U bolt, making a J hook, which 2 are used to retain
each unit (one on each side) and keep them from twisting on the railing
(as the center welded on 1/2" rod only maintains it
in loosely in position).
| Shown here are the Cannon Low Profile swivel base and the Scotty base with the adapter plate in the middle | Shown here are my finished downrigger mounts |
 |
 |
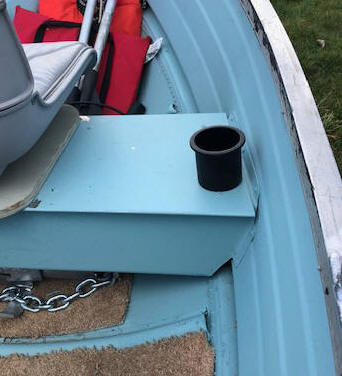
Cup Holders ; Here, since I already had Fish-On rod holder bases, it was natural to use their cup holder that sits into the rod holder base. Here I share the one I use on my 18' North River boat. The skippers holder is placed on the Port front side of the hinged storage box. Another regular cup holder out of the way for each bench seat and secured by Velcro, so they can be readily moved or even relocated.
You will also notice on the inner forward side of this box is mounted a dual outlet USB receptacle for rechargeing a cell phone.
| Shown here is the cup holder fitted to a Fish On rod holder base for the skipper's use & the USB port | Shown here is a regular cup holder mounted on a bench seat for the front fisherman |
 |
 |
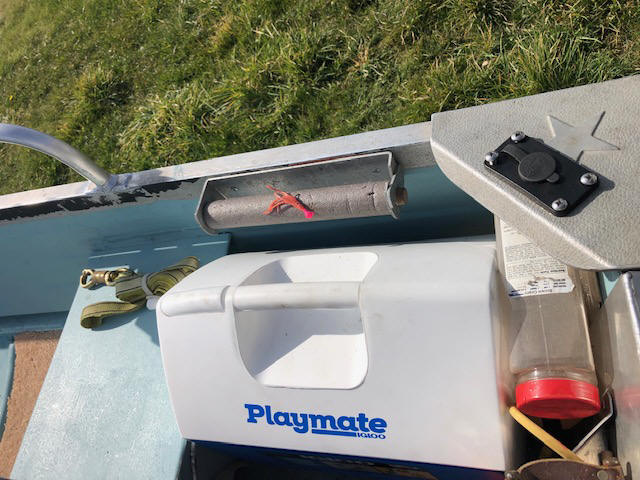
Leader Spool ; Years ago I copied a discontinued leader spool idea from a guide's fishing boat during a Alaska salmon fishing trip. This is a 2" wide X 10" aluminum U shaped frame with a 1/2" hole in one side and a hinged locking lever on the other that makes for easy removal of a 1/2" dowel inside a 1 1/2" round pipe insulation foam. I just happened to have one of these units left, so a home was found for it on the rear Port top side of this boat.
Personal Tether; If I fish alone, (which I do a lot) I have made up a 1" wide Nylon by 10' tether strap with a quick release, which I attach the looped end to the railing and the other (the quick release end) to my Offshore inflatable life vest Dee ring. Some of this tether is visible in the photo below. If nothing else, it will allow my kids to recover the body. And tucked in behind the cooler is my piss bottle.
| Here
is my leader spool above the Igloo cooler, and in front laying on the
bench seat is my lifeline tether & the leader spool on top |
 |
Repaint Boat ; I saved this painting project for the last. This boat had been repainted at one time (but not previously sanded) to a slightly darker than the original cream color. After I got it licensed and Coast Guard registered, getting a CG ID number, there were old numbers from another state, so I had to remove them using a heat gun. In the process some paint got scrubbed down to the original color making it slightly two toned.
I initially was going to
just hand paint the numbers on, and repaint the whole
boat later. However in just trying to patch in
a somewhat close paint under the letters, I found that a rattle can of
Rust-Olium paint in almond color, was a very close match for
this repainted hull. OK, why not just sand
down the roughness and repaint with the
rattle can? And probably there would not much
difference in cost in the long run, along with an
quicker/easier to touch up scratches later than if using a
brush.
Then
to purchase actual stick on 3" lettering, doing the job
right to finish out this project. At the
same time, I had ordered STARCRAFT decals for the
12' boat but never used them, so after the repaint
job, they were added to the rear sides.
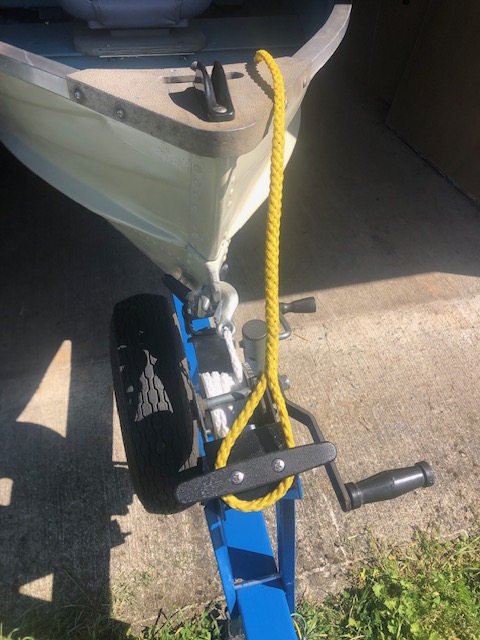
Launching Solo ; Here I use a 3/8" Nylon line about 12 feet longer than the boat, that is attached to the boat's bow using a medium sized snap. This line has a medium sized loop spliced into the other end. It is long enough to allow me to throw the looped end over a medium sized mooring cleat which I have bolted on the top of the trailer's winch post. Just prior to final backing down the now unsecured boat into the water deep enough to float it off the trailer, then bump the brakes to slide the boat off the trailer. Here is where this long line comes into play, with one end attached to the boat's bow and the other end to the trailer winch post, after launching, keeping it from wondering farther away than this line will allow.
When actually launching, after the boat is clear of
the trailer, I let it move rearward away from
the trailer a few feet. I then put the
vehicle in low gear and VERY SLOWLY move up the ramp
to where the rope tightens to the boat and gently starts moving
the boat back toward the ramp. I then drive up
enough (usually with the tires up away from the
waters edge) to allow the boat to
then slide up and stop
on the ramp. I can then get out, and
reposition, or secure the boat to the dock, or if no
dock, by
using a 10# mushroom anchor, secure it to the shore
while I park the vehicle and trailer.
| Here is my Mooring cleat attached to the winch post with the launching bow line attached |
 |
I also found that by having a second, or long stern line,
this can help at a dock if there is a wind, or there
is a current running at the launch at recovery time.
Here you can to use the wind/current
to your advantage (blowing the boat away from the
dock), where you can then maneuver the boat onto the
trailer by THESE lines. Let it drift away
somewhat, PULL on the stern line, gaining momentum,
while guiding the bow onto your trailer with the
bow line.
Anchor ;
Anchors for this size a boat can be just a
simple old large tin coffee can filled with concrete, or a
8 to 10# mushroom anchor being the most common.
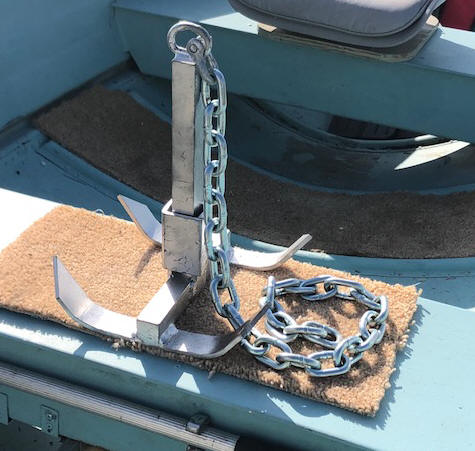
However, I
probably went overboard here, as I had some rusty steel that had been cut years ago to
make folding Columbia River style anchors.
There was enough steel left for one more, but for
this boat, I scaled the original size down to a
weight of 10#. Then I added 3' of 5/16" heavy
chain between the anchor and the line, as an extra
weight if needed, (better to have it in place than
wish for it later) using a small clevis on both ends
to connect to the chain to the anchor itself, and
from the chain to the line. With little spare
room in this type of open boat, the folding style
makes more sense for me, and it along with the
chain, just fit under the front bench seat on a
section of old carpet.
In the LH photo below, the shaft folds down to the
right, making it compact. When upright as
shown, a heavy steel slider secures the two parts
locked in location.
| Shown here is the folding anchor | Shown here is the bow storage |
 |
 |
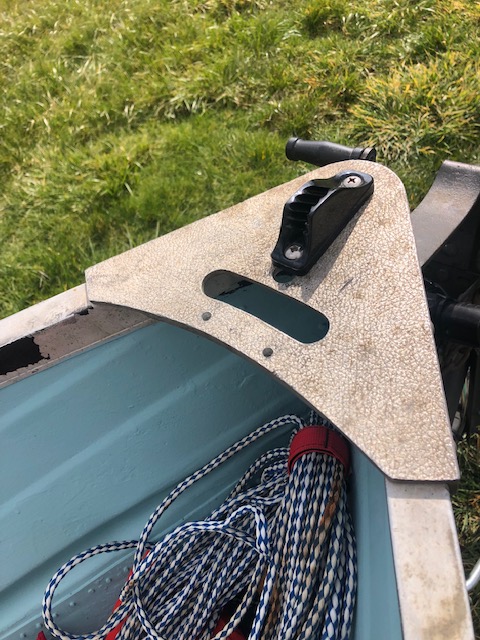
And then, how do I easily attach
the anchor line to this small boat? I
just happened to have a new unused wedge type line
chock, that I bought in the wrong size for another
project, (my a crab pot puller). Why not
just bolt it down to the cast aluminum bow handle
base as seen in the LH photo below?
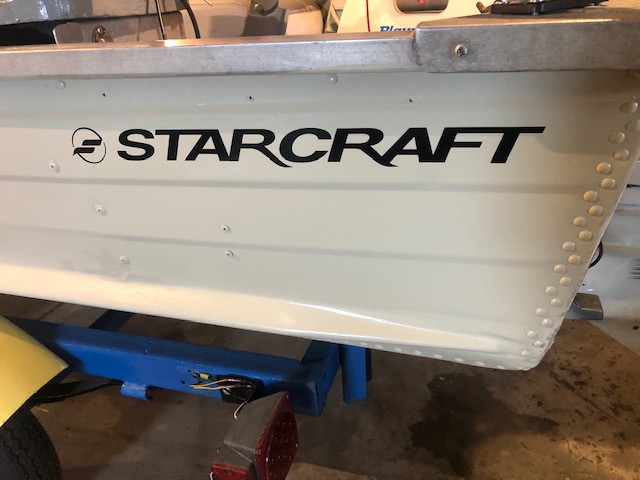
With all this work, and the boat repainted, why not purchase and install a
reproduction decal of
the name of the manufacturer as seen in the RH photo
below.
| Bow line chock for anchoring | Here the manufacturer's new name decal is installed |
 |
 |
Tether the Throw Cushion, or Life Vests ; In this style of OPEN boat if you don't tie all the light/bulky stuff down, it may well disappear along the road before you get to your destination. Here (in this boat)about the only location to store this gear is in the open bow area. But you better tie it down. Here, I use some 3/16" cord that is long enough to secure what I have located there to the gear and bow eye, and use a snap on the end for quick usage when wanted.
Intended Uses ; Here my intent for using this boat will be 4 fold. (1) There are a few reservoirs/lakes in my area that this would be ideal to use on. (2) In my area there is a limited salmon fishery in south Puget Sound. However launch fees are high, or for the WDFW launch closest, it is very shallow and if you need to launch/recover at low tide many times it will be on the sand below the ramp, where with a larger boat is not feasible. But with this smaller boat, even if having to tie the bow line to my towing vehicle to pull the boat up onto the ramp far enough to load it from there. Therefore this boat will be a lot easier to recover/lesser wait time than my bigger boat, and the trailer is a tilt tongue which would facilitate reloading in a situation like this. (3) In the fall of the year when salmon start migrating up the rivers, low down in the watershed (in the upper part of tidewater) this boat will fit nicely for this fishery for 3 different coastal rivers. (4) One of my hobbies is restoring small OLD outboard motors, so this boat will host many of them for the final motor adjustments.
The Trailer ; As I got this boat, it came with a manufactured trailer of an unknown make. The ID plate was missing, (only one plate screw was left). And it came from Oregon, which does not require small trailers to be licensed, (so no paper work was available) therefore I have no idea what make it is until I remove the boat, (if even then). Here I had to have it inspected by the Washington State Patrol and get a title/license issued.
This trailer is a tilt tongue type with a spring loaded latch. The metal, tongue and side eye beams seem to be thinner than I am used to seeing (kind of like stamped/bent 1/8" sheet metal), BUT then considering the weight of the boat which is not a lot, so maybe the two were designed for each other. This trailer by itself weighs 240#. It has leaf type springs for suspension so it is without shocks. The metal fenders have some slight rust but otherwise are in good shape. I cannot pinpoint the manufacturer for sure, however in doing some internet searching, I did find a StarCraft boat sitting on a StarCraft trailer that had a close resemblance to this one.
This trailer has been rode hard and put away wet, not pretty and seemingly protected by HEAVY coat of rust and then covered up with paint, so my project will be to remove the boat and be prepared to do some major restoration here also.
The previous owner had added new 8" tires on 5 lug wheels, felt bunk pads, LED lights (that don't work), a new trailer electrical plug in, a winch and tongue jack. One thing that I did early on was to check the grease in the wheel bearings and found the inner seal badly leaking grease on one spindle.
This trailer being an older one, possibly matching the same year as the boat, and small enough, it had a 1 7/8" ball hitch. To make it compatible with all my 2" hitch balls, it seemed logical to replace this old hitch. WOW, sticker shock when looking for new 2" trailer hitches to fit a 3" tongue, most were between $38.95 and $42.95, not what I was used to seeing. Further looking online, and I found one for 15.95 (from China I am sure) but this fit my budget and for what I want, it works fine. The old hitch was welded onto the tongue. So get out the trusty angle head grinder and cut off the welds. Now instead of welding, I bolted it on using two 1/2" bolts with lock washers under the nuts, then peen over the threaded ends for security.
The next thing that I looked at was the wiring, as the lights did not work. Here, I found 2 of the 4 wires loose/corroded at (non soldered) twisted/taped connections hid under electrical tape. The wiring from the plug in front, back to the cross-member was zip tied to the tongue's outer bottom. I changed that and pulled it through the square tubing tongue, making it out of the way and more secure. Still not working, OK, this is a tilt tongue trailer and with lots of rust, so I made a ground wire jumper from the tongue to the rear frame. Still no worky, OK, now the next thing to look at is the ground from each light unit. That still does not work, so I started tracing down continuity using a 12 volt test light/probe. What I found was the previous owner had added new lights and a new plug in, but tied them to the old existing wiring that was so corroded internally that it fell apart (disintegrated) during my probe testing. OK, now time to pull all new wire. NEVER ASSUME anything.
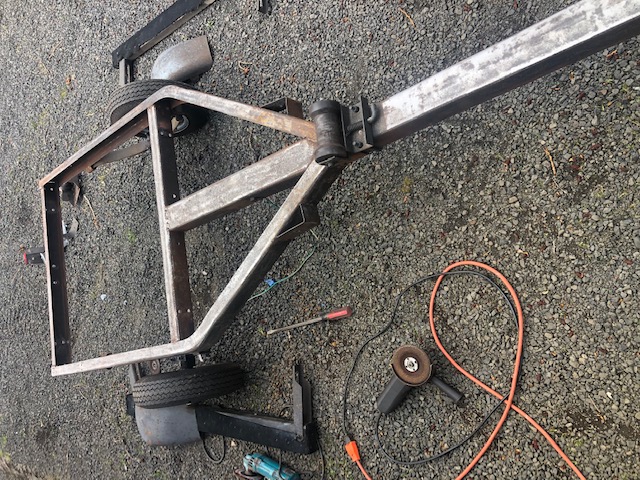
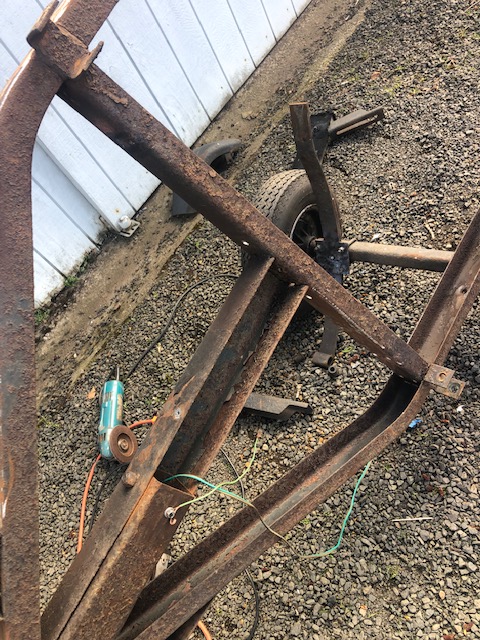
I also did some modifications by adding two additional center keel rollers, and later a set of side loading roller upright bunk guides at the rear, then some MAJOR clean up and repainted it. This cleaning actually turned into a COMPLETE angle head grinding job as it became very evident that this trailer had a very healthy coating of rust on all parts but the springs and fenders, along with what appears to be a black bed liner type paint protecting the rust. With it this bad, there was no sense of rewiring it until I got it all ground down to bare metal and repainted. This involved a total tear down, (even cutting the rusted bolts off using a Oxy/Acetylene torch), then grinding all parts inside and out, repaint and reassemble using new bolts.
| Here you can see the start of the rust removal on this trailer |
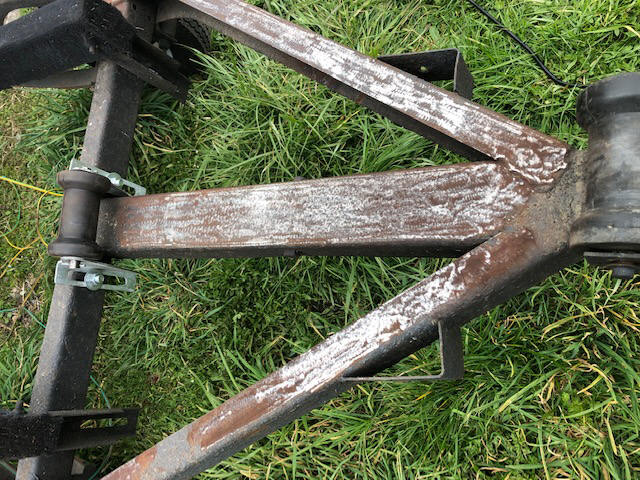 |
In this rust grinding, initially the bed-liner type paint plugged up the grinder wheel so often that I had to stop, clean the stone with a wire wheel often. I had to finally purchase a VERY COURSE grinder stone to eliminate this issue. It was so bad that a sander disc would not work until all the main rust was removed. Pretty time consuming, but I got a good enough deal on this boat/trailer combo, so it will come out in the end, and there is no need to scrimp here, then to be sorry later.
|
Shown here this trailer has been stripped down and all rust having been ground off the topside |
Shown here the axle was removed and the trailer tipped up on it's side showing RUST underneath |
 |
 |
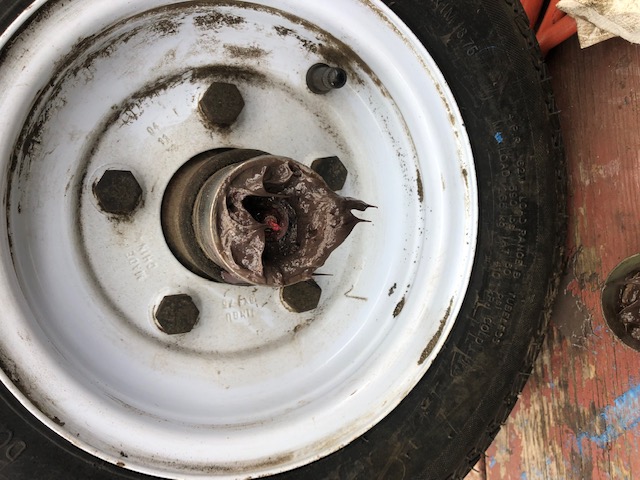
In the process, the inner axle seal on one spindle was replaced. It may not have been bad, as a previous owner had over greased these bearings. Both spindles had Bearing Buddys, but the outer part of both was filled with grease. There should not have been any there, if any, then only minimal. In reality maybe this one was just over greased enough to push grease out past that back (inner) seal. But with it all apart, and for the price of less than $10 for a new seal, it was not worth trying to reuse the old seal. In the photo below you see just the outer portion, the inner part of the axle/spindle, and rim were generously coated with black grease.
| Here you see an over-zealous grease job |
 |
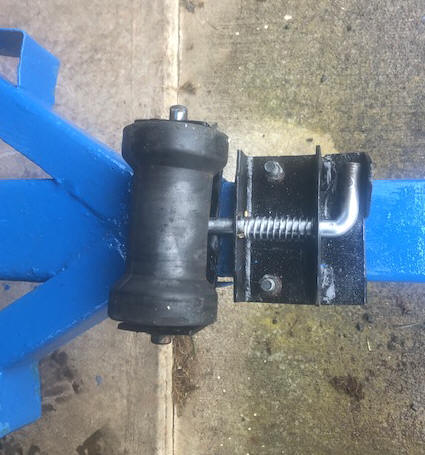
I also modified the trailer tilt latch, by lengthening the latch a bit for more engagement, and making a safety protection tab so it cannot be accidently tripped, making it more secure. In operation, you now have to lift the latch's handle up before you can pull it forward to disengage.
| Here the tilt latch has been modified |
 |
In redoing this trailer,
every bolt was removed, many by cutting them off
with a torch,
almost all were replaced, 2 new keel rollers added,
then these roller axles were greased, as they will
probably never be off again, and new wiring
throughout, all new wire ground connections. AND the
lights now work.
On the top outer sides of the trailer frame right ahead of the
fenders, steel eyes were welded to be used to attach a
ratchet strap tie down. This regular ratchet strap was
then modified by lengthening the strap between the
hook and the ratchet unit so that the ratchet was up
between the gunnels and not metal rubbing on the lower
edge of the boat.
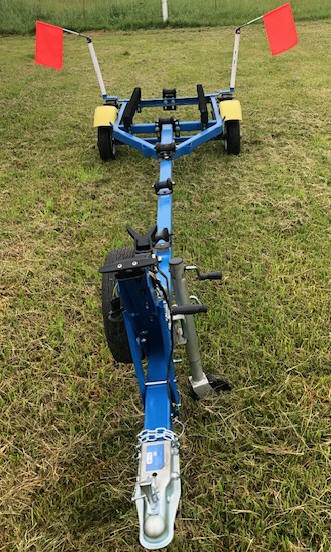
In fashioning the rear side loading pipe guides I did not have a lot of options for it's location. The base plate was made of 5/16" X 2" flat bar with 24" of 1" round pipe welded onto the outer ends at a slight angle, matching the boats outer side contour. Here I heated this plate with a Oxy/Acetylene torch enough to make a short coupled double bend enough to raise it over the lights and attached this plate to the rear cross bar of the trailer. This gives me the guides at the very rear of the trailer AND covers the lights providing them considerable protection. The width of them had to be made 4" wider than the width of the stern to accommodate the additional width amidships. Over this pipe, I slid 1 1/4" PVC pipe that was cut 1" shorter than the pipe to accommodate a 1" galvanized pipe cap that was lathe bored so they would slide a slip fit over the pipe, and then help in place with a set single screw. On top of these caps were welded 4 1/2" long section of 1/2" steel tubing, that accepts a Divers Down flag as a extension when launching or recovering, that makes the rear sides very visible to see in vehicle mirrors on this narrow trailer. These are mounted at a upward angle so that the lags do not jiggle out.
| Here this trailer has been stripped, restored, repainted, rewired & the flags |
 |
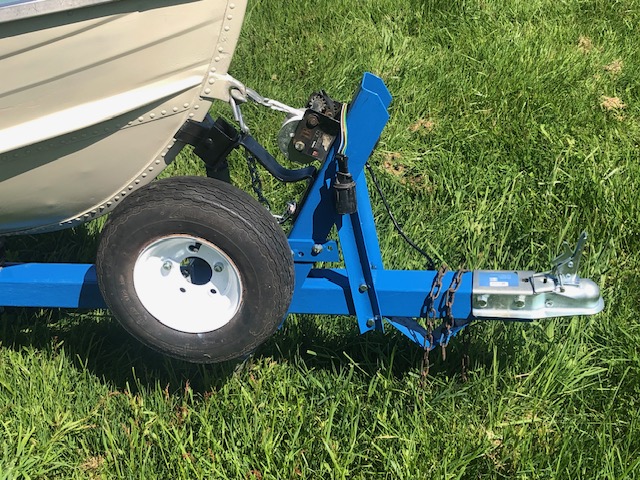
I did not like how the bow rubber stop bumper was positioned, (being ABOVE the eye and winch line) which was a pain to try to get the winch hook into the eye along with the safety chain hook. This 1/4" x 2" steel bar had goofy bends in it to get the Vee bow bumper in the right position. Here, this bar was removed, flopped over and bolted below the winch (which took a bit of Oxy/Acetylene heating to get the bumper aligned with the bow keel).
Also the tongue jack was mounted on the wrong side, (RH). It
seemed logical to have it on the same side as the
winch crank, and on the drivers side of the trailer
for convenience. This way, that left more
room to mount the spare tire/wheel where the jack
was. Then the safety chains
were also replaced.
| Here is shown the repositioned bow stop bumper, tongue jack & spare tire mounting. |
 |
As mentioned above, when I got this boat, a 1996 8 hp Mercury came with it that was supposed to run, so it was plan A for power. But in it's motor trials in a watering trough, (as it is not designed to be run on muffs) it was hard to start, not running right at anything over an idle, and I, not familiar with those black critters, so it took it to my local outboard repairman for a tune up. I had previously replaced the water pump impeller, (however the old one looked good). It seems that the previous owner probably had just replaced it, BUT he missed a bad gasket under the impeller plate that had chunks missing, causing a air leak on the suction side.
One thing the mechanic informed me was that the combo idle control knob was not also a choke as I was used to, but instead of being a choke, it is a primer. Two totally different things, giving the same results on starting a cold motor.
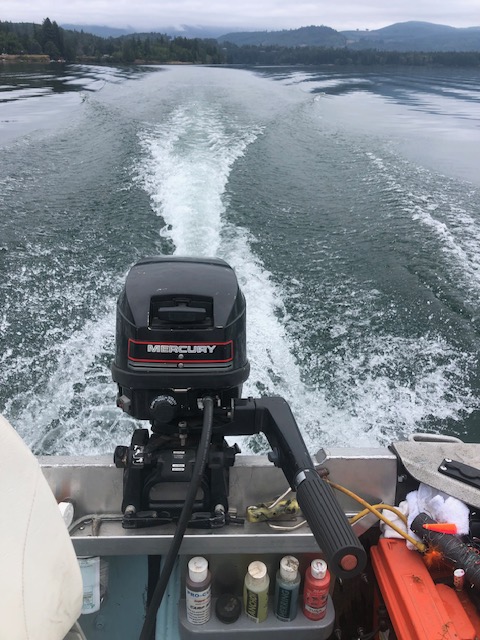
This motor now runs great, (once you figure out the start procedure) trolls like a dream, and even planes this boat with me alone and all my gear onboard.
And the few hours that I had a chance to take it out on the way home, after picking it up from the mechanic, I launched in a local lake, and did catch some trout, but lost a couple larger ones of course. But I got some fish blood in the cooler. I got it on the water, bloodied my cooler, so things are starting to look up. OK, the shakedown cruise was successful. And I was amazed at the high speed power that this motor has.
However there appears to be a slight leak in the hull near the transom. After inspecting everything, nothing was apparent. So jack up the trailer tongue, put the drain plug in and fill the boat with about 4" of water, all being at the stern because the bow was raised. No leaks in the boat, HOWEVER the drain plugs leak around the center shaft, (this was on two different ones, - the lever operated type). Maybe I need to really tighten them down before levering the up handle to tighten it.
| Shown here is the 8hp Mercury, planeing the 14' aluminum StarCraft at 15.5 MPH during the shakedown cruse | |
 |
Still Yearning for More / Different Power ; Yes, this Mercury would make a good motor for this boat, BUT I did not like in that it was designed where it could not be ran on muffs, as it had to be ran in a tank, and no way to modify it. I like to run my motors the night before I go fishing to be sure they will run at "O-Dark Thirty". To do that on this motor, I would have to remove it from the boat (it is not a light motor) and put it in my 55 gallon test barrel, (and at me being 86, that is doable but not preferable). The other option was to back the boat, motor and trailer up to a cattle watering trough then drop this motor in to run it. And with me living alone, that can get tricky without someone to guide me for the last foot or so. And it could also get expensive if things did not go right. Along with the fact that if I wanted to take along a fishing partner, this 8 hp may be marginally underpowered if we had to run some distance to outrun a storm, or if we had choppy water, fighting a wind.
Now having a somewhat viable option with the Merc, I proceeded back to the plan B, (the 15 hp Johnson). In getting into this motor, I found that it had been exposed to saltwater a LOT of it's previous life. Much oxidation under the paint along with it probably had never been flushed internally. It had a lot of issues, BUT compression was 120# on both cylinders, so I blundered onward. It was originally a long shaft motor, which I swapped out for a short shaft unit off another older (1974) parts motor. I also rebuilt the carburetor, and cleaned up / oiled the starter spool.
I got it running using a 1/2" drill
motor and a socket on the flywheel nut, instead of
me pulling the starter rope. At my
age, and with COPD, I needed all the advantages that
I could get in all the preliminary work to get any
stubborn motor running. But when I got it
running, it would not pump
water out the tell tale hole. On this motor,
the tell tale tube from the motor is located on the
bottom of the sideplate cover and very hard to get
to, so impossible to check for blockage starting
there. To make matters worse one of the bolts
holding the sidplate cover on is under the RH motor
mount, and with VERY LIMITED room there, making it
impossible to get to without pulling the powerhead.
No need to even try to take the cover
off, but I did remove the thermostat cover, (by
using a torch to heat it's stubborn / seized bolts), then
cleaned the stat in boiling water. It opened,
so it was OK.
Not much left now but to pull the powerhead. And what I
found was not uncommon to these
abused motors, with the water tube grommets into and out of
the block, both being pretty well collapsed inward. The
grommet on the input water from the water pump was 90% collapsed
while the outlet maybe 75%. I corrected
these, but from prior experience on saltwater motors
like this, (and knowing the construction of this
motor) I knew that the smaller passages inside
the sideplate would have a very good chance to also
be blocked, or at least partly blocked, restricting
water flow into the block. This sideplate is where the water first enters at the
bottom of the motor, then up to the head where the
thermostat takes over. OK, now I tried
to remove the sideplate bolts -- WOW all were seized
from the saltwater exposure. I did not
want to try much harder, whereby running a VERY GOOD CHANCE to
twist off all of them, (1/4" bolts). Next
would be to remove the head and clean those water
passages, but those head bolts (5/16") were as
stubborn as the sideplate ones. Here it was
better to work around the issue and to not break off
any bolts, as that would be a job no mechanic looks
forward to, ESPECIALLY WITH LOTS OF THEM. I
could handle one or two, but not all of them.
Now
what to do, this
motor's compression was GREAT, the rest of the motor
was salvageable enough to clean up and function.
OK, I pulled the thermostat, but replaced it's
cover, removed the tell tale Ell and plugged it with
a small cork, then tipped the powerhead upside down.
I then mixed a high concentration of Salt Away
solution (which dissolves salt crystals). I used a
large hypodermic syringe to fill the block's water
passages filling it from the water intake location with
would be directly where water would enter the block
from the water pump.
I then let it soak for from 6 to 10 hours, and poured
all of it out into a clean bucket (wanting to catch
any debris, and see if
my plan was being successful). Then I
removed the tell tale cork and back-flushed, with a
very forceful jet flow of water. I
repeated this process for 3 or 4 days. I am sure that I did not get
all of the debris that was inside, but after reassembly, it
now pees quite well. And in my test running
later,
the tell tale outlet plugged up 3 or 4 times, meaning
more debris was working it's way out.
Now to get it running. Initially, this motor, and when I switched to using the Mercury, I had a fuel tank issue, as the inside fuel pickup tube had fallen off inside. OK, got that issue solved along with all new fuel lines, couplers and primer bulb. But this motor was hard to start when cold, even with the drill motor. And it just did not respond to the slow speed carb needle adjustments like it should have.
Finally at 3 AM one morning, I came up with what had to be part of the problem. It had to be somewhere in carburation. The next morning, I pulled the slow speed idle needle from the carb, and sure enough it was bent. Putting it in my metal lathe and with some judicious use of a SMALL hammer, and by rotating the chuck needle), tap, rotate, tap, I got it pretty darned straight. Then when reassembling the carb breather, I found that I had somehow put the choke rod upside down, which on this motor, was restricting full movement of the actual choke, so yes it was hard starting because it was not being fully choked (if at all).
OK with the above done, I then ran it on the muffs, now it starts cold on 3 to 5 pulls, (when properly choked) and it was idling fairly well. But I wanted to be sure that it would perform at O-Dark Thirty, so I moved it to my 55 gallon test tank. Here I had the chance to test it on a cold start, over a couple of days. And to do some fine tuning of the carb slow speed needle.
It now starts very well, cold and warm, and after the carb adjustment, I got it to idle under power at a trolling speed, in the barrel, where it ran continuously for over 1 1/4 hours (while never missing a beat) before I revved it up to see if the spark plugs had began fouling. NOPE. My goal was to have a dependable motor that was large enough hp to get two fishermen there (with some speed and safety) AND back again, while at the same time to have a motor that ran good enough to troll all day, if that was what it took.
I knew it was possible with this 33 year old motor,
(as I am not a stranger to this series of motors,
but never have had a 15 hp on this small of a boat
before) and am now every impressed and confident with how it
turned out. Now for another on the water
test mixed in with some fishing, which proved very
good, it started on 3rd pull, trolled at 1.3 mph for
an hour before it died, but restarted and I revved
it up, burning some carbon off the spark plugs, then
ran for another hour. It planes this boat with
me alone, at 22.3 mph. And it burned 1/2
the gas as the 8hp Merc, which was a pleasant
surprise.
Then on the second fishing trip, it ran long enough
to get to the fishing area (about 3 miles), ran for
maybe 20 minutes and then died. At that
point all the other close boats had disappeared, and
we had to paddle back to the ramp. Once home,
the only thing I had not worked on was the fuel
pump. In rebuilding it, I found the
diaphragm was so deformed that it is a wonder that
it even ran to start with.
OK ready for another fishing trip, so on que, started it the next
morning, fine, it started, ran for a few minutes and
died. This time the flywheel key had
become sheared off. The reason was apparently
somewhere along the line, or in my negligence, the
flywheel nut had not been really tightened down,
allowing for slight wearing the taper just enough to
create a shallow shoulder, holding the flywheel up
and not allowing it to seat well onto the
crankshaft's taper. Got that fixed, and now
with the nut really sucked down, everything should
be a go. There is not one hell of a lot
left to look at now. The only thing I have not
replaced is the starter rope, and it looks fine.
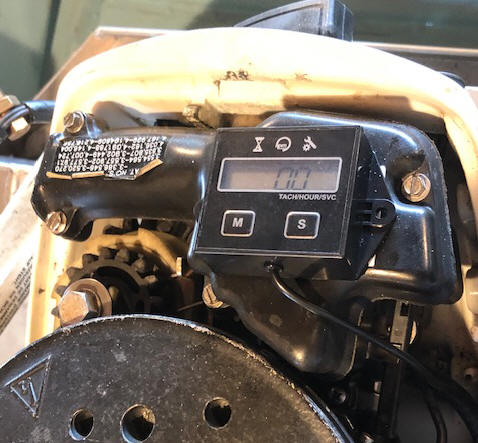
One last thing to finish this project off was to mount a hour meter/tack on the motor.
| Here is the hour meter installed on the motor. Did not have a lot of choices here under the top cowling |
 |
OK, finally after almost 8 months, (which would have been way more had I not cannibalized the storage box and under seat drawers off the 12'er) this boat and motor is ready to do some serious fresh water fishing.
Back to the Ramblings Home Page
Originated 01-08-2023, Last updated
10-17-2023
Contact the author click here