 |
Modifying /
Making Fishing Gear
for Better Performance |
 |
Modifying Gear/Tackle ; Many times a fisherperson can modify an existing manufactured product to fit a more usable item for local area usages. Most of the fishing gear / tackle is manufactured to fit a broad range of intended usages which may or may not be totally effective in a specific area or needs. This could include triple hooks, barbed hooks, lighter leader than local requirements, even different colors which may vary even daily.
Well this one is not about modifying gear or tackle, but may save you a lot of pain/aggravation. If you fish long enough for fish larger than trout, you WILL get a line cut on a finger, especially if you are using braid line. A quick fix here to seal it, and promote healing faster is to Super Glue the cut shut. Somehow band-aids don't cut it out there on the water.
(1) OK, this one may not be modifying tackle, but more of a housekeeping/tackle box cleanliness situation. This is more about utilizing existing items to achieve better UNCLUTTERED tackle boxes. Wrapping your leaders around foam takes up a lot of room. But if you frequent Burger King, A&W Rootbeer, Dairy Queen, Subway or some other fast food restaurants, that use the larger diameter soda straws, don't throw them in the garbage. Cut them into lengths of about 1 1/2" and wrap your leaders around two of your fingers, pinch them down and slip the straw over the coils, captivating them. If you frequent different stores, some use different colors, where you and could utilize different colors for different leader lengths, leader weights or ???
| Shown here are examples of how soda straws can be used to contain leaders |
|
|
(2) How many times have you had tied your up tackle get married together and it takes you longer to untangle than cutting it off and retying? I do wrap a lot of leaders on foam pipe insulation, which works well, but the one I have had problems with is that I use Brad's Super Cutplugs a lot, AND I retie the hooks to my specifications (as seen in one of the photos above). I also use soft drink straws cut in 1 1/4" lengths to captivate the leader. However if more than even a couple get together in the tackle box when it is closed and after the lights go out at night, they seem to become romantically attracted.
The idea of storing them individually, economically and yet readily available seemed desirable. I complained that the wife's Zip-Lock sandwich bags were really to large. Why not the 1/2 sandwich bags she asked? Not being that familiar with kitchen items, it sounded like an idea to pursue. She bought a box of 50 of these 6 1/2" X 3 1/4" bags for $2 at Safeway. Then when I ran out, I had a problem identifying them from the full size ones which are 6 1/2" X 5 7/8". I found they can be advertised as Small Size OR Snack Bags. They are a tad bit larger than actually needed, but simply fold it over as seen in the top image in the photo below. Then I found for trout tackle, even these were too large. So why not bring out the vacuum packer and burn two parallel bars close together down the middle vertically. Then with scissors, cut between the burns making 2 smaller bags
| Here is are my lures, one stored in & the other shown outside the 1/2 sandwich bags |
|
|
(3) Make changes to the rotating triangle fishing attractors, (a) like special or different colored reflective tapes and (b) a large round dot simulating a winking eye when the flasher rotates. (c) Also on one of the flashers below the 3/16" hole drilled in one of the wings, which will produce a string of bubbles, adding to the attractors effectiveness. (d) You can also add black electrical tape either to the back or 1/2 of the back, OR on a diagonal, creating more of a contrast. This black contrast is more effective than you can imagine, but you need to experiment as to what sides you put it on as compared to the other side, as if not done right, one cancels out the other. The diagonal is one on a single colored side is of the best easiest and ones to try.
In experimenting, place your tape on, then hold onto the rear swivel, and give the flasher a spin. You are trying to get a "BLINKING" situation here. If you do it wrong, one side cancels out the other when it rotates.
| Some original & modified triangle flashers. Use your imagination |
|
|
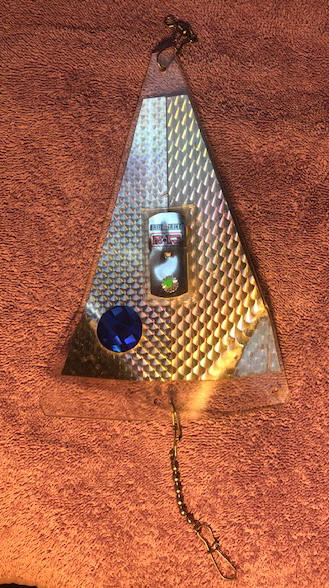
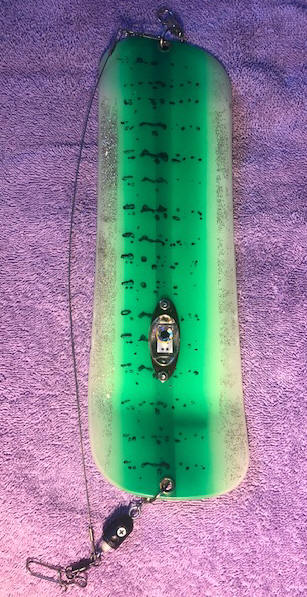
Their other water activated one is also sold by Pro Troll (and by Dr. Fish in bulk), This one apparently uses sealed internal electronics that when water activated, (even by saliva on your fingers) by 2 small bare probes flush with the unit. It is attached by screws when being used on a flasher, (but hole has to be cut to allow this unit to set inside the body of the flasher. It is smaller in size that the battery operated one and not as bright in my estimation. It has 2 flashing alternating lights, one red, the other green, which sells for about the same price as their battery operated brothers. Or it can be used independently inline.
|
Here this flasher has modified more to add a battery operated light |
Here the light is water activated |
 |
 |
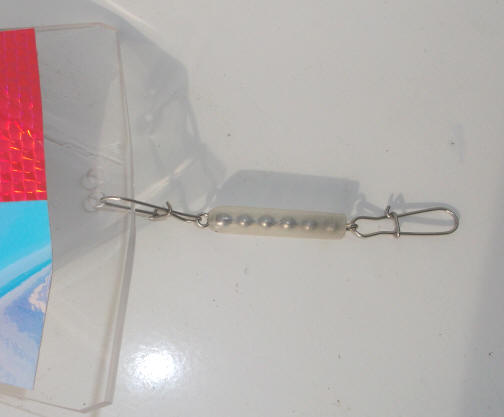
(4) If fishing in weed infected waters even using ball bearing swivels seem to plug up worse them the bead chain swivels. And given the need to clean your gear more often, the bead chain swivels offer more opportunity to eliminate twisted line. Now another twist is to add an Oregon Tackle weed-guard over the 6 bead bead chain. This consists of a simple clear plastic cover that goes over a bead chain swivel. This only requires a slight split in the upper end using a Dremel part off stone and then pulling the bead eye through the plastic guard using a crochet hook. It also may require a slight rear trim of the plastic to clear the rear snap. Some DIYers also use a outer part of a small syringe as this shield.
| Here you see Oregon Tackle weed guard installed over a 6 bead chain swivel |
 |
(5) If you use a rotating flasher ahead of a lure (either a cut-plug herring or lure that has it's own action), if the swivel between them gets contaminated with weeds, your lure may be rotating at the same speed as the slower turning flasher and not as effective as you anticipated. One way to somewhat counteract this from happening is to cut your leader in the middle and install another swivel, (ball bearing preferred).
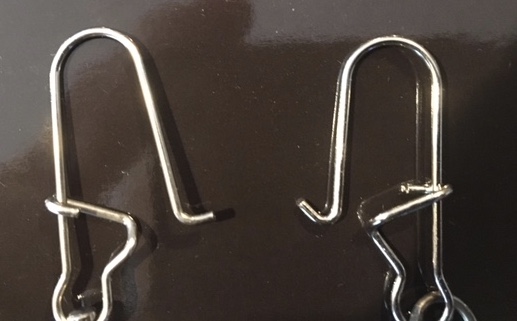
(6) For those of you who use Duo-Lock snaps, they are not all made to the same quality. Some under stress, (with big fish on) they may come undone. The outer end of the snap on some are not formed correctly and will pull out of it's mating connection. (A) either don't buy them, or if that is what you have, use a pair of needle nose pliers and reshape that end, being sure that you do not change the rest of the snap so that it will lock in place.
| Here, on the right is a good snap, notice the HOOK on the end |
 |
(7) Have you ever wondered just how strong a split ring is? Well in the box below is a listing for Sampo ball bearing swivels, listing the breaking test between split rings and welded rings. And the holes in their plain swivels are so small that getting a larger split ring is impossible. Pretty mind boggling and has me now sold on only the welded rings only.
| Here is the actual advertised strengths between Sampo ball bearing swivels supplied with split, or welded rings |
|
split ring welded ring #1 = 10# test #1 = 30# test #2 = 12# #2 = 45# #3 = 15# #3 = 60# #4 = 150# |
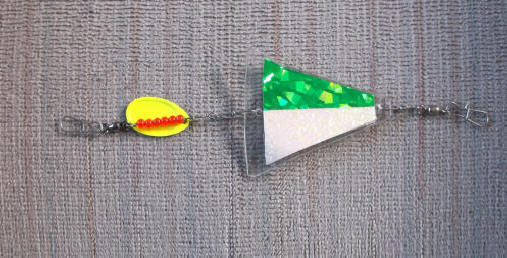
(8) For lake fishing where you want a smaller flasher, you can add a spinner blade to the rear of a flasher, again for more attractiveness.
|
Here you see a smaller 3" mini - mini
custom made flasher with a spinner
blade attached to the rear. |
 |
(9) If getting short strikes
WHEN TROLLING, tie your
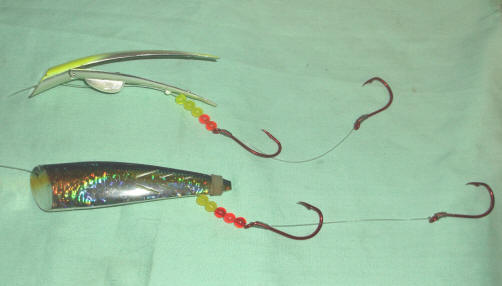
hooks so they drop back behind the lure like seen in the photo below. Here
the original single triple hook was removed and two 5/0 red plated Octopus hooks that
were tied about 4 1/2" apart. Five 6mm beads were added on the leader
which moved the front hook back to where, when in use, the eye of the hook is at
the rear of the plug. The red beads and the red hooks very likely could
simulate a wounded and bleeding herring.
This
redistributed weight slows the action of this plug a slight amount, but not
enough to effect it's fish catching ability, while actually improving the hookup
to retention percentage.
This method has also proved
worthwhile in rigging Apex plugs.
| Here you see a Brads Super Cut Plug tied with modified trailer hooks |
 |
This distance works well for
me when trolling, and I have a friend who fishes a lot more than me who moves
his rear hook back twice as far as I do. BUT, we both use these in
trolling, where you are moving against the tide/current. If I was going to
switch to back bouncing or hog lining, where the fish will be coming to the lure
(and would have more time), then I will shorten my drop back leader length.
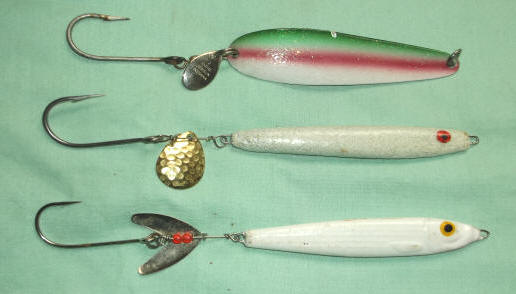
(10) To add effectiveness of a lead jig,
or trolling spoons, add a small spinner blade to the rear as seen below. When using spinner type blades to be used in salt
water, spray the blade with clear enamel while they are still new and shiny.
|
Here you see 2 lead jigs that has a spinner blade added between
the jig & the hook and a factory spoon that also has a spinner blade attached |
 |
(11) Somewhat akin to the added attractor to the rear of the lure seen above, there are also other things you can do to make the lure seen. This can be add reflective tape, and/or some black electrical tape on one side in a diagonal to simulate a "blinking" action. You can also add trailer hooks as seen in suggestion #8, or go all out and do all as seen below.
Here, seen in the photos below, are a well used plain Coyote spoon that was stripped, split rings and swivels added both front and rear. A Gamakatsu 3/0 Big River Bend Open Eye hook attached to the rear swivel, and a Matsuo 2/0 hook as a trailer. In the rear split ring a 1/0 hammered nickel Colorado spinner blade was added. Crafters silver sparkle was added to the outer part of the spoon by masking the spoon off, then cutting a slightly smaller pattern with a sharp knife, and then removing that inner section. Then spraying a thick layer of rattle can clear overcoat, and immediately before it dried sprinkle on some crafters fine sparkle. Anything that does not stick can be salvaged for later usage. When dry, peel off the outer masking tape. This sparkle was purchased at the Wal-Mart crafters section for $2.95 for 2 1/2 oz bottle, which is enough to probably do thousands.
On the opposite side of the spoon, plain black electricians tape was split to 3/8" and placed in a diagonal about midway, then trimmed off at the edges of the metal with a knife.
There also is a paste on eye, which is hard to see in this photo because of the lighting reflection.
Knots used here were simple egg loop on both, but the front using lesser front wraps than normal and more rear ones, with the tail trimmed off ahead of the hook eye far enough so it does not become snagged.
Using this crafters glitter works way better than trying to overly reflective tape on a curved surface. And you could experiment using different colors as many are offered.
| Here you see a simple tricked out Coyote spoon |
|
|
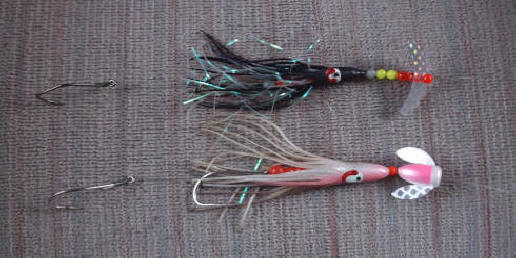
(12) Add small Spin-N-Glo or Smile blade to front of hoochie
to improve fish catching performance when trolling with conjunction with a
flasher, which imparts action to the non-action hoochie.
|
Here you see 2 hoochie rigs, one with a Smile blade & the
other with a #4 Spi-N-Glo attached in front as an added attractor |
 |
(13) Wriggle Hoochies are pretty effective as they come from the package, but one slight improvement that adds to the action is to file off a small amount (about .020") on one side of the bill, but keeping the same profile. What this does is make the lure work itself to one side, as far it can go determined by your leader (mine is usually 4 1/2', factory are 3'). Once it comes to that distance, it will trip and go back to centered, giving a sideways movement, which can trigger a strike.
In the photo below, you see two wriggle hoochies. The one on the right is a original later factory version while the one on the left is one of my early copies. This was left one was copied off an original, which was narrower. I made it out of a broken plastic clipboard that I scrounged out of a Rite Aid garbage can at their front door after inventory. By the time I got it cut and bent to shape, then the hole drilled, the bill was not symmetrical. My immediate thought was to correct this mistake, but something told me to test it first. I am glad I didn't as it catches fish.
That black spot on the underside of the bill is a stick-on lure eye. I decided that most fish when biting a trolled lure, they will be coming in from behind where this lure would have the underside exposed, and if I put two eyes there it would clutter things up enough nullifying the idea.
| Here you see 2 Wriggle hoochies, factory on right, with my nonsymmetrical one, upside down on the left. |
|
|
(14) Also you can add a small hoochie to the front of a rigged whole herring for more effectiveness while not effecting the bait's action.
(15) As seen in the photo below, a corky is added between the two hooks on a steelhead/salmon drifting roe lure in a river, either from the bank or boat. This corky adds just enough buoyancy that the lure is raised slightly off the bottom along with giving a bit of color if the eggs could be partly stripped off. This particular set up is for steelhead, where a larger gob of roe would be used for salmon.
| Here you see a corky tied between the hooks & used for buoyancy |
 |
(16) In the photo below, a Spi-N-Glow is added to a mooching leader for trolling a whole herring. Note the 2 small beads used as a spacer and bearing for the Spi-N-Glow as a bearing. Also the same principle is being used especially in the Columbia River hall Chinook fishery, by using a #3 or 3.5 spinner blade instead of the Spi-N-Glow.
| Here you see a rigged herring with a #4 Spin-N-Glo attached in front as an added attractor |
 |
(17) If you are having trouble achieving the preferred spin on your herring, either whole or cut plugged, bend the bait in an arc and use a round toothpick poked into the skin along the centerline, running lengthwise to hold this bait in a bend to maintain the spinning action. This can even be a way to salvage some bait had is older and getting mushy, which may save the day for you.
(18) Also, especially for cut plugging herring,
you can clip part of herring's
tail off to slow the spin down.
(19)
Most salmon plugs come with triple hooks attached right to
the eye.
You may consider changing out these hooks to singles with a swivel or bead chain
between them and the plug eye. With today's requirement that we release
"Non Clipped" fish in a manner that is consistent with conservation of hopefully
allowing them to return to their home rivers and spawn. Multiple hooks in
a fish makes this requirement hard to do. By converting to single hooks,
or at least reducing one of the two to singles improves your odds in releasing a
healthy fish.
In deciding what works and what may be detrimental to the plug's proper
functioning, I have not come up with this myself, but have borrowed what well
known fishing guides have done and the lure successfully catches fish.
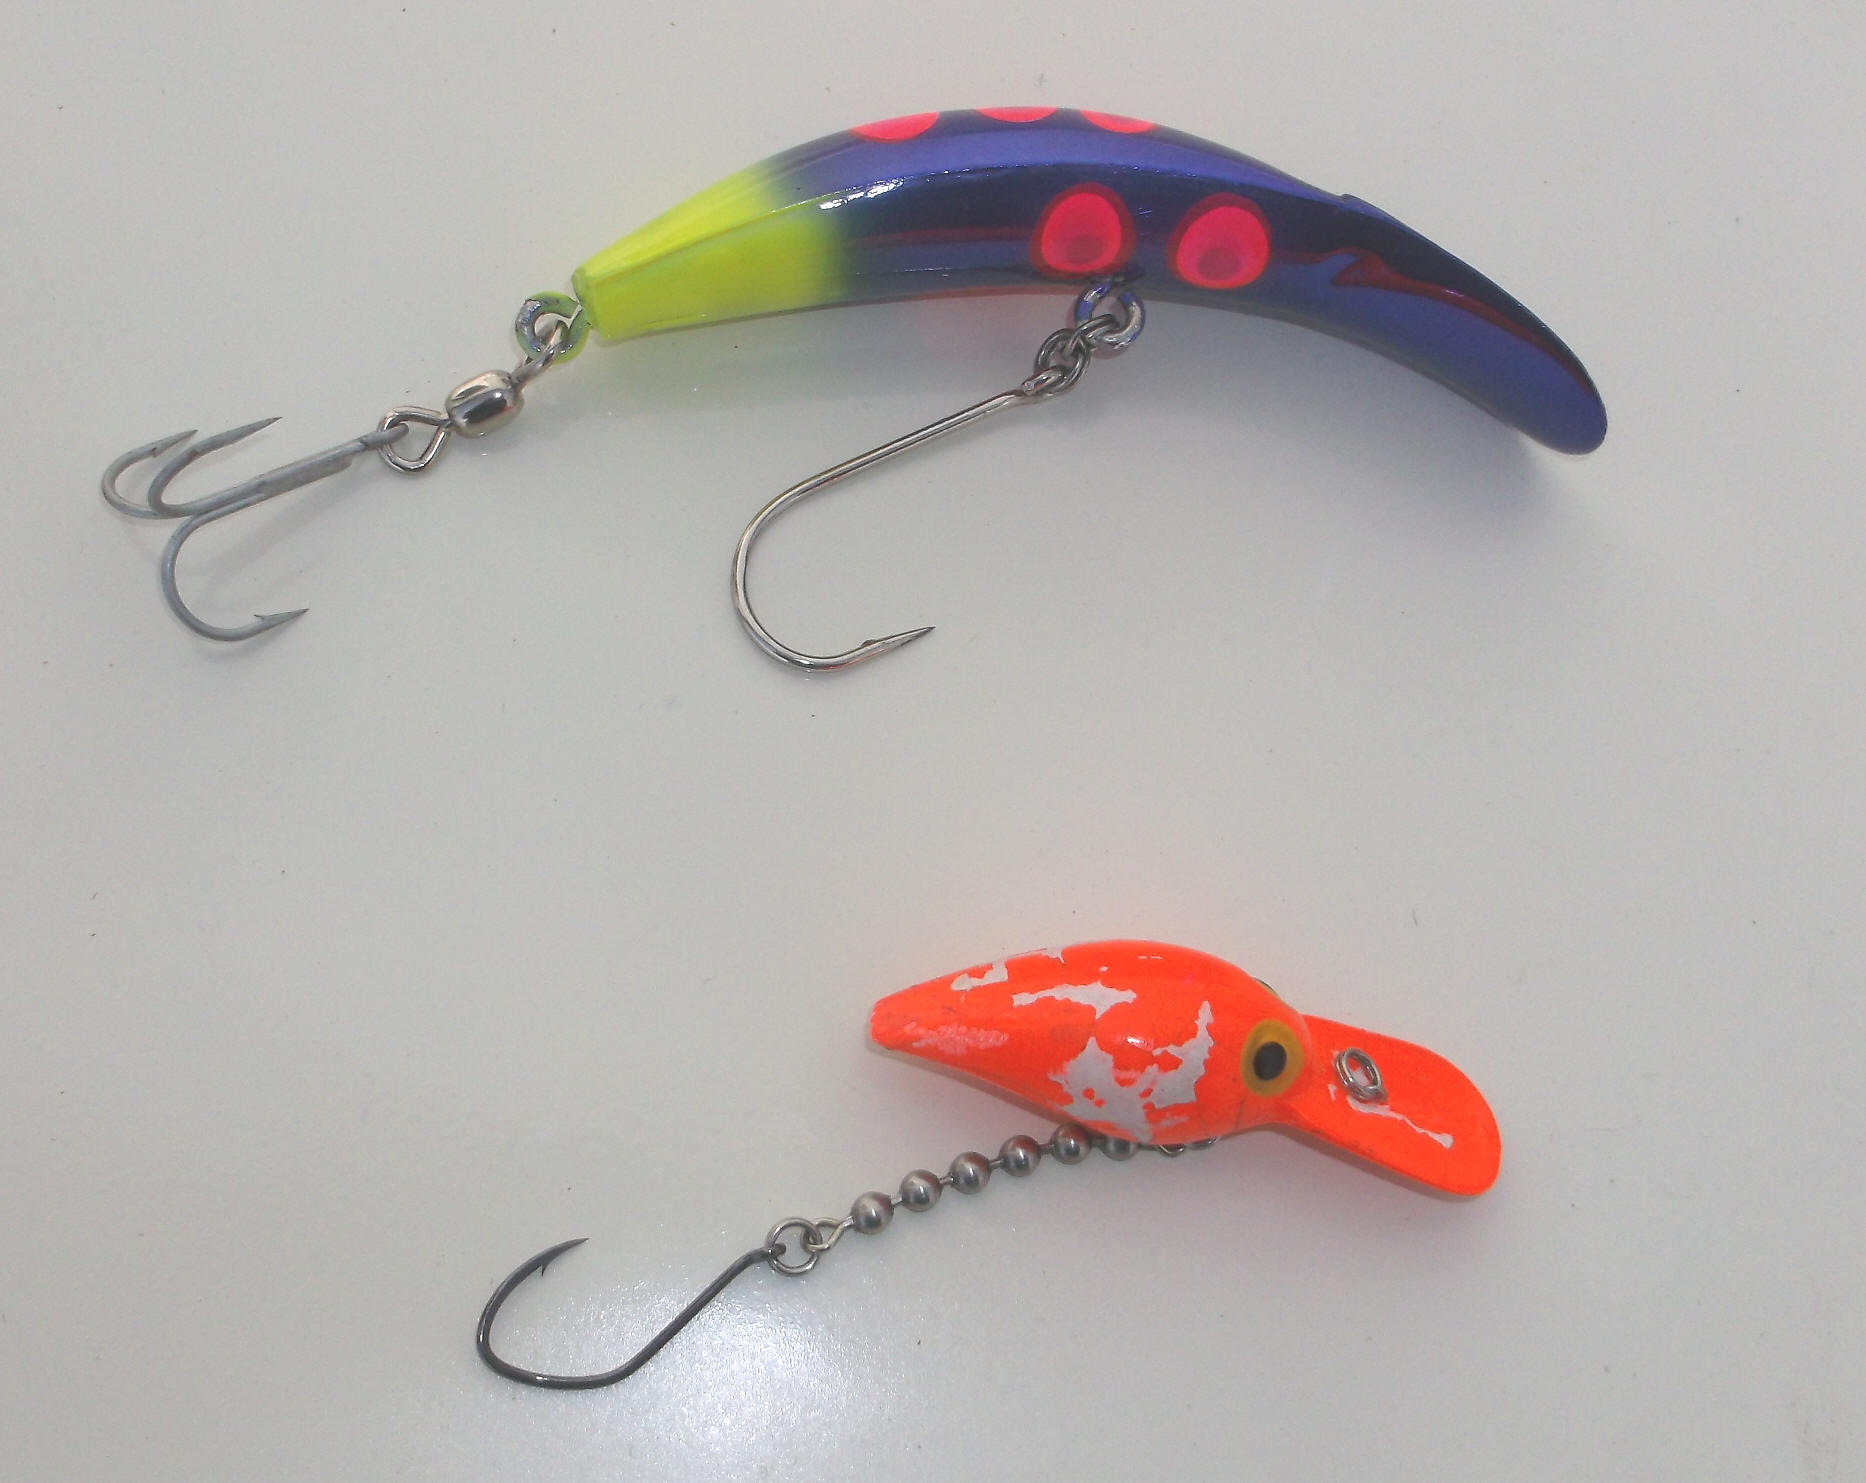
On the Kwik Fish shown below, you will notice the triple is attached directly to
the barrel swivel. This is accomplished by using a set of HEAVY DUTY side
cutting pliers and cutting the eye of the triple hook close to the juncture
where it is welded to the third hook. Now carefully bend it SIDEWAYS
simulating a Siwash hook's open eye. These hooks are usually pretty hard, but
doable. You may break a few, but when done properly will be as strong as
the factory Siwash open eyed hooks that are made that way. The belly
single Siwash hook is attached by using two split rings. This accomplishes
a couple of important things, (1) it positions the belly hook point down for better
hookups and (2) it still allows a sort of a swivel motion, cutting down the chance of
the fish using the plug as leverage to become unhooked. One downside, is
if you backtroll in rivers, it could have the chance to grab bottom or snags
more than if the bottom hook was on a swivel pointing the hook up.
The Wriggle Wart shown below uses a bead chain, split ring and a #2/0
Sickle hook. This is very effective for fall Coho in rivers
and can be readily removed from natural ruddered fish.
| Here you see 2 salmon plugs with the hooks modified. The Kwik Fish where the hooks have been modified & the lower Wriggle Wart where both triple hooks were removed, note it's missing paint |
 |
(20) Change out hooks on salmon trolling gear to larger size up to
THE LIMITS of the
spoon or bait. Where you are not using egg roe or prawn where the fish
will be feeding on a bait that they may be familiar with or are picking it up
because of the smell and can feel a large hook, but for trolling spoons, whole
or cut plug herring move up to larger hooks. Even to 5/0 or 6/0 size.
The larger the hook in these situations, the better in my book. However, if you go
too large, it can change the action of a spoon however, but this may be to your
benefit. I have sat in a hog-line for late river Coho fishing and got a
pretty good lesson from the boat next to us. He changed hook sizes on his
spoons until he got the action he wanted in relationship to the river flow at
that particular time and location.
(21) There is a company calling themselves
NW Cove which sells
their Q Cove breakaway flasher. For more information on it and how to
modify your existing Hot Spots
CLICK HERE.
Also recently there are at least 2 other companies who build conversion kits to do this
to your existing flashers,
Good Day Fishing and Simon Wobblers. My choice is Good Day as it has a
adjustable Nylon ball/socket system.
(22)
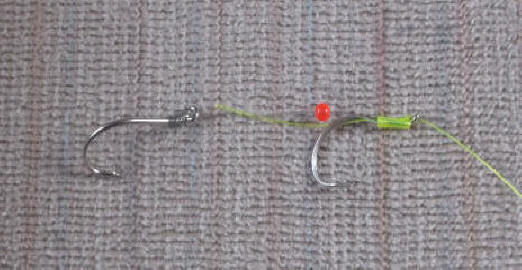
When tying slip style leaders, use a
different colored mono line for slip wrapping knot. Others may
use a old Dacron halibut line for this, which seems to allow for better adjustment. This
odd wrappings help identify that style as compared to a regular solid tie.
Also it has been found that by adding a small (#4 or #5) plastic bead between the hooks, that IF a fish gets
hooked only on the front hook, this bead helps protect the chance of the front
hook being forced into the rear hook's knot, breaking it off. Here I leave
the knot leader ends long, so once the hooks are adjusted to fit the herring
size, the leader tails can be pulled tighter and then cut off, or even left a tad long
if desired.
| Here you see a mooching style slider leader tied |
 |
(23) Adding a barrel swivel between the spoon and hook improves your chances of the salmon not throwing the hook during a fight. This swivel allows the fish to twist and turn without being able to use any leverage, compared to the hook being attached directly to the spoon.
In the photo below are two salmon spoons that
have a barrel swivel between the spoon and hook. The top is a original 40+ year old
commercial Canadian Wonder #5 1/2 spoon and the bottom is a 3" Coyote spoon.
The 40 year old commercial Canadian Wonder spoon was made that way, while the Coyote was modified. From
this you can figure out that adding this swivel is not anything new.
| Here are 2 spoons using a barrel swivel between the spoon & hook |
 |
(24) If you desire a slightly
different action when trolling or casting a spoon for fall river Coho, consider
using a French spinner blade used for trolling/casting spoon. Take a
spinner blade of your choice (I like the embossed/fluted French or Indiana style in size 5
to 9) and
drill a small hole near the outer end of the blade, creating a spoon blade.
In this hole place a split ring attached to a swivel and then a Sickle Siwash hook.
I then attach a leader about 18" long to the spoon. At the juncture of the mainline end use a 3 way swivel, one to the mainline, the other to the leader to the spoon and the third to a sinker. The sinker I like best is a pencil lead pushed into rubber tubing that the opposite end is attached to the swivel eye, just like the old steelhead dropper leads of years gone by. You need this weight because this blade is a lot lighter than a regular spoon. This spoon has the tendency to follow, then occasionally dart from side to side to the extent that the leader length allows.
| Here you see the above described spoon |
|
|
(25) When fishing for late
saltwater spooky Coho in the
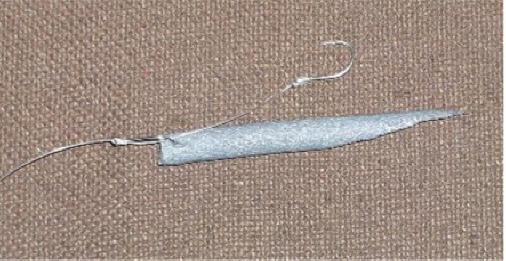
sound, make up a lightweight floating lure simulating a candlefish out of
"backing rod foam" found in a building supply store. This foam is round,
light gray and available in either 3/8" or 1/2" bulk rolls and is made to take
up gaps around windows etc. before the trim is installed. Cut it to
simulate a baitfish, (angled diagonally for about 1/2 of a 6" piece. Hook
it very similar to a cut plug herring, leaving the rear hook trail.
This lure can be trolled on top of the water a distance behind the boat.
You will probably need to place a light weight ahead of it.
Depending on how you cut the head (straight or angled) you can achieve
even a popping or darting action.
| Here is a simple top water anchovy/candlefish imitator lure |
 |
(26)
Use a Luhr Jensen 4
1/2" hog nose
salmon plug with the hooks removed instead of jet diver for back-trolling when river fishing.
This plug seems to have somewhat of a erratic motion at times that may trigger a
bite to your lure.
(27) Now, here is a modification you can do to the large 180 degree rotating type "skateboard" type of flashers. They were designed to rotate in a large rolling motion, which required for you to maintain a speed of approximately 3 miles per hour. What if your needs required a lesser speed? Pro Troll then added a small wing on the rear section, which they call an "Agitator Fin", which gives the flasher more KICK allowing the slower speed, even 1 MPH, and yet still achieve the full rotation.
But what if you have a lot of the older flashers, even different brands that do not have this fin? In the LH photo below you will see the late factory flasher with the fin on the left. In the middle is one I have added a fin, and on the right is a unaltered flasher. The far right photo is a angled side view of this fin, showing more clarity of what it consists of. This new added fin was made of a section of a faded out electric fence warning sign. The size is 9/16" X 2" and simply JB Welded onto the flasher using the same angle as the new fins. You will need to cut and peel back the tape, then remove the adhesive with rubbing alcohol before trying to glue it on. For adding it to the older Pro trolls, there is a mark on these that you can use as reference to glue it over. Update -- the JB Weld does not hold as good as I had hoped, but it does leave a good base when Super Gluing the fin back on.
| Here are an example of flashers with the fin on the left, an added on fin in the center and a naked flasher on the right | Here a side view is shown |
|
|
|
(28) For those of you who fish for salmon and are required to use barbless hooks, here is an important item that Good Day Fishing makes that enhances any system WHEN USING BARBLESS HOOKS, is a small bungee shock cord, which they call the Green Weenie. If you add this behind any flasher, in front of your leader, they are designed to keep just enough tension on the fish so that it has less of a chance to throw the barbless hook. At rest, they are only 4" long, but extend to 8" when at full pull. This distance is governed by a heavy cord INSIDE the green rubber tube. This one is short enough that you do not have to use a 12' rod when landing the fish because of all the gear you have added behind your sinker.
| Here is shown the Green Weenie from Good Day Fishing |
|
|
(29) To improving your landing net, there are a couple of things you can do. To make it floatable is a desired option, pull the handle off from the net yoke/head, then both the rear handle cap and the front snap in lock. This spring lock is usually made in a large Vee shape of sheet metal and can be compressed enough to be pulled out frontwards from the handle.
Get a can of the household spray insulation foam in a can, a couple feet of 3/16" or 1/4" Vinyl tubing to fit the nozzle of the spray can. Connect this tubing to the nozzle of the foam can and push the button, watch the filling of the tube to get an idea of how fast it works. With the hollow handle, reach inside as far as your tubing will go and start filling the tube, but back your Vinyl tube out so you fill from the middle out. Be careful as this stuff EXPANDS considerably and it is STICKY. Change ends and repeat on the other end of the handle. IF YOU SCREW UP there is no chance of repeating, or redoing it once it starts to set up. On the front where the snap lock is located you need to leave enough room to replace the lock spring. This foam expands once sprayed in, but after it dries can be cut with a knife. Any cleanup can be done before it dries by using Acetone.
(30) If you ever need to replace the landing net bag, it might be wise to remove the net bow from the aluminum head, early on in the net's life, like soon after is is new or slightly used. There are usually 2 screws through the head and into the rear of the bow rear ends, which in turn hold the bow to the head. What will happen, especially if you fish successfully in salt water, is these rear bow ends will generate salt corrosion inside the head connection, making removal difficult, or even impossible later on.
Remove the bow, clean their rear surface AND their mating holes in the head, then coat both with a thin coating of boat trailer bearing grease, then reassemble. If the retainer screws are not made of stainless steel, replace them with stainless steel ones, as they can get corroded in enough that you will not be able to even remove them later on.
Some bows are left natural anodized aluminum, others may be painted or covered with an epoxy coating. If the bow get to where you need to redo them, remove them from the head and strip off the old coating if it is paint or epoxy. This can be done with sandpaper or a wire wheel on a grinder. Prime the bow with a pressurized rattle paint can of zinc chromate primer (usually a greenish military OD color) using a 2 or 3 coats. Then paint it with your final color, which would usually be black. Give that a couple of coats and let it dry in a warm room.
Then overcoat that paint with a clear overcoat, again a couple of coats. Let it dry and reassemble. Be sure that all of your paints are compatible with each other, otherwise the second coat may wrinkle or even loosen the first coat to where you have a mess.
Now you can reattach the net bag and you have a nearly new net.
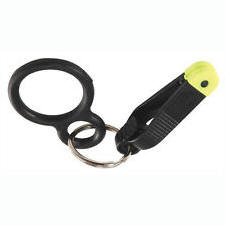
(31) For years we have been taught to use your finger to retain the bottom of the landing net bag when you net a fish, so you avoid tangles AND possibly scare the fish off it the bag is dangling in the water, and then let the bag drop as you net the fish. There is one product on the market that does this for you, the Scotty Net Minder. What this is, is simply a rubber figure eight with a downrigger clip attached. The large rubber loop is slid onto the net handle being located so the clip can be attached to the bottom of the net bag, thereby holding it securely until the fish is in the bag, which pulls the clip loose from the bag. No need to hold the bottom of the bag with your finger using this. This also allows your hand to be farther to the rear of the handle, which could extend your reach up to a couple of feet.
There are a couple of detrimental things with these that I have found, (1) is if you leave your net exposed to the weather (sunlight especially) the rubber figure eight will deteriorate. (2) the downrigger clip is the trout size and just too small to force over a good sized salmon net bottom cord. This devise is hard to find in sporting goods stores, and probably because it is not something that the dealers even realize is available, as it is kind of hid in the Scotty catalog, but I now find that they are available through Amazon.com for about $10.
| Scotty #210 Net Minder (net bag holder) |
 |
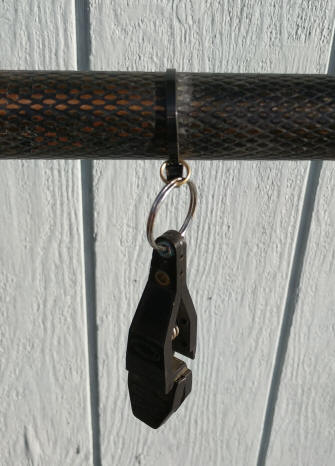
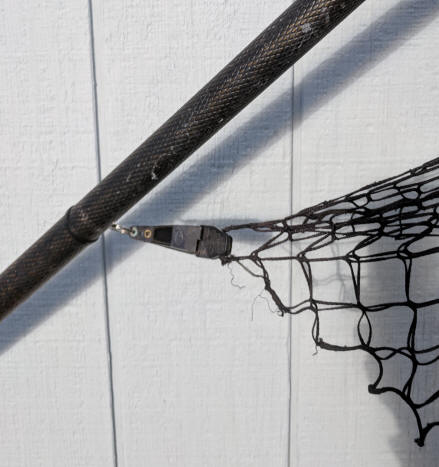
After my Scotty Net Minder rubber ring broke off and the clip got lost, is when I found it was hard to find a replacement when I needed it, I proceeded to make a Red-Neck version as seen in the LH photo below. This involved using a Zip-Tie, a key ring, #7 split ring and a lonely salmon downrigger clip out of my spares box. I like this clip better as it opens up wider than the small or even large Scotty ones do, as the bottom cords of my bag were heavier, making the Scotty hard to clip on without a lot of effort. This clip I am now using is a Delta brand, made in Canada (but now discontinued). However the Offshore release clips will work just as well. The Offshore versions are made in two tensions, the lighter freshwater trout/Kokanee version, and the salmon tension, (same clip configuration, but a stronger spring). The lighter version is made in white plastic, while the heavier version is black.
| Red-Neck net bag holder | Here it is shown in use |
 |
 |
(32) Most fisherpersons prefer to bleed their fish to provide a better eating fish. For this, some boaters will make a bleeding knife. This can be a cheap fillet knife, cut shorter and with a sharpened hook on the front, as shown in the photo below.
| Here is a gill cutter/bleeding knife |
|
|
(33) How many times have you reached for the net to extend the handle, and aluminum shaft is stuck rather tight to the aluminum bow base unit? For those of you who never fish saltwater, this may not be of any concern to you. But for saltwater fishermen, it maybe a good idea to learn to flush the net shaft and bow base off with freshwater and soap at the same time you wash off the boat/trailer and your rod/reels. Even a little WD 40 surely can not be a bad thing for preventive maintenance here.
The above can also be used on the EXTENDABLE boat hooks. However be careful to not het a lot of oil on the extendable shaft otherwise the twist lock feature may be defeated. They need to be washed off and stored in a unlocked position.
Another trick here is to make the landing net handle into a floater. Do this by purchasing one of the spray cans of household spray foam insulation. Find a 24" section of 1/4" plastic tubing. Attach this tubing to the nozzle of the spray can, remove the end caps of the handle then reach inside to the depth of the tubing. As you spray this foam inside, slowly back the tube out leaving enough foam inside to fill the handle. This stuff expands A LOT, so you do not need to fill it completely Change ends and repeat the procedure. When you are finished, you will have a floating salmon net.
(34)
How many times have you been fishing in a COLD, RAINY or FREEZING day where
even wearing fingerless gloves leave your fingers freezing. A simple
solution may be that you might try wearing latex gloves
UNDER the wool fingerless ones. This
gives your fingers still the sensitive touch needed to bait lures while
giving the bare fingers some protection from getting wet, AND at the same
time stops any body/finger heat from escaping, while still giving you the
ability to change lures etc.
| Here is a simple method of keeping your fingers warmer in cold wet / freezing weather |
|
|
Another version here used by some who operate open boats in harsh weather (Spring Chinook) is to reverse that, but use the lightest cheap cotton gloves UNDER the latex glove. This gives the operator some protection from the elements. You can even add a chemical hand warmer between the two for added comfort.
(35) Sometimes you may need something to carry or store a small amount of gear in while leaving your main bag farther away, like surf perch fishing or any fishing where you need a place to temporarily store bait or tackle that you are changing out. Here you can use a cheap 2 pocket canvas carpenter's nail apron, and have a 1" Nylon web sewn onto the upper part, purchase those plastic male/female quick couplers and you are in business making it into a readily removable fishing apron. Many times these aprons are given away to customers who purchase merchandise. Or you could just use the tie cords that it comes with.
| Here is a simple cheap fishing apron |
|
|
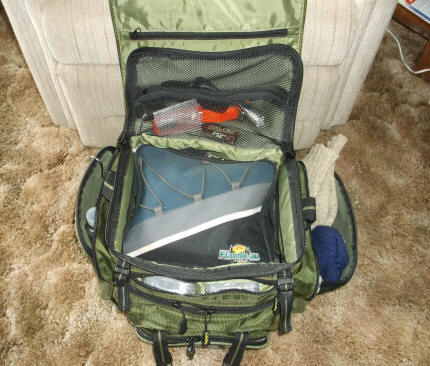
(36) Most of us seem to accumulate way too much gear in our tackle box, and space is at a premium on any boat, so I have developed two "GO TO" gear/tackle bags. One a smaller one, while the larger combo main bag can accommodate all I need for a days fishing, and the smaller one also.
When I go with a fishing guide, or on a charter boat, this is larger one is my Go To bag, but I may leave out the smaller tackle bag listed below since they usually supply the tackle. Prior to finding this bag, I used the backpack that was my pack-in river salmon and steelhead bag. That worked well for years, but this new bag is more convenient and easier to access for boat usage.
This carry-on larger gear bag is a Cabela's deluxe gear bag, in it I can have a set of lightweight Frog Togs raingear, wool gloves, wool skull cap, sunglasses, small LED flashlight, emergency whistle, small side cutting pliers, digital scale, camera, water bottle, lunch, etc. plus a thermos and in addition my small go to tackle bag. The lunch is not in a lunchbox, but the sandwiches are simply in Ziploc baggies, with the apple or orange and thermos in there loose. There also is enough room, (crowded, but doable) to cram in a hooded sweat shirt in the bag if the weather looks the need is there.
One thing I like about it is that in the large front zippered pocket, there is enough room to stash two 4" X 6" plastic tackle boxes which supplement my tackle bag. The one thing different is that the lid, which has the single handle on it is laid over the bag and uses quick release buckles on the front to secure it. The inner lid cover has a zippered mesh pouch, and the outer lid cover has another zippered pouch for papers or charts if you desire. Gear can be organized a bit better than the older carry-on bag, allowing an emergency whistle and small flashlight and a current tide book can be stored inside the inner lid's zippered mesh pouch for better accessibility. And my small tackle bag still fits inside and on top of my rain gear.
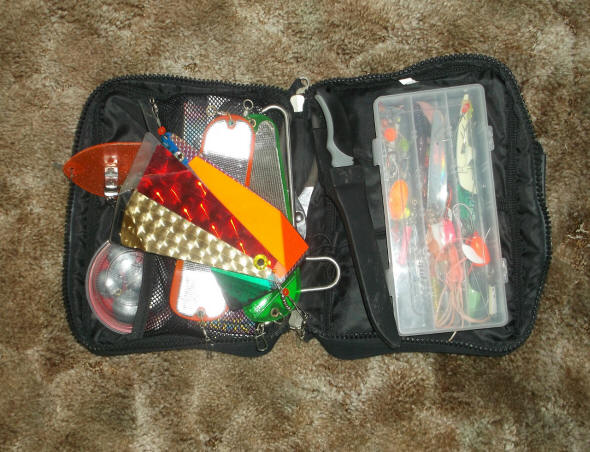
For the small tackle bag, I have a Flambeau 4" X 8" X 11" padded cloth bag that has a heavy duty zipper going endwise from the bottom, up to the top, across, and down the other side and a carrying handle on top, allowing it to open up like a clamshell. Inside this bag, one side has a net mesh type pouch. Loose inside the bag, I have a fillet knife, small pliers, and a hook remover and a Flambeau 1 1/2" X 4 1/2" X 9" #3003 plastic tackle box.
In the bag's pouch are an 8" Hot Spot flasher, an 8" E-Chip flasher, two 8" Fish Flash attractors, a small Deep Six diver, leader material, a hook remover and a couple of Colonel Sanders KFC small plastic gravy container of cannonball weights. Not shown here is usually a jar or bottle of scent, but it was taken out after the season and placed in my refrigerator.
In this plastic box, as you can see in the photo below, it is crammed with salmon tackle in this case. Not a lot, but selected, proven terminal tackle along with swivels/snaps for the intended outing. If the outing was for a different specie, the contents of both the bag and this box would be changed for what may be more appropriate for that particular outing.
On one of the outsides of this tackle bag is another mesh bag with a elastic top strap. In it I have more tackle. This normally includes two more 6" Fish Flash, Les Davis size 0 dodger, another small LED flashlight, an Apex and Brads Super Cut plug lures, cork bobber and a rigged #0 Spi-N-Glo hook setup. OH yes, a pair of surgical gloves are in there somewhere also.
| My small tackle bag opened up | Here my Go To carry-on Cabela's fishing gear bag with the small bag enclosed |
 |
 |
(37) Most new rods come with a factory shrink-wrapped clear plastic protection on the cork handle. These plastic covers do a good job of protecting the cork. However many manufacturers only use this for sales as the warranty card may be under the plastic wrap and to get to this information, you have to remove the plastic covering.
If it is naked cork, or even the shrink wrapped handles, many fishermen will remove the wrapping and then varnish the cork to protect it. If this is your plan, recommend a semi-gloss instead of the high gloss, which provides a better non slip surface. You want a quick dry (2 hours) varnish to help alleviate runs. I have found that a fast dry (2 hours) polyurethane clear satin finish with a name of ZAR, that is recommended for floors and works great for me. It says for indoor use, but for our usage style, the rods will not be exposed to the elements any longer than we can withstand, so the indoor use recommendation is of little consequences here. Minwax of the same polyurethane description is so thin it requires MANY MANY MANY more coats to get the same protection buildup and then not near the protection.
| Here is the rod handle finish that I use |
|
|
Also if it has a naked cork handle that has been used for some time, these will get dirty/grungy over time. You can clean most of this off by aggressively wiping it down with Acetone. Then possibly a lightly sanding with a fine 150 grit sandpaper. If you have holes or chunks of cork missing, fill them with plastic wood in a natural color. But you may not get a decent color match with plastic wood filler. If this is the case, after the final sanding, I wipe on a light oak stain. This colors the plastic wood and does not really darken the cork that much. Let it set for 1/2 hour and wipe off the excess. Let it set overnight to dry completely before you apply the final varnish.
Before you start applying an varnish, the use of masking tape is a good idea to keep from covering unwanted parts. Apply enough coats of the finish to cover and fill all the holes. Usually about 3 coatings is sufficient on a new rod, more for a used rod as it seems that much of the finer particles have disappeared. Do not apply so much at a time that it runs unless you use a rotating fixture, or you have the time to stand there and manually rotate the rod until it pretty well sets up. I have found that 3 or 4 coats are enough to do the job on most of my rod handles.
And IF over time the varnish gets damaged, just remove it with Acetone, or fill the holes with Plastic Wood and redo it.
| Here is a rod that has had the cork handle preserved with Polyurethane Varnish |
|
|
The above information is referenced for cork handles and not the newer coated foam type handles currently available on some rods.
Some fishermen will even wrap the cork with black electricians tape as a protective coating. Or you can use handlebar wrap obtainable from bike shops. This helps greatly in preventing cork damage when trying to get a rod out of a rod holder if a large fish is pulling on the other end. There is also a following of heat shrink tubing being used on the handles. Recently the manufacturers have been offering fiberglass handles, of which some fishermen like, while others like me, dislike this idea. Some of us old geezers are hard to change our ways, unless you can give us a very good reason to make the change.
(38) For those boaters who like to bleed the fish and then drag it over the side while bleeding out, here is a simple device. It is made from 1/8" to 3/16" aluminum. The size that seems to work well is 8" overall length. This is simply band-sawed from a sheet of scrap aluminum. The hole is drilled to match your cord (in this instance a Tuna Cord), with the hole the balance point in the center. On one end is a hook that is sharpened in the inner edge. In use, you open the fish's jaw, reach in with the hook end, and cut/pull a gill on each side. then push it all the way through and out the bottom of the gill opening. With this balanced toggle it now forms a Tee that will be pulled up under the gillplate, securing the fish to the cord, very similar to a halibut harpoon.
The cord will need to be made to accommodate the size/height of your gunnel and yet let the fish be dragged a little in the water. On mine, I made two loops, the lower one to secure to a rear mooring cleat, the other larger loop longer out, so I can have something to hold onto while I am attaching the other loop to a cleat, just a little insurance policy.
| Here is one method used for bleeding a salmon or steelhead if in a boat |
|
|
(39) For those bankies, the same principle as above but slightly modified. Here the same toggle as above, but with a 6" section of a push broom handle attached to the cord about 20" up. This may need to be adjusted for how tall/short the person is. The need is to NOT have it so long that you drag the whole fish on the ground, or so short that you are lifting them all the time, as that gets heavy after while. You want to just lift the heads up enough to act as a sled.
On this one, I tied a small loop just above the handle so the Karabiner snap can attach it to your belt during the fishing so you do not have to dig into your pack for it when needed. Then up the cord another 20" to 24" another loop, which is used if you are standing in the river and need to tether the fish to you, but away enough so that you are not encumbered with it too close and stumble over it/them. And saves time if you are waist deep in water and when working a fish all the way back to shore increases the chance of loosing it, where here, you can bring the fish along side, net or gaff it and then secure to this tether without a lot of wading.
This unit was developed and used in Alaskan walk-in Coho river fishing trips, where there the ADFG advises to not leave your fish on the bank if you anticipate any bears being near. using this you can tether it to either of your wader belts and keep them in the river near you where the smell is minimal. They do not want you to FEED THE BEARS, thereby educating them to follow fishermen. It could also be used in the states where you did not want someone to steal them when your back is turned. The pointed other end can be used to dig into a gravel bar and then as a spike to secure your catch while still in the water.
These units can readily accommodate up to 4 Coho in size up to 14#.
| Here is a modification of the above, but used for bankies as a tether/tote |
|
|
-
Here on a rare non-rainy day in Alaska, part of the crew are carrying/dragging their limits thru the Muskeg back to the trailhead, with the shotgun totter on the left.
This last fisher has his too short, the one ahead of him about the right length
(40) Transporting your rods. OK, now for making some of your own gear from scratch. One would be rod cases if you are traveling, sometimes even a short distance or flying to a dreamed about destination. If you are flying on commercial aircraft, it is best to consult that airline for their specifications. AND if in doubt, call the airline to verify, if there is any restrictions as to length and or total dimensions of girth/length, otherwise it could get expensive if your dimensions are oversize. As Alaska Air has a different category for fishing rods with is 115", but there seem to be contradicting info as to just what this means.
This works well if you need a rod case to transport rods during a aircraft flight. For our Mexico trip the total maximum dimensions for the rod holder was 62", but Alaska was 60".
Make your own tubes that are
better than commercially available and have proven themselves on several flights
to Alaska, Canada, Mexico even Australia, or even shipped ahead on UPS and FED EX.
The ABS ones are indestructible, plus security proof and by far
better than any tube sold on the market that you will ever see!!
Use 3" or 4" Black ABS 1/4" thick
round pipe which the 3" will
usually accommodate 2 spinning rods where the 4" will hold 3 rods each. Place the rods together tip to butt and use thin
bubble plastic around the first 18" of each tip and eyes. Then use foam 1"
pipe wrap insulation and place it around the 2 rods at 20" to 24" intervals,
bottom, top, and 2 places in between to cushion the rods from shock or movement
within the tube, then side the package into the tube after putting a foam plug
in bottom and another after the rods go in. You want it to give a fit with
about 1/4" of clearance on the sides.
Use
ABS glue and glue on an end cap, and another one with a screw plug, making the
tube 3" longer than the rods being transported. After the cap in on before rod
insertion take a drill and drilled a 5/16" hole horizontally through the threads
and exiting out the threads on the other side, then get a cheap 6" long
combination bicycle padlock to
lock the cap in place. The one good thing is that this padlock going thru
the center of the tube, which also keeps this case from rolling off the airline conveyers.
What I also use is a 1/4" nylon rope and tie it around each end with enough slack between to make a sling similar to a rifle carrying strap. This proves to be one of the best cheap improvements you can make, as if you are dragging your checked baggage, dragging your wheeled cooler and carrying your carry on bag, this strap really helps keep your rod under control. Be sure to put your name and ID info that is clear taped onto the tubes also.
In the photos below you will see two ball bungee cords located near each end. These are placed so the balls are aligned parallel along the tube so that it prevents them from rolling off the loading conveyer of the airplane.
One one trip to Alaska, going up was fine, but coming back, those TSA employees must not have really read the rules or had never seen many of the plastic rod tubes (more than likely this large 4" one designed to carry a buddy's rod also), and they really got concerned when it did not meet their Over All standard length of 60", but was well within the OAL for Alaska Air's fishing baggage size. So once on the plane when we returned, I measured the overhead compartments (60"). But I did notice on some planes, there is a opening between two of these compartments, so if you got on early AND found the right two compartments, you could slide a longer rod holder into one and part of the other.
Another thing to do is wrap some bright colored surveyor flagging tape on one end to identify your tube. On these flights to favorite fishing destinations, you will be amazed at the number of rod tubes that are nearly the same as they come off the carousel.
But I had learned, and the next year I went the Redneck single rod version made of two heavy cardboard tubes, telescoping together and duct-taped at the juncture to the outer tube as seen on top in the photo below, as seen below on top (which TSA probably see a lot of) and I never had a problem. However this next year at the Yakutat Alaska terminal there was a large sign posted, saying 60" maximum length. However if the same sign was posted in Seattle, I never saw it.
| Examples of two different styles of rod transporting tubes |
|
|
(41) LAST BUT NOT LEAST -- Be very careful who you show your Man Cave/Fishing Room to. The gun owners already know this, but what about you fishing nuts? By this, with all the thefts of anything that can be readily sold, your rods/reels could very well be something the druggies would be interested in. However most fishermen are cheap and pawnshops know this, so they would only pay pennies on the dollar. And almost all fishermen are are penny pinchers, willing to pay out minimal dollars for a good rod, where tracking is nearly impossible, even though they may suspect it may be stolen.
You will probably be fine by showing it to your fishing buddies, as they will usually be envious, BUT be careful, not to allow any of their kids or even possibly some of your younger relatives into that sanctuary. Not saying THEY may "borrow" your gear, but most likely they could in an unknowing way, mention that their uncle has a LOT of fishing gear in his garage. This simple sentence may be overheard by others who may not be so trustworthy.
And it might be hard for you to explain to your wife the value of your loss to your insurance company, if you told her that rod you just bought only cost $35, while in reality it was $235.
Copyright © 2014 / 2023 LeeRoy Wisner All Rights Reserved
Back to the Ramblings Home Page
Originated 02-18-2013, Last updated
08-18-2023
Contact the author