|
|
Flushing These Johnson 1984 - 1991 , (Using & Installing a Water Flush System) |
|
, Evinrude, OMC, outboard motor, outboard motor repair, 9.9, 15 hp, date/year of manufacture, water pump, carburetor, long shaft, 15 hp conversion, sailmaster
|
|
Flushing These Johnson 1984 - 1991 , (Using & Installing a Water Flush System) |
|
Water Intake : These motor's main water supply to the water pump comes from a screened tube right behind the prop in the exhaust outlet which was carried over from earlier motors. Water is forced into the screened intake to the water pump by the prop thrust. Therefore you will need to put the motor in a barrel (with enough water covering the cavitation plate) to submerge the water pump, otherwise you WILL get an overheated motor, especially if you put it in gear.
Some users
report that when running these motors in a barrel, (usually a small
one) that the prop has to be installed and usually in gear as apparently
they need to get more water pushed to the water pump by the prop to
get enough to cool when running at over an idle.
There is no stainless steel intake plate on the left side above the cavitation plate like the previous versions. Aftermarket flush kits for this motor are obsolete and rather scarce. There is really no provision currently available for a easy muff system to run this motor out of a tank.
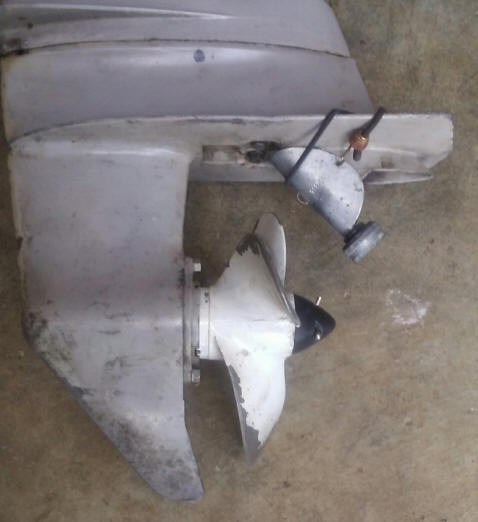
Aftermarket Water Flushing Adapter Cover : These motors main water supply to the water pump comes from a screened tube right behind the prop in the exhaust outlet which utilizes the thrust from the prop to push water up to the water pump. This method of water intake does not allow the newer type of flushing muffs to be used. At Soon after these motors came out with this type a water intake system, Tempo made Flush Kits #918FAA (as seen in the photos below) for a while for these motors, but now are not currently made and are rather scarce IF THE PERSON EVEN RECOGNIZES WHAT THE ARE. Those of you who frequent garage sales may be on the lookout for these.
| Johnson 6hp with Tempo Flush Kit in place |
 |
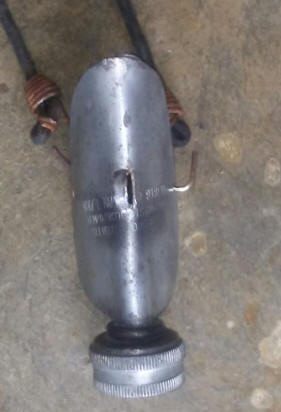
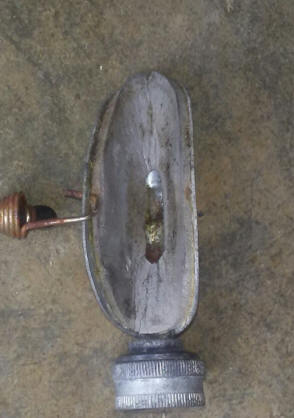
This unit is 3"
long not counting the hose nut, and lined with what appears to be
1/8" sticky backed foam, which provides some sealing and is held in
place on the motor by a mini bungee cord.
| Tempo #918FAA front view | Tempo #918FAA rear view |
 |
 |
Modification to Use Screw In Flush Adapter : But there is hope. After looking closely at my 1984 6 hp, I concluded that it may be possible to alter the lower housing to accept the 3/8" threaded adapter currently used on many motors to flush them. I figured out a location and way to drill/tap/modify the lower unit near the water pump to where I am able to utilize the later screw in flush adapters on this motor.
Mercury sells a flushing adapter that uses a 3/8" National Course bolt thread on one end and a female garden hose end on the other, as seen in the photo below.
Mercury's Quick-Silver part number is #C-24789A 1 for the brass version @ $22.08, or C-48755A 1 for the plastic version @ $13.00, with the actual name being "Flushing Device". Also OMC Johnson/Evinrude uses the same adapter to back-flush for many of their outboard motors made from 1993 to 2007, but for some reason not readily located on their parts listing. These adapters also fit about all of the Japanese outboards that use a back-flush system.
| Mercury Outboard Flush Device #C-24789A 1 |
|
|
These plug screws are, OMC #0307551 (new # which uses a Hex wrench) or Sierra #18-2387 (older standard slotted head), and sell for about $4 each. in use, you remove this 3/8" plug and screw the garden hose into the adapter, then into the motor, then turn on the water. It does not need to be full force of the standard house water pressure, but about 1/2 force. Start the motor up and let it run for long enough to get the motor warm enough to open the thermostat allowing water to flush thru the power-head. Shut off the motor, then the water, replace the plug screw.
In coming up with this location, it is critical that the hole is pretty well centered in the water entrance cavity. I marked it on the plastic, then also on the top edge of the lower unit. Now reassemble back onto the exhaust housing. Then transfer that mark onto the exhaust housing, measure up so it is located min the center (note info below). Center punch your mark and drill through both the housing and the plastic with a 5/16" drill bit. Try not to be square with the center of the motor, but 90 degrees to the surface at the location you are drilling so the underside of the plug head pretty well is flush against the outer part of the housing, (note- it is a slightly radiused surface).
Tap this hole with a 3/8" National Course tap, all the way and into the plastic. The reason I tapped both parts is the metal is rather thin, (like about 1/8") and this adapter threads may also go into the plastic for better support.
Remove the whole, lower unit, then the water pump and plastic base, so you can clean any metal or plastic out if the new intake chamber. Reassemble the same as if you were replacing a water pump impeller. More detail on that HERE.
| Johnson 6hp with the water pump in place & the new flush hole drilled into the base. |
|
|
The dimensions that I used were from the front of the exhaust housing under the cavitation plate, rearward 5.520" to the center of the 5/16" drilled hole. I centered this between the space below the cavitation plate and the bottom of the housing. WRONG, I did not take into account for the gasket under plastic plate, which you can see in the above photo, my hole is not centered in this plastic, but slightly high and when tapped, cut into the upper part of this plastic housing. The hole should probably been .308" up from the bottom of the exhaust housing so the plug screw head would have been very near the joint of the two metals.
This plug screw is the standard OMC oil plug fill/drain screw. I removed the thick Nylon washer normally used and replaced it with a standard 3/8" Nylon washer (thinner). I also radiused the outer edges of this screw to make for less water flow disturbance.
You could purchase OMC drain/vent plug and washer, or the Sierra Marine equivalent #18-2387 - Drain Plug Slotted, and #18-4248 - for the Washer.
Mercury sells a flushing adapter that uses a 3/8" National Course bolt thread on one end and a female garden hose end on the other, as seen in the photo below.
This Quick-Silver part number is # 24789A1 for the brass version @ $26.68 with the actual name being "Flushing Device". Also OMC Johnson/Evinrude uses the same adapter to back-flush for many of their outboard motors made from 1993 to 2007, but for some reason it is not readily located on their parts listing. These adapters also fit about all of the Japanese outboards that use a back-flush system.
In the photo below, you will notice this plug's location inline with the original factory water intake screen in the extension behind the prop.
| Johnson 6hp showing the new flush plug installed |
|
|
Copyright © 2018 - 2020 LeeRoy Wisner All Rights Reserved
Back to the Ramblings Home Page
Originally stated 05-20-2018 Last Updated 11-04-2020