|
|
Modifying
Existing Tube Type Clam Guns to The New Venting System |
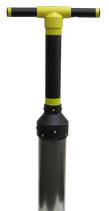
| A Real Clam Gun designed for precise digging |
 |
Razor Clam Digging History ; Westcoast Razor clam digging typically used to be done with specially designed clam shovels for MANY years. The old standby shovels were made by True Temper and were forged metal, and are no longer made. Later cheaper ones (still in production) were stamped, formed sheet metal. Most older ones came with short wooden handles, because the digger would be on one knee and the need for a longer handle would be a hindrance.
These shovels were made in two shovel lengths,
a long and short spade. These long spades were 5" wide at the rear, 3 1/2"
at the bottom and the spade had a pretty good inward curve. The short
spades were about 3" shorter. The overall length of the long shovel was
35" from the tip of the spade to the top of the handle.
In
digging with these shovels, they are NOT used as a normal shovel fashion.
Here the digger inserts the shovel about 4" on the ocean side of the clam show
dimple, pushes the shovel down in a slight inward arc. Then instead of
rocking it back like digging a ditch to take out the sand, he (she) lifts the
shovel straight UP and possibly slightly forward, pulling out a slice of sand.
Then the second motion is another repeat of the first in the same hole, but with
the front of the spade about 1 1/2" closer to the show dimple, bringing up
another slice. Depending on the depth of the clam, possibly another pass
may be required, HERE the object is to, with each pass, to move closer to the
clam so that the digger can feel the shovel's tip scrape the back of the clam.
At this point, disband the shovel use, and go in with your hand where the shovel
spade was, find the clam
and pull it out. If you missed, or it was deeper, dive in and using your
hand, pull handfuls of sand out, dive in again and do a rotational search for the little bugger.
Clams will be positioned with their backs to the water, so your shovel tip will
not damage the shell because the
backs are thicker at the hinge than the open fronts.
If you use these long spade shovels as a normal digging spade, you will break the spade/blade in the middle AND/OR mangle the clam. I never did figure out what usage the short blades spade was good for, unless you used for clams other than razor clams, or digging a ditch.
Since these shovels are long obsolete, and I broke the handle of my True Temper after 50 plus years of usage, I
almost cried, as no handles were available anymore. I was not about to abandon this old friend, so I made a new walnut (the wood I had on hand) handle on my metal lathe, copying the shape and length of the old one. As these handles were contoured larger at the end and not simply a cut off long handle.
| True Temper clam shovel |
 |
 |
Progress ? ;
Digging changed
in the 1960s with the introduction of the tube type clam gun. Initially
these were made of 4" dia. (the minimal size allowed) PVC pipe with one end
capped, a Tee handle attached on that end and a small 3/8" vent hole drilled in
the cap.
From there, 4" aluminum agricultural irrigation pipe replaced the
PVC, but still using the same full tube design.
This "clam
gun" soon became
a proven tool for clamming on the US west coast. In use, with your thumb
or finger OFF the vent hole, simply push the tube
down in the sand over the clam show
dimple with a rocking or circular motion as you push it down. Now block the
air vent with a thumb or finger and pull up the core of sand hopefully with the clam
inside. It might take two or three tries depending on the depth of the
clam.
It has been found that clams tend to move
toward the water when a digger starts after them, so here it may be beneficial
to tilt the gun tube slightly in direction of the ocean.
The
size of the tube, (diameter) was upped on some to 5", for some guns, BUT this meant a bit heavier
pull for the extra weight of the sand.
Then in 1979 a patent was applied for a clam gun with vent mechanism
for easing the withdrawal from the sand, basically breaking the vacuum on the
outside of the tube allowing the gun's tube full of sand to be withdrawn from
the sandy beach easier. This idea was then improved on by numerous
local sheet metal shops, mostly adding (spot
welding) a vent on the outside. Then in 2019 a aluminum tubed model showed
up with the 5" tube and the outside vent being extruded in all as a single piece
tube.
These
tubes were then made in either aluminum, steel or stainless steel, with steel
being cheaper (easier to weld) but heavier. Those being made of stainless
steel of course were more corrosive resistant, stronger and thinner, (but
provided easier entry into the sand the makers advertised). Some also went to
a Nylon handle/top half and attached to a thin stainless tube. And a lot of imported product
showed up on the dealer's shelves. Some makers work was not of the highest quality,
possibly not enough personal testing, while others a lot
better. And LOTS of COPYCATS here. Some had a guarantee of sorts.
Prices range from $14.95 for the PVC versions up to $135.00 for the newer Nylon/Stainless Steel ones.
|
Here is shown the transgression, the 4" PVC on the left,
4" aluminum in center & 5" aluminum on right |
Clam Hawk |
|
|
 |
Drawbacks ; With the introduction of these TUBE GUNS, numerous diggers did not understand the amount of strain they were putting on their backs, by not using their legs to help lift on the up pull. Some so much so that they required back surgery afterwards. This was probably one reason for the introduction of the vent tube guns.
Modifications ;
Being a
somewhat frugal person and on a limited income, along with the amount of digging
times I can participate in, I decided to install a outside vent on an existing
gun that I had. I do not have a spot welder, but got a sheet metal friend
of mine to fabricate a thin outside Vee tube that I JB Welded (Epoxied) to
the outside, being very similar to like the final result of being a Big Boy's gun, but epoxied
instead of metal welding.
My plan worked out quite well. I
had this vent made of.030" thick aluminum, with a overall width of 1.312" and a
height of the Vee vent .300". I cut this vent material to the overall length that I decided would work, laid it
on the gun tube and marked around this new vent with a felt marker to locate it
later. I filed the outer edges smooth and then mixed up the epoxy,
smearing it onto the "to be" inner edges of this vent tube. With the aid
of a helper, we positioned the now uncured epoxied tube in place as earlier
marked.
Now again with the aid of a helper, we secured this vent tube to
the gun's tube body by using ball bungees. With one in place on the
lower end, another was placed on the upper end. Now using my finger, I
smoothed any excess epoxy down into the edge. Then by using a paper towel soaked
in lacquer thinner, I cleaned any excess off the tube. Now add 4 more
bungees, placed evenly along the entire length. Then let it set
overnight, and BINGO we had a vented clam gun.
I was concerned that possibly too much epoxy
would exist and be pushed inward, possibly plugging up this venting system.
So my idea was to get a 1/8" 22 caliber ramrod and after the tube was in place
and before it cured to push this rod and a slight amount of cleaning patch
material down inside to clear any that was possibly plugging the passage before
it cured. Of the two that I have done, one required this, while on the
other, it was not needed.
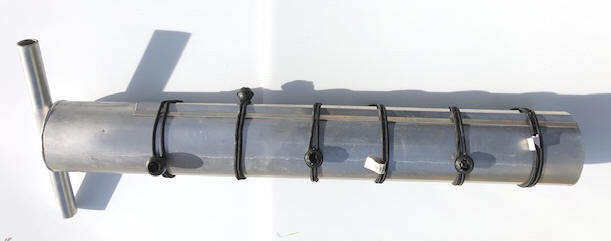
| Here the outer vent epoxied in place |
 |
|
Outer vent to being held in place on a 4" tube while the epoxy cures using
9" ball bungees |
  |
The second tube that I converted was a 5" version using the same method, but the only thing that I encountered was that these 9" bungees have to be stretched to their MAXIMUM.
|
Here a novice digger using a 4" aluminum tube gun & her limit of clams |
Here are some NICE razor clams |
 |
 |
Observations ; Each digger will have to decide their own method and make/model of shovel, or tube guns. Personally at age 83, I can not use the guns, as I have been diagnosed with COPD and Acute Bronchitis and have a real problem breathing when being bent over, along with Arthritis in my lower back, so much so that I have a hard time digging a whole limit at one sitting using the tube. So back to the shovel for me, where I can kneel on one knee and no bending over as with needed when using a tube/gun.
However, I have been told by a longtime tube user that there is a secret to pulling it out of the sand. He says when you get near the bottom of your initial dig, to then pull it back UP about 1", then push it down about 2" before trying the actual withdrawal, saying this helps break the suction. And DO NOT use your back to pull it, but, slightly squat as you go down, then using your leg muscles, to do the lifting with.
With the use of these tube guns
(especially the 4" models), I see many clams mutilated and left on the beach, or
the digger burying them. Not sure of the reason, unless the digger was not
properly instructed as to the position of the gun over the show dimple, or
simply not paying attention. More the reason to go to the larger tube
design.
Now, for prepping to cleaning your prize, here is a tip. Get a large pot of
water boiling, (preferably outside over a propane burner). When it is
boiling, (with a limit of clams in your nylon clam bag) dip the bag and clams
into this boiling water. This should be NO MORE than 30 seconds, just
enough to separate the shells from the body meat. Then immediately,
dip them into cold ice water to stop the "cooking", otherwise they will become
tough. Shown in the photos below are examples of this process and
the results.
| Here you see the pot of boiling water and the clams/bag ready to blanch |
Here you see the results, NOTE the shells simply fall off |
 |
 |
Copyright © 2019 - 2023 LeeRoy Wisner All Rights Reserved
Back to the Main Ramblings Page
Originated
10-28-2019, Last updated 04-20-2023
contact the author
![]()