 |
|
 |
Attractor Flasher ; Fishing attractors have been around for years as an attractor to the lure in trolling for salmon or other fish specie. There are many types and typically using a limited explanation, a flasher rotates, while a dodger sways from side to side. Both have their benefits as for attractiveness for water flow or speed the boat is moving.
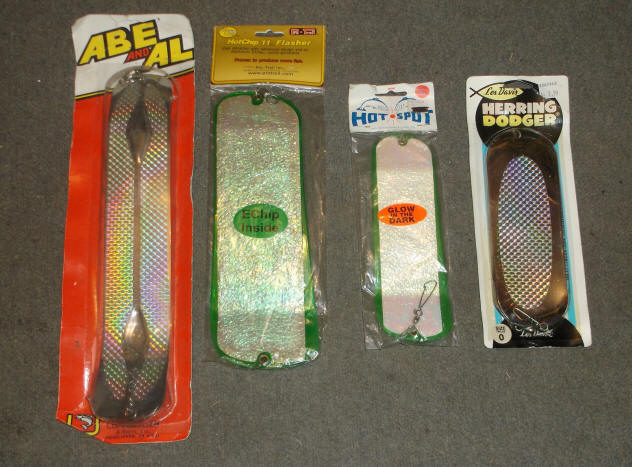
Years ago, the main attractors were Kelp Kutters, Abe & Al metal flashers or Les Davis dodgers. The metal Abe & Al have pretty well disappeared but have been replaced by plastic Hot Spots and Pro Trolls, but the Les Davis have survived, and have even been downsized to small units many of which are used for attractors for trolling for Sockeye salmon, trout or Kokanee in lakes.
In the LH photo below, you will note this Abe & Al has survived still in the unopened sales package that I purchased probably 40 years ago when I was a commercial salmon troller. The Les Davis is also probably near the same vintage as the header is somewhat faded.
| On the left is the Abe & Al, center left is the Pro Troll E-Chip, center right is the newer small Hot Spot, & on the right is the Les Davis dodger |
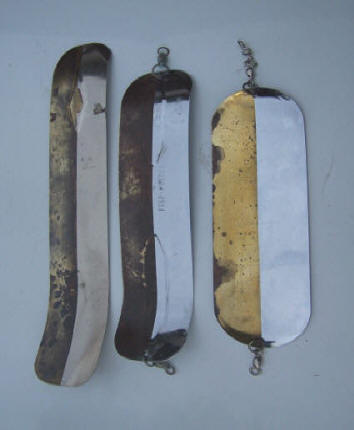
Shown here are well used Abe & Al, Kelp Kutter
& a
Les Davis herring dodger, all are/or were (needing polishing) in 1/2 & 1/2 brass & nickel |
 |
 |
The drawback for the flashers in those days was getting the gear down into the strike/fish zone (before downriggers). That was usually accomplished by using a heavy weight on the line. These weights were rigged with a wire loop and split ring combo running from front to rear. The mainline could be inserted into the loops then slid partly into the split ring which held the weight in that location ahead of the flasher. When a fish hit, the mainline pulled out of the split ring's grip, yet was retained by the loops, where the weight then slid on the mainline if the fish ran, so that it was not near the flasher creating a chance for the fish to throw the hooks.
Then along came divers and downriggers which totally changed the game in getting the gear down. Flashers then came out being made of plastic and when being used on a downrigger, the weight problem no longer existed because the gear was attached to the downrigger wire that had the heavy ball, on the bottom, when a fish hit, the line snapped loose from the clip. However there was still a drag between the fish and the fisherperson.
The sport salmon fisherman techniques usually lagged behind the commercials, as in the early 1970s there was a stainless steel square winged attractor about 6" square that the commercial trollers used that was an effective no drag attractor. However this did not become recognized by the sport fisher, probably because the downriggers we know now had not been invented yet.
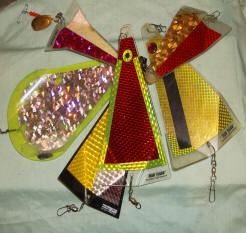
Now for the uninitiated, do not associate the word flasher as seen above with the Fish Flash shown below.
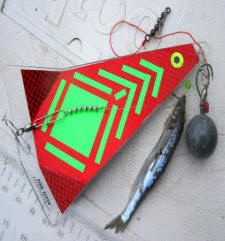
Fish Flash ; Then in 1994, Al Hazelquist from Tacoma WA. developed and applied for a patent for the "Fish Flash", a plastic triangle in-line rotating low resistance attractor. This became available (hand made by him) at limited locations in late 1996 /early 1997. I soon found out about them, but did not locate a source (Monte Square in Montesano) until 1997. In addition to the divers and downriggers, again this attractor changed the salmon fishing game dramatically. At the time Al was making his product in his garage, he had to defend his patent numerous times. After the patent ran out, numerous full time imitators popped up, some almost a direct copy, while others slightly different. Later, due to health issues he sold the business to Yakima Bait, and they are still being made using his name, with slight improvements as a metal grommet at the snap holes and in a more variety of colors. I became acquainted with Al thru the Gig Harbor PSA chapter about 1998 and have remained friends since then. He and his wife are now in an assisted living facility (2018).
Many new manufactures have came out of the woodwork now, some being existing tackle manufacturers, while others being backyard/garage entrepreneurs, some only slightly changing Al's design while others deviating a little. Hot Spot's version is longer and narrower with a longer shallower bent wing in relationship to the overall length. One is made of stainless steel, another of molded plastic rotating around a stainless steel cable. Another uses rounded corners and a more radiused bend. Shortbus pretty much copied Al's design but included a injected in grommet at the snap holes and offers many more colors, even customized if enough requests. One even has a counter-rotating inner blade.
| Miscellaneous copies of the Fish Flash. Top LH is out of business Hookin'up Enticer, top RH is a Delta Tackle from Canada, that Big Al had authorized. Bottom is Old Salty stainless steel Flasher | The Hot Spot Agitator, note the dual angled wings & more streamlined/tapered design |
|
|
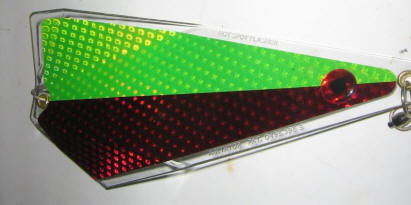 |
This article is not to downgrade the manufactured attractors, but many fisherpersons have been known to have their own ideas of preferred colors for their particular situations. Or, over time the original colors fade, or peel off, so this gives the fisher a chance to be creative by purchasing desired new colored reflective tape and to overlay the original color. However it can get expensive when buying new factory flashers, only then to purchase new tape just to experiment with overlaying the original color.
Make Your Own ; OK, enter the idea of making your own rotating flasher. Here if you are going to make a few for your own usage, I suggest that you copy an existing known design, like the Fish Flash at first, until you get the hang of things and want to expand your ideas. You can purchase 1/8" either clear or even colored Plexiglas, (either, which is not cheap by the way), but not bad in relationship to the final product's outcome. You should be able to find this at large lumber yards or glass replacement stores and may even be able to purchase remnants. Plexiglas comes with a self adhesive paper attached to both sides so as to not scratch the surface if being used for a window panes.
Do all of your marking for cutting and drilling on
this paper covering so you can lay out your needs as a way to decrease any wastage.
You will need some means of cutting it into size. An ordinary table saw will work, IF you use a fine toothed blade designed for finish work, otherwise course teeth fill fracture the Plexiglas a slight amount on both sides of the cut.
The normal sizes of these attractors are small, medium and large. The small being 6" overall length of the Plexiglas, medium 8" and the large 10". Of these sizes, I like to use the mediums for most freshwater/estuary usage and the large size for open saltwater. The medium may be upgraded to a large flasher or add another medium or small in tandem if water turbidity changes or gets worse.
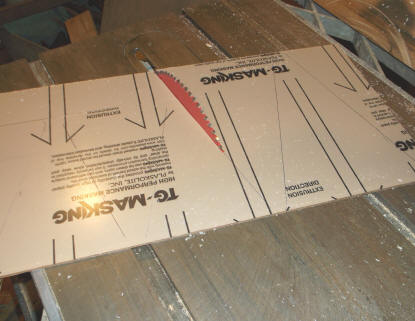
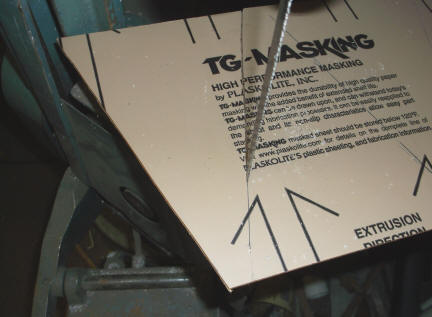
In the photo below, a table saw using a 10" fine cut blade is being used to cut the Plexiglas into usable sized sheets that can then later be cut to final size using a bandsaw. The bandsaw is less forgiving than the table saw if you do not have a steady hand, unless you intend to make a lot of these and build a cutting fixture and IF the teeth are fine enough to again not fracture the edges of the plastic. I have found a metal cutting bandsaw that uses 24 teeth per inch does fine. Most wood cutting bandsaws have a higher RPM and courser blades.
Shown here is what was left over from the 28" square sheet and is being utilized by making two 10" flashers and the other five on the left will be 8". The 3" strip on the rear will be made into smaller trout flashers, or mini rudder keels, utilizing as much as possible from the left over surplus. Notice the numerous teeth on the table saw blade.
| The large sheet being cut down on a table saw into smaller more manageable sizes | Here a metal bandsaw is being used to cut each individual flasher to size, not as accurate but more forgiving. |
 |
 |
Again, do your cutting and drilling before you remove this paper covering. One thing I have found is that is I use a template, and mark around it, but you need to allow for the saw cut, in doing this on the layout, I also mark an X on the side of the line I allowed for the saw cut, otherwise these finished flashers may vary slightly in size. Sure the fish would not know, but I would.
When drilling, do not force the drill unless you are backing the Plexiglas up on top of a block of wood, as again if you force it, at least on the lower 1/2 of the hole, you will break through and again fracture the Plexiglas. If you are making a number of these, a simple drilling fixture is helpful. The holes need to be about 3/8" in from the front and rear outer edges.
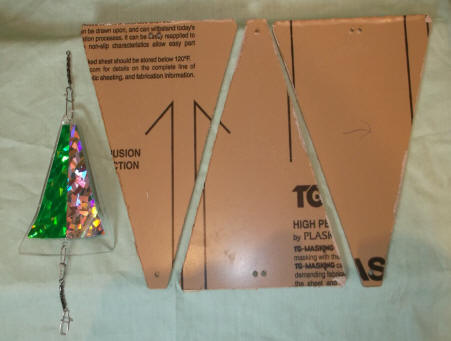
In the photo below you can see the sawed out and drilled blank Plexiglas along with a finished small trout attractor that was made from surplus material. You will also notice that some of these have two rear holes for attaching the snap/swivel, one being centered while the other is 1/4" or so off to one side. This will allow the flasher to be rigged so it will be pulling the lure a bit offset, creating a different attraction for the lure.
| Here are some of the flashers sawed & drilled before the protective paper covering is removed, with a smaller 4" finished one made from scraps on the left |
 |
To clean up the saw marks a medium grit belt on a band sander works great. Remove the paper Plexiglas covering, clean up any edge roughness with a medium metal file.
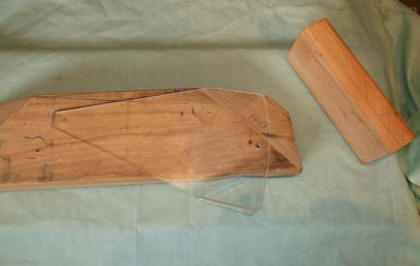
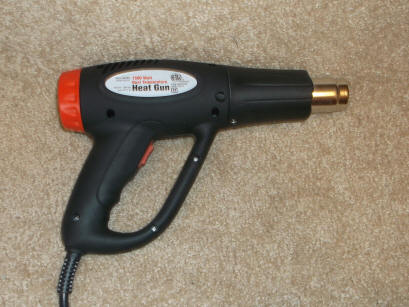
Now comes the bending process. You can use a cheap 1500 Watt electric heat gun for the bending process. But before that, you need to make a bending fixture. This can be made of wood, and a 2" X 4" works fine. This cut will be a compound angle. Again it may be best to use an existing flasher as a sample. Cut one end of your board at the desired angle. If it does not come out just right when the sample is placed over the board, re-cut or band sand until you are satisfied. You may even want to cut the other end of the wood on a 180 degree reversed angle so you can experiment with something different (RH or LH rotation) than what the fish may normally see.
One time, I asked Al (the inventor) why he made them rotate the direction he did. Simple, he is right handed and bending the wing that direction seemed easiest to do at that time
| Wooden forming fixture | Economical $14.95 Harbor Freight 1500 Watt heat gun |
 |
 |
Since this Plexiglas is
transparent, mark your outline on the wood for each size you will be making.
Also mark the location of the rear hole so you have a consistant reference mark. Once you
get your prototype to what you want, you may decide to drill a rear hole in the
fixture and drop a short pin in through the hole in the Plexiglas and into the hole in
the fixture so as to better secure it in this location.
Lay the Plexiglas on you wood fixture, hold it firmly in place and turn the heat gun onto high and with it close, but not so close it will melt or bubble the Plexiglas (about 1 1/4" works for me). Play the heat more onto the section that is in contact with the wooden fixture than the extended wing. Heat it up, and immediately, using another piece of smooth wood, press the wing down onto the lower fixture while still holding the front section in position. Hold it there long enough to cool somewhat and to have it maintain that position as close as possible. You will probably have to repeat this procedure a second time, again focusing on the bend area, to get it where it will lay against, or near the fixture. You want the inner edges of the bent wing to not come so close together in the center so that it does not disrupt or weakens the rear hole placement. Remember that the heat needs to be directed at the bend, or even a tad inward, if you want to get a good even bend.
Flop the Plexiglas over and do the opposite wing. When done, if the two wings are not parallel, reheat without the fixture and bend by hand, holding it there, eyeballing until cool enough for the wings to stay in the parallel proper position.
You can purchase self adhesive reflective tape designed for fishing tackle at most tackle stores. However be sure you get the brand that also has broken silver on the sticky side so when done the flasher will have reflectiveness on both sides, (one being colored and the other side usually broken silver pattern). This tape is made or sold under many different names and in many colors. The newer Ultra Violet tape seems to be more favored, if you can find it in the color that suits your fancy. Lay the tape where you want it, mark it, the using a good quality scissor, try to cut a bit undersize so the outer edges of this tape will be slightly inward from the outer edges of the Plexiglas to protect it from being torn off while being pulled in the water while fishing. Peel the paper tape off, being careful not to contaminate the adhesive or let it come in contact with itself.
Now install the reflective tape, being sure it is laid out so it will be straight and with no air bubbles under it. This may take a bit of experimenting before you get that down pat. If there are air bubbles, you may be able to press them out if they are small, otherwise, use a knife point, pierce a small hole in the tape's bubble and force the air toward this hole.
If you want to add a simple distinctive flash, simple electricians tape works well for applying diagonal stripes on the back side.
Add Duo-Lock #5 snaps and the swivel of your choice. This swivel could be a barrel swivel, bead chain or ball bearing swivel depending on your needs or desires.
What I have found is that if I am using these in the ocean where there is little debris in the water and you are covering a lot of territory, and pulling hardware instead of bait, where you may not pull your gear for a while or until you get bit. In this instance, I recommend using ball bearing swivels on the attractor. However if you are fishing a estuary or river where you will be making a pass and then pull gear in, and do this over again, bead chain swivels seem to function just as well and maybe even better. For one, you will have more debris in the water and a weed could incapacitate a ball bearing swivel, where the same weed may only effect 1/2 of the 6 beads. For a second thought, you will be pulling the gear oftener, therefore also inspecting for weeds oftener. However I do recommend a ball bearing swivel at the end of your mainline as this is needed to prevent twisted a mainline.
In the photos below, both photos are of the same flashers, just flopped over showing the opposite sides. The objective here being to create a distinct color or combination of colors to instead of having it just rotate, but also give off a flashing/blinking attraction. Note the diagonal black electrical tape and large round dots. The ones with 1/2 the side being black is also electricians tape. The light blue tape changes color into a pink, depending on the light refraction. It's color is named Moon-Jelly.
| Some factory and home fashioned flashers, RIGHT SIDE |
|
|
| Some factory and home fashioned flashers, LEFT SIDE |
|
|
You will notice in the photo above that some of these flashers have a large round "eye". These are placed on the back side of the flasher and it has been found that if this eye is placed on the back side of the contrasting colored tape that it shows up better when the flasher is rotating, kind of like the eye is winking. These eyes were simply cut out of the same tape but a dark color about 1" in diameter. These slight differences may just be the ticket to where you get your fish box smelly, or go home empty handed at the end of the day.
Another thing that you may notice is the hole on one of the outer wings. These are drilled using about a 3/16" drill bit. The purpose here can be twofold. One to create air bubbles which can be an attractor in itself, the other, you can tie a few of inches of colored yarn in the hole to give more attractant.
Another thing that can be made from this Plexiglas scraps is a trolling rudder or smaller flashers for use in trolling for trout or Kokanee in a lake.
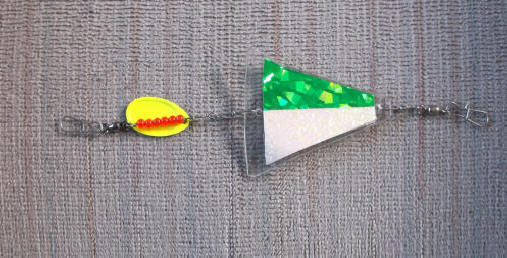
The flasher/spinner combo shown below, when attached to the rear of a kidney sinker when used for salmon mooching off a charter boat, can easily the odds and place your lure more attractive than all the other plain baits dangling below the boat.
| Here you see a smaller 3" mini - mini flasher with a spinner blade attached to the rear. |
 |
Another thing you can do is to make some with the
wing bent reversed from the normal rotation. This may offer a slightly
different view to the fish, which may trigger a bite. You can also make a
smaller flasher with the reversed rotation, place it ahead of a larger one connecting
them in tandem for added attraction.
Copyright © 2014 / 2021 LeeRoy Wisner All Rights Reserved
Back to the Ramblings Home Page
Originated 02-11-2014, Last updated
08-05-2021
Contact the author