
Basic Freshwater Fishing 101
 |
Basic Freshwater Fishing 101
|
 |
MANY YEARS AGO, as a young man (maybe I was 8 or 10 years old), I had the opportunity to watch closely (learn) one of my uncles, bobber fishing in an abandoned millpond that WDFW stocked catchable trout before each season. From this, I learned a lot about fishing from the bank in ponds and lakes. Our family also lived very near a creek (actually through our back yard), that eventually I learned by myself how to fish it, as my dad never really fished, and when I was growing up he was busy working to put food on the table for a family of 5 kids (me being the oldest).
But for those who may not have had the chance to at least be exposed to this addicting pastime, the learning curve could be so great that they may abandon the whole idea especially if you are trying to teach a son or daughter, which really need to be able to catch at least a few to keep them occupied, and for your own efforts.
I had not even thought much about doing an article on HOW TO FISH, until my grandson now has a family (2 boys 12 and 14, and a daughter 3). His fiancé mentioned they needed to get the boys some fishing gear and expose them to the sport this summer. This grandson was not the fisherman in the family, being the hunter, while his younger brother was the fisherman. With this, I finally began to realize just how many other families, or even single moms, may not have the benefit of a tutor like I did. Hence this article was born. Basically starting form GROUND ZERO and trying to relate in a manner somewhat hopefully easy to understand for the beginner.
Here we will initially be targeting bank fishing, as using a boat usually comes later when you get addicted, unless you find a friend that has a boat. And in targeting the single mom here, this bank fishing would probably be her first step. And if/when on to boat fishing, where tackle and gear could be similar but somewhat different.
| Start them young. Can you just see the determination on this little guy? |
 |
|
I snatched this photo off Facebook in 2016. It was taken at Fort
Borst Park in Centralia WA I have not been able to find the photographer. If you know who, or are them, please contact me so I can give credit & add a bit of info to this photo. |
From The Beginning ; On second thought, maybe I am biting off more than I can chew here as many of us experienced fisherpersons become rather humbled even though we have MANY years of experience by coming back from a day on the water with no fishy smell in the cooler. But you really need not measure the pleasure of the experience by the number of fish caught.
The most basic type would be a long willow or cane pole, with line tied to the tip and a hook which could be baited with about anything fish appealing, worms or a grasshopper may have been some of the first, and still viable baits. If you need to reach out farther into the water, then some sort of a line container would be required, (a fishing reel to store more line). These can be had in numerous styles, which are then designed to match the style of the rod and method of fishing.
Now we have a couple of slightly method differences, (1) Plunking, (2) Bobber fishing, where both could be called "Still fishing". Both have many similarities, like casting the bait out and waiting for the fish to find and bite it. The main differences are that with Plunking, the bait usually rests on (or near) the bottom with no strike indicator on the mainline. Bobber fishing can do the same, but with a strike indictor (bobber) floating on the surface of the water. With bobber fishing, you also have the ability to suspend the bait if seems to be what is needed (or if there are underwater weeds that you need to keep the lure out of). Another method (3) would be casting and retrieving, which may also require a different lure, like a spinner where you are trying to entice a bite. In this article we will cover all three.
Other than that gear (Rod, Reel, Line Etc.) are pretty much the same for all three methods.
And although this technique can also be used from a boat, although it's popularity by those fishing from shore cannot be overstated.
Reels ; For the beginner, it is usually recommended that a spinning outfit be selected, because of ease of casting farther with minimal problems. The usual problems with normal casting type reels would be the line becoming tangled, (especially for the uninitiated) officially called a backlash (but usually just called a "Bird's Nest") on/in your reel at the end of your cast. These can become exasperating in getting untangled.
There are 2 types of spinning
reels, (1) Closed face and (2) Open face. The closed face would be
more easily used by younger kids, as it is simpler to operate as it has one
lever that acts as a combo brake/release. However the open face is more
popular, especially when the kids get up to about 10 years old up to 80ish.
Using these to cast, the line from the reel needs to be held against the rod's front handle
with the index finger, flip the bail open, then cast, but time the finger
release to gain casting accuracy and distance at about a 10 O'clock position.
Releasing the finger too soon will send the lure too high in
the air, and too late splash in the water in front
of you.
They both will have a drag system to control
tension on the line. The closed face will usually have a
star shaped wheel under the crank handle, (or a dial
type wheel on the rear) where the
tighter (RH) rotation increases this drag. The open
faced reels could have a adjustment on the front of
the spool, or on the very rear of the reel body to do
the same. The normal method of setting these would
be to set them at about 1/2 of the line's braking
strength.
All reels will be rated in size by the capacity of
line they can hold, which will vary depending on the
line weight, and are usually labeled as such on the
reels.
| Closed Face -- Shakespeare 1766 model EE | Open Face -- Shimano FX 2000 (rear drag adjustment) |
|
|
|
For the closed face reels, they
are usually held in the strong hand if you are right
handed, cast, then
switched to the weak hand with the reel pointing UP,
and cranking with the dominate hand. With
the open face reels, the rods are held in the
dominate hand, with the reel hanging below the rod,
and cranked with the weak hand. Most of the
newer open faced reels now manufactured, you can
change the crank from RH to LH by removing the reel
handle, and inserting it from the opposite side.
Rods ;
Closed Face
and Open Face rods are somewhat different. Both
will have some sort of a handle, (many times made of
cork or EVA foam).
But the closed face, being constructed so the line
comes off the reel out of a small central hole, the
rod line guides will be smaller at the rear and are
essentially just a normal level-wind casting rod. In use,
the closed face reel will be held so the rod guides are
pointing UP, while since the open faced reel, (being
on the underside during all fishing) the rod guides will
be pointing downward.
The open faced reel rods are made in two grades, where the better grade will have a reel seat made into and between the rear handle section and the fore grip, that has metal retainers that attach the reel to the rod. Cheaper rods may simply have two metal rings that slide over the continuous handle, that can be pushed on over the reel feet to retain the reel. The open faced designed rods, will have larger line guides, (especially the rearmost ones). This is so that when the line is spooling off the reel spool when casting, it will come off in a larger diameter loop, therefore the rear guide needs to be larger so as to not restrict the line initially coming off the reel, relating to longer and smoother casts
Rods will usually be made of fiberglass material and in lengths of from 5' to 12', depending on the intended purpose, (bank fishing or boat fishing and also depending on the specie/size of fish targeted). Rods are also rated as to Light weight, Medium, Heavy, Slow or Fast action, AND also for which line weight they are designed to handle and weight of lure that could be used. Obviously a 6' rod/reel designed to catch trout or perch would be a lot lighter than a 10' or even 12' rod designed to catch Stripped Bass or Salmon.
Rods,
especially longer that 6' or 7' will be made in
sections so the rod can be taken down (usually 2
piece) and
transported more easily. For this type of
fishing most rods being used by newbies will be with
lengths in the 6' to 7' length. You may
see some 8' or 9' rods used, but, the cost is higher
and would probably be used by a fisherperson who may
be using their favorite steelhead rod here also.
For a link to an expanded ROD information article
CLICK HERE.
Line ; Most fishing lines now that are used on these beginning spinning reels would be Monofilament (mono). These lines are made and sold on spools ranging from containers of 1/4# up to 5# large size spool and in weights from light leader weights of 6# or even down to 2#. A 1/4# spool will normally fill 2 or 3 trout reels. But for mainline basic trout fishing, mono in 8# up to 12# should be sufficient. My standard mainline is usually 10 or 12# with a short leader to the hook/lure of possibly 6#.
Leaders ; Many times fisherpersons will tie the lower 2' or 3' with a lighter mono leader section. The purpose of this is twofold, (1) if you happen to get hung up on the bottom or snagged on a tree root or branch, you can break off this weaker hook end, while retaining the more expensive attractant gear. (2) In clear water as the season progresses, some fish can become leader shy, so a lighter leader, (being smaller diameter and less visible) can help hide the line to the hook/lure. However a 2# leader is LIGHT and any hard jerk even if a fish, can break the line, therefore most beginners would do well using 6# or 8# leader.
Fishing Knots ; Ordinary Granny knots do not work well when using mono line. The knot is the weakest part of any line system, as you will probably never find a knot that will tie at 100% of the line breaking weight, usually 80% would be an exceptional one. And unless you understand fishing knot tying, you may go on for years thinking you have tied a strong knot, but that is not necessarily the case.
One thing you will see many fisherpersons do is to wet the line by spitting on it or putting it in their mouth at the knot before pulling it tight. This is when using mono, that just the friction created in pulling the knot tight (many loops over the line and hook) is that you create friction, abating the line, creating a spot for it to break when under tension (like a big fish on the other end). Therefore the wetting with saliva is a simple solution.
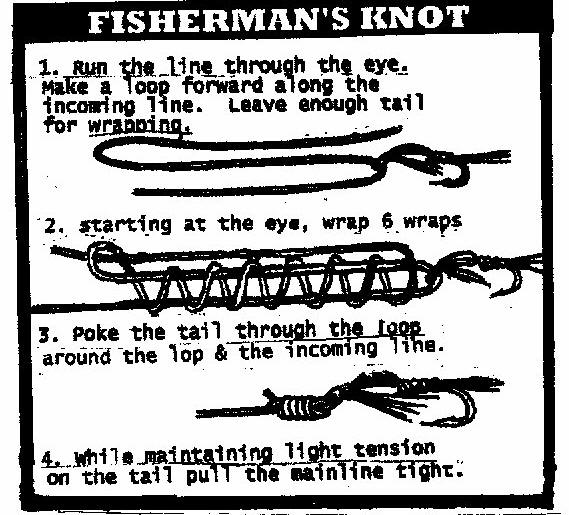
The Fisherman's knot shown below is an easy solid knot, however if you go to this article on Fishing Knot Tying, there are numerous others
Gear ;
HOOKS --
Fishing hook sizes range from VERY small at #16 up
to large at #1, and then the numbering changes for
larger beginning at 1/0 to
a 6/0 for salmon and then on to a 19/0
being a shark hook. The best size for trout or
pan-fish would probably be from #4 or #6.
Hooks are made in many different styles for
different purposes. Most hooks will have a
barb near the sharp point, better to retain the
catch. However some locations where the wild
(unmarked fish) are required to be released, are
required to have NO
barb, OR the fisherperson is required to pinch it down,
making it barbless. Some hook eyes are
straight with the shank, while others tip up or
down. Some are called "baitholders" which
will have small barbs along the shank, others could
be just the size of a single salmon egg and
designated "egg hooks", many being gold
plated and designed to be buried
in the egg whereby the fish can not see the hook.
For the beginner, buying a package of 10 or 12 "snelled"
hooks (usually with a 8" leader) is the way to go until you
get more used to the methods.
The number one rule to remember, that the hook is your connection to the fish and not all hooks are "sticky sharp" right out of the package. You need to check each hook, and the most popular method is to drag the point across your thumbnail. If it slides at all, sharpen it with a hook stone or file. When sharp, the point should immediately dig in without moving at all.
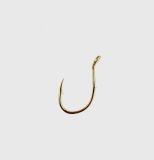
| CBait-holder hooks | Egg hook |
 |
 |
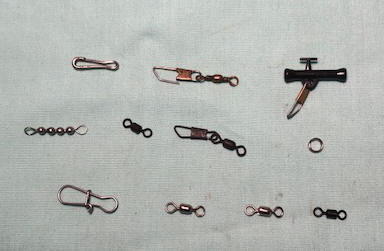
SWIVELS / SNAPS -- With all the different gear that can be available, you need to tie your terminal gear to the line/leader. Many times this can be tied directly as if you were using flies, but for much of the other lures, swivels and snaps are used. The snaps make it easy to change lures, if size or color of your lure does not entice a strike. If you are doing a lot of casting using a rotating lure like a spinner, you may need to have a swivel between your mainline and the lure to keep the chance of line twist from becoming excessive.
The item in the photo below top RH is a sinker slider. The black plastic part slides on the mainline, while a sinker can be attached into the snap. These can be used where you do not want the fish to feel the weight of the sinker as it bites, and the slider allows the line to move freely, but is captivated by the lure that may be laying on the bottom.
| Shown below are various trout sized swivels, and snaps |
 |
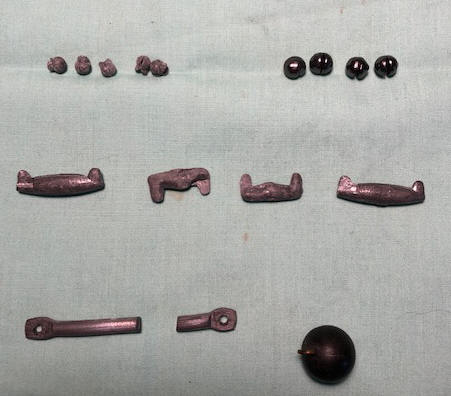
SINKERS -- Most weights (or sinkers) are made of some sort of lead and comes in many different configurations. They all will have some means of attachment to your line or tackle, either being a split shot that is crimped onto the line, or with an eye of either metal or cast into the weight. One is also Pencil Lead, which is made in different diameters and sold in spools. This version, you simply cut off the length you need, punch a hole in one end or slip it inside a small section of surgical tubing that is then attached to a swivel on your line. Some are designed to be a slider even have a hole thru the center allowing it to be slid over the line.
One of the uses of sinkers would to also add weight to your casting lure so you can achieve a longer cast / and or get the bait down and not floating on top of the water. Another, if you are fishing in flowing water like a river, the weight is needed to get and keep your lure deeper in the water.
Placement of sinkers on the mainline would usually be above the lure enough so as to not hinder it's presentation to the fish (usually a couple of feet above the lure). In the photo below the top rows are "Split Shot", that can be pinched onto your line. The middle row are larger versions where the line is inserted into the groove and the ends are folded over. Bottom row left are pencil lead with a hole punched into them and the far RH is a 1 oz cannonball with it's cast in eye.
|
Shown below are various lead weights or
sinkers used for trout fishing |
 |
BOBBERS -- Otherwise known as floats, are simply some form of a small floating device that is attached to the line to (1) hold the lure at a specific depth below the water's surface (usually out of the weeds), and (2) as a strike, or bite indicator. Bobbers could be as simple as a used wine cork, or made of wood, Styrofoam, hollow plastic or anything that would float. They are usually painted a bright color so that you can see them under most any conditions. Some are attached to the mainline by a simple spring activated hook, that can be readily removed, while others may need to be threaded onto the line and attached by a peg. Positioning the bobber on the line will usually be trial and error, trying to keep the lure from tangling in bottom growing weeds or in a known fish traveling path. Sometimes just a couple of feet above the lure is enough.
Sometimes if the bottom is not weedy, you may want the bait on the bottom, so in this situation, position it higher and use it only as a strike indicator.
Some bobbers are designed to be filled partly with water to add weight, which then allows you to cast farther with a lighter/small lure.
|
Shown below are various floats used
for various methods of float fishing |
|
|
In use, IF there is minimal slack from the float to the lure, when a fish bites, you may see this bobber bounce a few times if the fish is just nibbling, but when the bobber goes under the water and starts moving off, the fish has it and may already be hooked. Usually at this point you need to wake up, grab your rod, lifting the tip enough to put tension on the fish, automatically setting the hook. If you allow TOO MUCH SLACK in the line laying on the top of the water, from the rod tip to the bait, you may not detect that slight bobber movement when the fish is stealing your bait, and miss your chance at hooking one.
It may help if not illegal, is to use more than one baited hook. Some states allow 2 or even 3 hooks to a line, depending on location and body of water, so check your regs on this one.
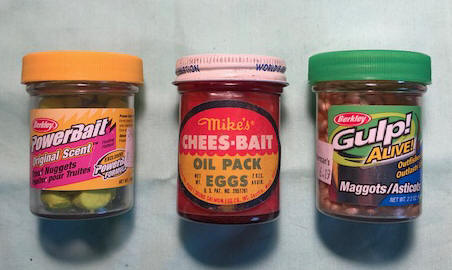
BAIT -- Here bait can be a multitude of things, natural ones being worms, cured salmon eggs, grasshoppers, even miniature marshmallows or cornel corn, to artificial stuff, by many manufacturers like Berkley PowerBait or Gulp. This artificial stuff comes in different colors, some in a jar of a consistency like peanut butter, while others are individual bait sizes, some even simulate grubs, maggots or worms. Many of these artificial baits are made so they semi-float, this being if you are fishing on the bottom, the bait will raise up enough to clear the weeds, or at least put it up off the bottom enough that the fish have an easier time seeing it along with having a enticing scent.
| Shown below are various prepared trout baits |
 |
You will probably need to use a sinker to be able to cast it with, and a bait that has some buoyancy that will lift the lure off the bottom and more in line with the fish's travel pattern. For plunk fishing, put a sinker a couple of feet above the bait, (which needs to be floating or lifted off the botto), like Berkley Power Bait, a couple of these nuggets on the hook will float it up into the fish path (out of the weeds) and at the same time not give any resistance to the fish.
The bait of
choice if fishing for recently planted hatchery fish can be Berkley Power Bait
"Hatchery Formula" and fished on the bottom with
6" dropper and 2' leader.
What this means is this bait floats, so but a 3 way swivel on the end of your
line, a 6" dropper line to the sinker, and on the 3rd eye of the swivel 2 feet
of leader to the hook. What this does is raise your bait up off the
bottom. The floating bait will lift the hook up off the bottom being in a
better location for the fish to see it and above any weeds if they are there.
In reference to the above Berkley®
PowerBait® Hatchery Formula Trout Nuggets, if you can not find them, try to find
a location that sells pellets used for commercial ally raising trout or salmon
and pulverize some, making a powder. A cup full would last you for a
LOOONG time. These pellets are usually about the size of a wooden
match stick, and can easily be pulverized. In use, coat your bait with a
liquid or gel scent, then dip it in this powdered fish food. This will add
to your odds of catching planted hatchery fish in a lake, as that is the same
scent as the food they have eating.
Cocktail
Shrimp are also a very good bait, but as they come
from the can, they are mushy enough so they don't stay on the hook well, so put them in a micro-wave for about
a minute to
toughen them up. This only applies to the canned variety, as fresh or frozen
should be OK without the zapping. I have also cured
(toughened ) them in salmon herring brine, where you
can also add different scents or colors.
Some baits are even small marshmallows soaked in scent. Marshmallow baits may need to be trimmed down so they do not engulf the hook so much that it is ineffective. Here if you are using more than one hook, is to diversify, using Power Bait on one hook and shrimp on another. You could use one to lift it up and something else until you found out what they are biting on that day.
One thing when using natural live worms, DO NOT use the whole worm as like the bass fisherpersons do, but break it into smaller bite sized sections, (1/2" long or less) otherwise it is so big that most panfish or trout do not have mouths large enough to get the hook in their mouth, and you are just feeding the fish and they will seldom become hooked.
One important thing to remember is that once you open these jars of bait, just screwing the lid back on may not be good enough to keep them from spoiling after the day of fishing, or loosing the sealed in scent. The old way of resealing a jar of salmon eggs (or any other bait), was to use one of the old wooden matches, poke it down into the remaining eggs, but just below the jar lips (you may have to break off part of the stick to gain this distance). Using another match, light the poked in match on fire , AND VERY RAPIDLY screw the lid back on. This method simply burns out any captivated Oxygen, thereby re-preserving the contents. Lately the newer method is basically the same, but instead of using the first match, use a small amount of wax paper.
SCENT --
You will find natural scent and artificial scent,
the natural would be like shrimp or crayfish, where
the artificial would be like Garlic or Anis.
Both have their followers dictated by the fish, and could change day to
day. Most of the time a little goes a
long ways, just like perfume on a beautiful lady. Scent
smells can be so numerous that it can get confusing,
but pick your poison and experiment.
Some of these scents are more of a thick liquid,
while others are a thick smear on gel type of jelly or
Vaseline.
The liquid type is more suited for applying to a
feather or foam lure, while the jelly type can be
applied to metal / plastic lures or attractors.
There will be so many scents available that the
average fisherperson may be confused.
Sometimes it seems that the availability of scents
AND colors of lures is more to catch fishermen than
fish.
One thing that these do, is that some people who sweat a lot, excrete an enzyme that repels fish, so when using scent under those conditions, you may have masked your bad smell, which could improve your catching.
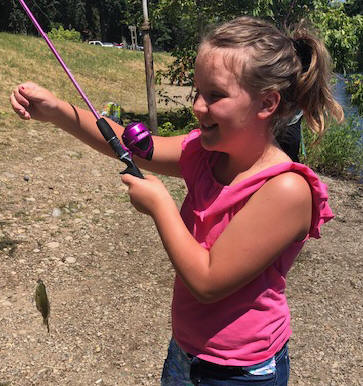
| Happy young lady with a small bluegill, but it was fun |
 |
SPINNERS / SPOONS / PLUGS -- The above bobber and bait section would usually be associated with "Still Fishing". But if using spinners, spoons or plugs, you normally would NOT use bobbers, but simply cast out and reel back, using the action/attraction of the lure to entice a bite. You notice that I said "NORMALLY",
One thing when using these types of
lures, do not cast out and simply reel back in. But try to reel in in a
erratic manner, like twitching the rod tip, or reeling in, then momentarily stop, allowing
the lure to drop, anything to create a unusual action to your lure on your
retrieve and yet not get hung on the bottom.
Lures are mostly designed to imitate small bait fish or insects by their action
of being pulled through the water. Others like the spinner shown top RH
seem to just be an attractant and the fish then when near sees/smells the worm
on the hook.
| Shown below are various trout casting spoons or spinners |
 |
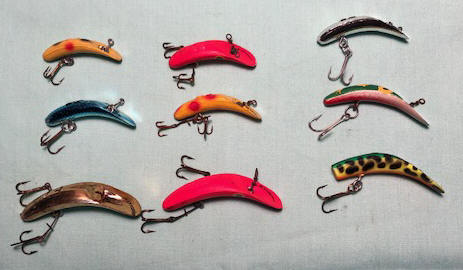
Shown in the photo below are
trout sized plugs. These are all one brand, namely a "Flatfish" and in
different sizes. The smallest is a size #3, with some being #4, #5, #6 and
#7. You will notice that the hook sizes vary on the plug size, and then
some of the older smaller that have 2 triple hooks are considerably older than
the ones with the single triple hook of the same size. Colors do dictate
at times which the fish like. Some are designed to imitate bait, while
other brighter colors seem to incite a aggressive /defensive mode to the fish.
These all wriggle a lot when pulled through the water.
| Shown below are various trout sized plugs |
 |
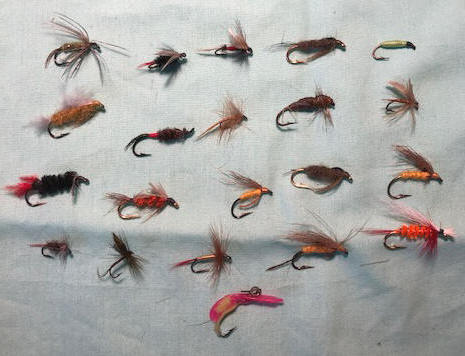
FLYS --
Here, I am not talking about live or even dead bugs, but hand tied
imitations. Many fisherpersons may be misled
into thinking flies are only used by those elite who
use expensive fly rods and reels, wear those funny special hats
and chest waders that cost upwards to $400, act
like they own the water and talk in a different
language. NO, here flies can be
also used under a bobber, but being cast out and slowly
reeled in using a small jerking motion as to imitate
the bug swimming or trying to move around.
| Shown below are various trout tied flies, some dry (floating) while others being wet, all trying to imitate a wild bug/fly |
 |
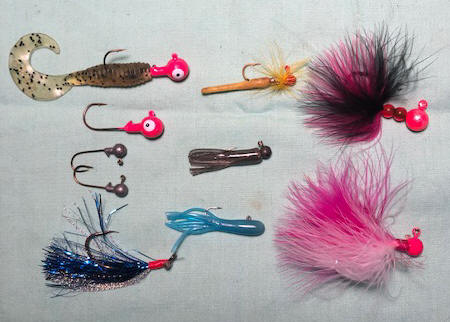
JIGS -- Another method of fishing can be using jigs. These are usually a combination of a lead headed hook with a attractant body/tail, which could be plastic, hair or feathers. For trout, they come in different size weights, from 1/16 oz to the largest seen here being a 3/8 oz. Use the smallest size to achieve your casting / depth requirement.
These are intended to simulate a swimming grub of many sorts. The two on the right are made of Ostrich marabou feathers, which when wet, loose their fluffiness and become more of a live minnow fluxuating as it moves in the water. They are usually fished differently in that they are cast, then rod is slightly lifted, the reel reeled for a few seconds, the rod tip dropped again, causing the lure to skip across the bottom.
| Shown below are various trout sized jigs |
 |
RIGGING -- OK, now you have been exposed to the tackle, just how do you connect the dots? Let's initially use the most simple rigging as possible. After you have threaded the line from the reel, thru the rod's guides, starting at the rear (closest to the reel). Pull it out far enough to tie a combo swivel/snap onto the end of the line. Snap a snelled hook leader's eye into the snap. Above the snap crimp on a split shot sinker. On the mainline 2 or 3 feet up from the snap, attach a plastic red/white bobber. These have a plunger that on the other side have a small J hook that can be attached to the mainline and moved by sliding up or down.
METHOD -- Once you have your gear all ready to fish, casting it out onto the water is a prime prerequisite to catching fish. For casting when spinning usage, the best is to reel your lure/weight so it hangs about 1 foot below the end of the rod tip. This gives you a better advantage than having it right at the end, or 5 feet away.
Depending on the type of spinning reel you are using, you need to secure the line at this location. For a closed face spinning reel, simply push in on the thumb lever, which holds the line at the reel. For the open faced spinning reel, you need to place you rod holding hand index finger on the line in front of the reel and pinch/hold it against the rod's fore grip, then flip the reel's bail open until it locks, (if it doesn't want to hold it open, rotate the spool slightly).
You do not have to give it the baseball bat swing, usually a flip of the wrist can be all that is needed, however some people add a bit of a swing (either side or overhead) along with the flip of the wrist. To cast these reels you have to time the finger release to gain casting accuracy and distance. Therefore it is best to practice in your yard or a park lawn. It does not take a lot of practice to get the hang of it and still be able to place your lure somewhat close to your intended location. All the more reason to do your first experience in a back yard or field. Then when you move on to pond/lake, (where others may be watching) where if the lure makes it anywhere to the water you have accomplished part of the learning curve and you don't look like a idiot.
One thing to take into consideration is the wind. It may be hard to cast into the wind, usually making shorter casts. But if you don't, and your distance below the bobber to the hook is short enough to not allow the bait to rest on the bottom, the wind will blow your bobber, making for a short drift.
Later you can become more accomplished and can be able to cast to a specific location as if fishing a river as to specific locations where fish are more likely to be resting (like behind rocks or logs, or seams between fast and slower water).
One thing to think about, do not make a lot of movement/noise or splash in the water. This would be something the fish may become spooked by and move away into deeper water or under brush as something as a form of protecting themselves.
One thing the beginner needs to be aware of, is "What is Behind YOU ?". By this, I mean when you are casting, be sure that your friend is not behind you to get hooked, or there is no brush or overhanging limbs that your lure/line can get hung on as you are making your backswing. Been there - Done That, as I broke the tip section of a new rod on the second cast, Steelhead fishing.
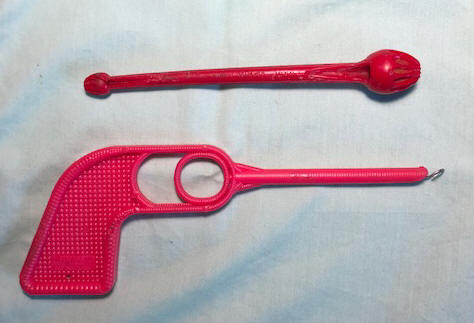
DE-HOOKER -- When you do catch a fish, they may have the barbed hook imbedded in a jaw or throat. Sometimes it is hard to remove the hook, so there are various forms of de-hookers. The other method is to use long nose pliers, but to each his own.
| Shown below are two of the types of de-hookers |
 |
The section below was snatched off the Berkley information page and explains Plunking quite well.
"Catching trout requires a little know how with
quick limits likely for those having an understanding of their chosen fishing
method – in this case the still-fishing when using PowerBait.
It’s so Easy:
Cast out,
allow your outfit to sink to the bottom, wait for a bite, and set-the-hook when
your rod tip dips toward the water. It’s important to leave some slack in your
line, so trout can swim off with your bait and swallow it without feeling line
resistance before you yank back on your rod tip to set the hook.
Important! When using
PowerBait you can greatly increase your success by using the right amount of
dough trout bait in combination with a Lil’ Corky single-egg-imitation such that
your bait will float above bottom so cruising trout can quickly see / find it. This is fundamental to success and often results in quick limits! The buoyancy
of your Lil Corky single-egg-imitation will take the guess work out of how much
dough bait is the right amount to float your bait.
When rigging a Lil’ Corky/PowerBait combination, use
a ball of PowerBait slightly larger than your Lil’ Corky. We can tell you, based
on extensive testing and observation of underwater video footage, that you will
catch far more fish if your Lil’ Corky and PowerBait combination floats
side-by-side in the water column.
Selecting the Right Leader Length:
Leader length is important because, after all, you want your bait floating at
the depth the fish are cruising, which might be close to the bottom during times
when the water is clear and sun bright, higher in the water column during the
spring - when water temperatures begin to warm - early and/or late in the day,
or on overcast days. And while the average leader length should be 18-to-24
inches, a leader long enough to extend above bottom-growing vegetation might be
the ticket to success when trout are swimming just above the weed tops.
Rigging is Easy: Simply thread your main line (extending from your rod tip) through the hole in your oval egg sinker, add a small plastic bead, and tie your line end to a size ten (10) barrel swivel. Then attach your leader (18-to-24 inches), complete with Lil’ Corky threaded on leader above hook, to the free end of your swivel end, then mold a ball of PowerBait around your hook.
Note: A size 12 treble hook should be used in
combination with a size 12 Lil Corky, and size 14 treble with size 14 Lil Corky
bait floater.
Terminal Tackle You Will Need:
1) Selection of size 12 and 14 Lil’ Corky floating
egg imitation/bait-floaters; the most popular colors being pink pearl, red,
orange, pink, sherbet, clown, and (for night fishing - where legal) luminous
flame.
2) Selection of size 12 and 14 treble hooks.
3) Selection of ¼, 3/8 and 1/2 ounce “Oval Egg”
free-sliding sinkers.
4) Size 10 barrel swivels.
5) Size 4 and/or 6mm plastic beads
6) Spool of four (4) or six (6) pound test
monofilament or fluorocarbon leader material. Fluorocarbon leader material is
less visible to fish.
SUNGLASSES -- Polaroid Sunglasses are beneficial for 2 reasons, (1) to protect you from the sun's reflection off the water. (2) They also enable you to be see better into the water, removing the reflection off the surface. Many times you can see fish in the water, and these help you know where to cast to.
ROD HOLDER -- Many times, you will have a laid-back lazy time here waiting for the fish to come to your lure, so standing or even sitting holding onto a rod, can become tiresome. And with the bobber as a strike indicator, it is not really necessary to hold onto it every minute. Therefore some form of a rod holder is needed.
The most rudimentary would be a forked stick pushed into the ground to hold the rod's forward section upward. Simple home made ones could be made of PVC pipe, or purchased ones using a metal spike attached to a cheap boat type rod-holder. One thing that you should do however is to reel in slightly so that the line to the bobber is fairly direct, so that WHEN that bobber goes down, you do not have to reel in a lot of slack line before you actually connect to the fish. If the fish was not hooked well, and you gave it a lot of time, it might come unbuttoned from the hook.
|
On the left is an old commercial rod holder & on the right, a home-made one |
|
|
|
LANDING NET -- Depending on the shoreline, a landing net may be a good investment. It does not have to be an expensive or large one, but a long, 36" handle may be helpful with a 15" or so, size net. And depending on the size of your fish, if the shore is a sloping gravel beach, you can simply pull the fish up onto dry land. However if there is grass. weeds or even trees OR a steeper bank, a landing net is helpful. If the fish is small, like under 10" or so AND it hooked well, it is possible to simply lift it out of the water and onto the bank.
STRINGER -- When you catch a fish or two, just letting them lay on the bank may not be wise, as sometimes, they flop around enough and since banks usually slope into the water, your prize may just find it's way back into the water and freedom or partly dead. Having something to attach to the fish can be beneficial. This could be as simple as a short section of small rope or twine. Or manufactured ones are available using a light chain with large snaps attached along the length so you can snap it onto the fish's mouth or gills.
To keep the meat better, it is good to cut the fish's gills, allowing it to bleed out, making for better tasting eating.
ICE COOLER -- Now, depending on the weather if you are planning on eating your catch, taking care of it properly can improve the palatability. Here a small ice cooler comes in handy. It may be best to have some form of cooling, like a re-freezable ice pack, or even freeze a couple of water bottles work well. It is good to, once the fish is dead to wash it off before putting it in the cooler. You can of course also use this to keep your favorite beverage cool.
FOLDING LAWN CHAIR -- This could provide added comfort.
You will find so many accessories available to the fisherpersons, that sometimes it seems ridiculess. And at times it seems that the one being hooked may not always be the fish, as lures may come in many different sizes and colors that may be to attract sales and not really bites.
LOCATION -- First off, the one thing needed here is WATER that has a good chance of holding fish. This could be a small farm pond, freeway barrow gravel pit, lake or reservoir behind a dam. Many state Department of Fish & Wildlife agencies can be very helpful in supplying locations of these potential fishing sites. Some locations may also be where these departments may stock catchable fish.
Depending on the geographical area, the specie will vary. Fish like to stay comfortable, and top waters will be warmer than water nearer the bottom. And some waters may be warmer than others, (shallower and warmer, or deeper and cooler or with a creek/river running into it, making it cooler). All this in turn dictates the specie of fish that may be caught. Some cooler waters may only have trout in them. Other warmer waters may have Crappie, Perch, Bass and Catfish. Each specie dictates the method and or lure to be used. However a worm seems to be pretty universal.
Arriving at a new lake or impoundment may be intimidating to the newbie. If there are others fishing there, explain your situation to them and ask for advice. Most fisherpersons will be more than willing to help out a newbie. But first ask if they mind if you share the bank with them (but not REALLY elbow close).
If the area has a dock, try fishing off it as many times fish may use it for cover or to get a way from the bright sunshine. If it is a reservoir, try fishing near the dam as here would be a flow where food would be coming to the fish, or a small inlet creek mouth, instead of wearing your arm out trying to cover barren water. If the water depth goes from shallow to a deeper area, fish this edge. If your efforts go unrewarded in one area, move to another, as most fish run in "schools". Try fishing your lure at different depths. And add some motion to your lure by twitching the rod tip.
Some areas may be barren of fish, for reasons not readily understood. Some could be too shallow in that area, or too weedy for the fish to find your bait or even if a good area the weeds may be so thick, you would have a problem even landing a fish if you hooked one. And if you can find a underwater spring, that in the summertime provides cooler water, that would be a desired prime area.
Many fish like trout and yellow perch may tend to school up, (and usually each school will be of the same general size a fish) and they will usually travel around until they find food. That being so, they will move around, usually circling a pond or lake. Then as they tend to grow larger, this schooling seems to somewhat dissipate.
If your state allows chumming, you might try to throw a bit of food out into the water near where you are fishing, to attract them. However not enough to let them gorge and therefore not be interested in biting your lure.
Fish have no eyelids, they seem to disappear into deeper water as the sun comes out. But on a cloudy day or ripples/waves on the water they may stay closer to the surface.
Some fish will only bite a lure that represents a natural food for them, be it a fish egg, worm, bug or small fish. Others may bite a larger bright lure where they may be aggressively trying to chase it off from their "Home Ground Area". Others bite things that seemingly represent nothing apparently known on this planet. Sometimes lures are made in sizes and colors to attract fisherpersons.
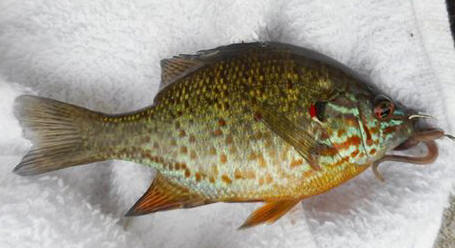
AND THE RESULTS -- All your preparations need a happy ending, to keep you or your kids interested. Here the young man in the photo on the right caught a nice fish, but initially thought he was hung on the bottom.
| 14" Rainbow trout | A nice Bluegill |
|
|
 |
COOKING -- Part of the benefits of catching a fish or two is being able to eat them. However you probably had better clean it first. Here, the normal method is to using a knife, holding the fish on it's back, enter the knife in the anis, and cut the belly open as far forward as you can go, (to the gill covers). Using s ordinary table spoon, scrape out the innards. Cut the head off behind the gill covers, and wash off any blood. Cut off the fins.
On small fish with small scales (trout to 16") you do not
need to skin them as it is easier to do that after they are cooked. For "panfish"
that have larger scales (Crappie or Perch) they are probably best to be skinned,
unless you like picking scales from your teeth.
Larger fish works best to fillet them.
CLICK HERE for a link to filleting
saltwater Rockfish (sea bass).
The method mostly used is frying. This can be done by rolling the fish in
flour and using a frying pan that has a small amount of vegetable oil added,
cook until done, usually a golden brown. Do not overcook.
Copyright © 2017 - 2020 LeeRoy Wisner All Rights Reserved
Back to the Main Ramblings Page
Originated 05-18-2017, Last updated
11-18-2020
Contact the author click here