 |
Razor Clam
Digging & Tricks of the Trade |
| A Real Clam Gun designed for precise digging |
 |
Razor Clam Digging History ; What is a Razor Clam? This meaty Pacific razor clam lives on inter-tidal coastal sandy beaches. Here, a low (preferably a minis) tide is the time to dig, as these clams live in sand that is normally under water. Digging time can be from an hour before low tide, and then onto the incoming tide. Usually from about October through April, is the time of the year digging is allowed in Washington State.
Here, to prolong the season, they have either morning digs or afternoon digs. Morning digs seem to be early spring/summer, then moving to afternoon digs for fall and winter. Morning digs are the simplest, as just show up and start the show on the road.
Afternoon digs require additional preparations, in that you will
need some kind of a light, identifying your vehicle in the dark,
and being able to exit the beach without becoming stuck in the
sand at a entrance ramp.
Safety ;
Here you need to adhere to being very observant, ESPECIALLY if
youngsters accompany you. They can disappear very
quickly if you are preoccupied and water seems to attract them.
Sneaker waves could knock them down and be carried out to sea.
Also for you the digger, IF CLOSE TO THE SURF, NEVER turn your back
on the ocean, for the same reason as stated above.
Clothing ;
I have dug on bright sunny days where flip-flops and tee shirts
were the order of the day. Then just the opposite as low
tides are known to present themselves during rainy/windy days,
where rain gear would be appropriate. However one
highly recommendation would to always have spare clothing back in your
vehicle.
Then depending on your method of digging (shovels as compared
to guns) also make a difference. Using shovels, you WILL
many times need to "Go For Them" sometimes clear to your
armpits. Here I may be wearing a vest, but I have
found it best to wear a sweatshirt. This way, the digging
sleeve can be pulled up higher at a moments notice and then
lowered if need be.
Using guns, is a lot different, as you hardly ever have to
"Go For Them", and if you do it will nt be on your knees, therefore you could be bundled up in winter gear
without hindering your digging/retrieving.
Night Digging with Lights ;
Here, things are different, not just a flashlight. With
too much direct light, the shows simply disappear, so a indirect
light is beneficial. You will see a mired of lighting
here. Some may use a small 4 legged stand with a propane
lantern attached on top to locate the shows. But then,
being able to see what you are doing during the dig leaves
something to be desired.
Some diggers simply work in pairs, one running the light, the
other digging and then trade off for the other's limit.
The simplest for an individual digger is to use a large
adjustable focus flashlight with a long strap tied to each
end that goes over the diggers neck and hangs at a level of the
lowered hand. Here the digger has easy control of
the light, shining somewhat horizontal to the beach, and yet
attached to them during the digging process. But again loosing
sight of the show while digging, which can be remedied by a
battery powered headlamp. I have also seen a similar set-up
but the digger using a belly mounted floodlight.
Locating
Your Vehicle ;
Here for night digging many use a magnetic flashing flashing light sometimes seen
on mail carrier's cars. However,
you may have to be inventive as other diggers may also be using
the same.
For daylight digging, tie a few bright colored ribbons on your radio antenna,
You will be surprised how may vehicles look just like yours as
you try to walk back down the beach, and you can't remember
which direction you wondered while chasing those elusive
critters.
Locating
the On Ramp at Night ;
This is probably the trickiest, as if you miscalculate even by a
few feet, your vehicle may become stuck in soft sand.
Following other drivers may or may not be appropriate here.
A GPS with a tracker, allowing you to locate where you entered
the beach may be beneficial. I have even thought about as
I exit the ramp onto the beach to drive a flagged stake into the
sand.
| Here you see a typical day on the beach of clammers |
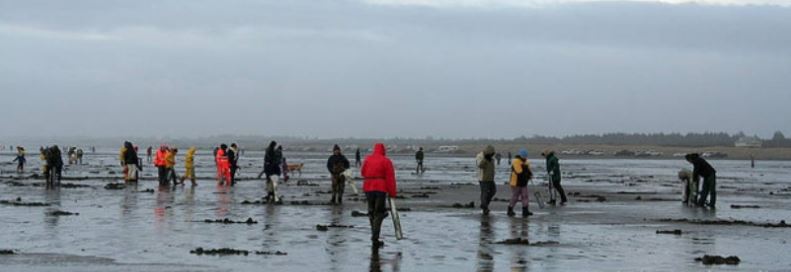 |
Razor clamming is a popular recreational activity for all
ages, and it’s easy to see why. It’s fun, it’s fulfilling
to forage for and prepare your own found food, and razor clams
are delicious!
Clam seasons are set by the Washington Dept. of Fish and Wildlife,
in conjunction with the Dept. of Health, which monitors for Domoic Acid. Seasons / days are tentatively set,
then verified by the DOH, whether to open or not depending on
the toxic level.
| Here you see different beaches in Washington State |
 |
In Oregon, razor
clamming is regulated by the Oregon Department of Fish and
Wildlife, but they do things quite differently. Beaches
are open from the California border to Tillamook head
year-round. Beaches from Tillamook head north to the South
Jetty of the Columbia River experience a seasonal closure each
year from July 15 -September 30. Beaches can be
closed to all harvest in the event of a biotoxin closure, so
always call the shellfish hotline at 1-800-448-2474 prior to
harvest. Clatsop beaches (Columbia River to Seaside) have
the most abundant populations–95% of Oregon’s razor clam digging
occurs here.
In both states, it is illegal to discard any clam, broken shell or
not, for whatever reason. Any clam that you dig counts
towards your limit of 15 clams per day. Which means, you
keep the first 15 you dig.
Clamming is relatively easy, all you need s a clam shovel or
tube, a bucket to put your clams in (one bucket per person) and
your clamming license. Kids will especially enjoy the task
of finding the “clam shows,” or the characteristic dimples, or
doughnuts in the sand that indicate a submerged razor clam as
seen in the photo below. It has been thought that the
bigger the show the bigger the clam, where many old time diggers
will only dig the larger shows (however, most generally that is
true, but not always).
| Three different types of clam "shows" with a dime for reference |
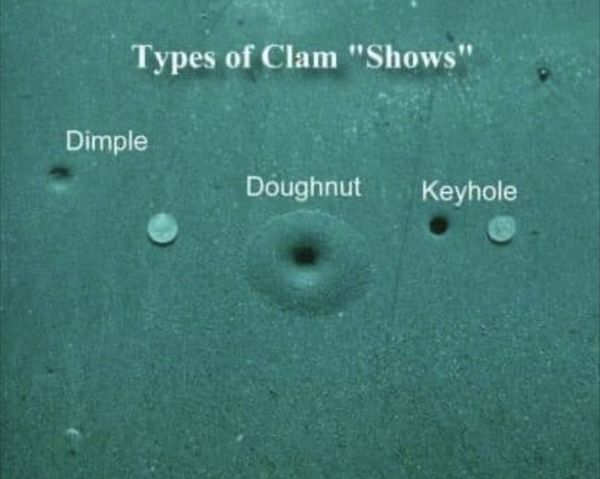 |
Many times, the clams refuse to show, so to induce them to perform this needed duty, many people may stomp very hard, walking in circles while looking behind them to see if that prompted a show. You can also stomp using your shovel handle or gun. Some even use a long wooden dowel or small tree, these may even tie a long cord to the stomper so that during the digging they do not have to be concerned that it may decide to run away.
The worst conditions to dig (in my mind) is when it is raining, where there is water standing on the beach, even well above the common near surf areas. You simply cannot see the shows which are still there, but covered with a layer of rainwater. One digger said he simply stomps repeatedly in small circles, which seems to allow the water to dissipate, exposing the clam shows.
Most digging is on the dry beach as seen in the photo above in the beginning of this article, however there is another twist here, and that is digging in the surf. Here the digger, (usually wearing chest waders) will walk out into the receding water, watching for small ripples. What is happening, is the clam is "Necking", with it's neck protruding from the sand just enough to collect food washed off the beach. Or they will move outward a bit more into water maybe 6-8" deep, where the vision into the water is better and the digger is able to actually see the clam neck. What is showing, looks like a small multi-fingered star. Here the digger needs to act FAST, as getting the clam ASAP is imperative. The issue here is SAFETY, YOUR SAFETY. NEVER turn your back on the surf.
West coast razor clam digging typically used to be done with specially designed
clam shovels for MANY years. The old standby shovels were made by
True Temper and were forged metal, and are no longer made. Later cheaper ones
(still in production) were stamped, formed sheet metal, which never achieved the
blade arc of the older versions. Most older
ones came with short wooden handles, because the digger
would be on one knee and the need for a longer handle would be a hindrance.
These shovels were made in two shovel lengths,
a long and short spade. These long spades were 5" wide at the rear, 3 1/2"
at the bottom and the spade had a pretty good inward curve, and 11 1/4" overall
length of the spade. The short
spades were about 3" shorter. The overall length of the long shovel was
35" from the tip of the spade to the top of the handle.
In
digging with these shovels, they are NOT used as a normal shovel fashion.
Here the digger inserts the shovel about 4" away and on the ocean side of the clam show
dimple, pushes the shovel down in a slight inward arc. Then instead of
rocking it back like digging a ditch to take out the sand, he (she) lifts the
shovel straight UP and possibly slightly forward, pulling out a slice of sand.
Then the second motion is another repeat of the first in the same hole, but with
the front of the spade about 1 1/2" closer to the show dimple, bringing up
another slice. Depending on the depth of the clam, possibly another pass
may be required, HERE the object is to, with each pass, to move closer to the
clam so that the digger can feel the shovel's tip scrape the back of the clam.
At this point, disband the shovel use, and go in with your hand where the shovel
spade was, find the clam
and pull it out. If you missed, or it was deeper, dive in and using your
hand, pull handfuls of sand out, dive in again and do a rotational search for the little bugger.
A slightly modified version of the above is to dig on the side of
the show, go down and then reach to the side that the show was on to find the
clam. This is the usual method used by commercial diggers, ensuring
non crushed clams. This may a better way for a novice, ensuring that the clam would not
be damaged.
Clams will be positioned with their backs to the water, so when using your shovel
on the seaward side, if the tip scrapes the back of the shell, it will
not damage the shell because the backs are thicker at the hinge than the open fronts.
If you use these long spade shovels as a NORMAL DIGGING spade, you will break the spade/blade in the middle AND/OR also mangle the clam. I never did figure out what usage the short blades spade was good for, unless you used for clams other than razor clams, like butter or horse clams, or possibly digging a ditch.
Since these shovels are long obsolete, and when I broke the handle of my True Temper after 70 plus years of usage, (I bought it in 1954) I almost cried, as these handles were not available anymore. I was not about to abandon this old friend, so I made a new walnut (the wood I had on hand) handle on my metal lathe, copying the shape and length of the old one. As these handles were contoured larger at the end and not simply a cut off long handle.
| True Temper clam shovel |
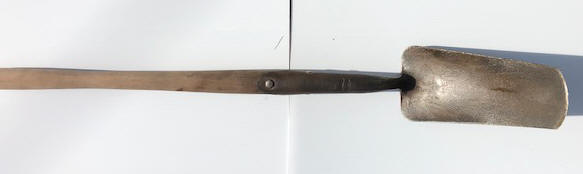 |
 |
You may see a few of these old True Temper
shovels in antique stores for a outrageous price, (upwards to $150). I
keep on the lookout at yard sales for these and occasionally pick up one for
$20. I once found one for $15 and my wife asked, "Why did you pay that
much for that old shovel". The one bad thing, most diggers do not take care of their shoves
after the dig, as they were not made of stainless steel then. By this I mean, wash it off with fresh water and oil it
(better yet grease it) before you put it away, even that is not the cure all. I have seen some
that are beyond repair.
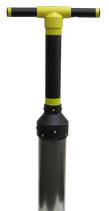
Progress ? ;
Digging changed
in the 1960s with the introduction of the tube type clam gun. Initially
these were made of 4" dia. (the minimal size allowed) PVC pipe with one end
capped, a Tee handle attached on that end and a small 3/8" vent hole drilled in
the cap.
From there, 4" aluminum agricultural irrigation pipe replaced the
PVC, but still using the same full tube design.
This "clam
gun" soon became
a proven tool for clamming on the US west coast. In use, with your thumb
or finger OFF the vent hole, simply push the tube
down in the sand over the clam show
dimple with a rocking or circular motion as you push it down. Now block the
air vent with a thumb or finger and pull up the core of sand hopefully with the clam
inside. It might take two or three tries depending on the depth of the
clam.
It has been found that clams tend to move
toward the water when a digger starts after them, so here it may be beneficial
to tilt the gun tube slightly in direction of the ocean.
The
size of the tube, (diameter) was upped on some to 5", for some guns, BUT this meant a bit heavier
pull for the extra weight of the sand.
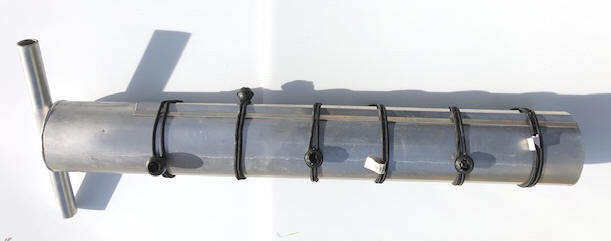
Then in 1979 a patent was applied for a clam gun with vent mechanism
for easing the withdrawal from the sand, basically breaking the vacuum on the
outside of the tube allowing the gun's tube full of sand to be withdrawn from
the sandy beach easier. This idea was then improved on by numerous
local sheet metal shops, mostly adding (spot
welding) a vent on the outside. Then in 2019 a aluminum tubed model showed
up with the 5" tube and the outside vent being extruded in all as a single piece
tube.
These
tubes were then made in either aluminum, steel or stainless steel, with steel
being cheaper (easier to weld) but heavier. Those being made of stainless
steel of course were more corrosive resistant, stronger and thinner, (but
provided easier entry into the sand the makers advertised). Some also went to
a Nylon handle/top half and attached to a thin stainless tube. And a lot of imported product
showed up on the dealer's shelves. Some makers work was not of the highest quality,
possibly not enough personal testing, while others a lot
better. And LOTS of COPYCATS here. Some had a guarantee of sorts.
Prices range from $14.95 for the PVC versions up to $135.00 for the newer Nylon/Stainless Steel ones.
|
Here is shown the transgression, the 4" PVC on the left,
4" aluminum in center & 5" aluminum on right |
Clam Hawk |
 |
 |
Drawbacks ; With the introduction of these TUBE GUNS, numerous diggers did not understand the amount of strain they were putting on their backs, by not using their legs to help lift on the up pull. Some so much so that they required back surgery afterwards. This was probably one reason for the introduction of the vent tube guns.
Modifications ;
Being a
somewhat frugal person and on a limited income, along with the amount of digging
times I can participate in, I decided to install a outside vent on an existing
gun that I had. I do not have a spot welder, but got a sheet metal friend
of mine to fabricate a thin outside Vee tube that I JB Welded (Epoxied) to
the outside, being very similar to like the final result of being a Big Boy's gun, but epoxied
instead of metal welding.
My plan worked out quite well. I
had this vent made of.030" thick aluminum, with a overall width of 1.312" and a
height of the Vee vent .300". I cut this vent material to the overall length that I decided would work, laid it
on the gun tube and marked around this new vent with a felt marker to locate it
later. I filed the outer edges smooth and then mixed up the epoxy,
smearing it onto the "to be" inner edges of this vent tube. With the aid
of a helper, we positioned the now uncured epoxied tube in place as earlier
marked.
Now again with the aid of a helper, we secured this vent tube to
the gun's tube body by using ball bungees. With one in place on the
lower end, another was placed on the upper end. Now using my finger, I
smoothed any excess epoxy down into the edge. Then by using a paper towel soaked
in lacquer thinner, I cleaned any excess off the tube. Now add 4 more
bungees, placed evenly along the entire length. Then let it set
overnight, and BINGO we had a vented clam gun.
I was concerned that possibly too much epoxy
would exist and be pushed inward, possibly plugging up this venting system.
So my idea was to get a 1/8" 22 caliber ramrod and after the tube was in place
and before it cured to push this rod and a slight amount of cleaning patch
material down inside to clear any that was possibly plugging the passage before
it cured. Of the two that I have done, one required this, while on the
other, it was not needed.
| Here the outer vent epoxied in place |
 |
|
Outer vent to being held in place on a 4" tube while the epoxy cures using
9" ball bungees |
  |
The second tube that I converted was a 5" version using the same method, but the
only thing that I encountered was that these 9" bungees have to be stretched to
their MAXIMUM.
Update on the above modification. It did not last well
in usage, as the lower end (which takes al the abuse) came loose, which prompted
me thoroughly clean the epoxy off, and to seek out a good aluminum welded, who
worked his miracles.
|
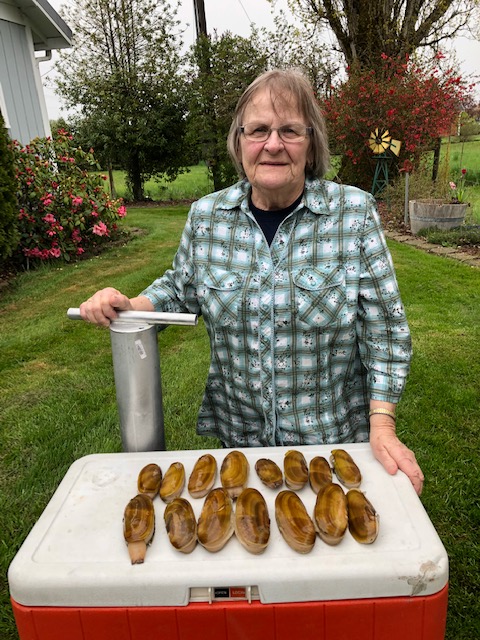
Here a novice digger using a 4" aluminum tube gun & her limit of clams |
Here are some NICE razor clams, - - note one is trying to hide |
 |
 |
Observations ; Each digger will have to decide their own method and make/model of shovel, or tube guns. Personally at age 85 +, I can not use the guns, as I have been diagnosed with COPD and Acute Bronchitis and have a real problem breathing when being bent over, along with Arthritis in my lower back, so much so that I have a hard time digging a whole limit at one sitting using the tube. So back to the shovel for me, where I can kneel on one knee and no bending over as with needed when using a tube/gun.
However, I have been told by a longtime tube user that there is a secret to pulling it out of the sand. He says when you get near the bottom of your initial dig, to then pull it back UP about 1", then push it down about 2" before trying the actual withdrawal, saying this helps break the suction. And DO NOT use your back to pull it, but, slightly squat as you go down, then using your leg muscles, to do the lifting with.
With the use of these tube guns
(especially the 4" models), I see many clams mutilated and left on the beach, or
the digger burying them. Not sure of the reason, unless the digger was not
properly instructed as to the position of the gun over the show dimple, or
simply not paying attention. More the reason to go to the larger tube
design.
Now, for prepping to cleaning your prize, here is a tip. Get a large pot of
water boiling, (preferably outside over a propane burner). When it is
boiling, (with a limit of clams still in your nylon clam bag) dip the bag and clams
into this boiling water. This should be NO MORE than 30 seconds, but just
enough to separate the shells from the body meat. Then immediately,
dip them into cold ice water to stop the "cooking", otherwise they will become
tough. Shown in the photos below are examples of this process and
the results.
| Here you see the pot of boiling water and the clams/bag ready to blanch |
Here you see the results, NOTE the shells simply fall off |
 |
 |
Now, for a warning, it is illegal to drive on the beach below water line, however there can be little creeks that empty onto the beach and sometimes the waves do mysterious things to the sand, even on unimproved approaches as evidenced by the photo below.
| This can be disastrous if you don't have a buddy close by with a tow rope, especially if the tide is coming back in |
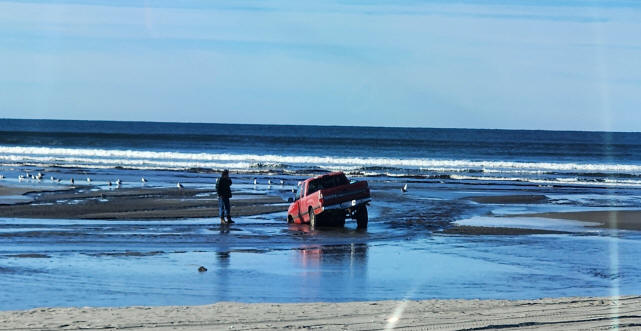 |
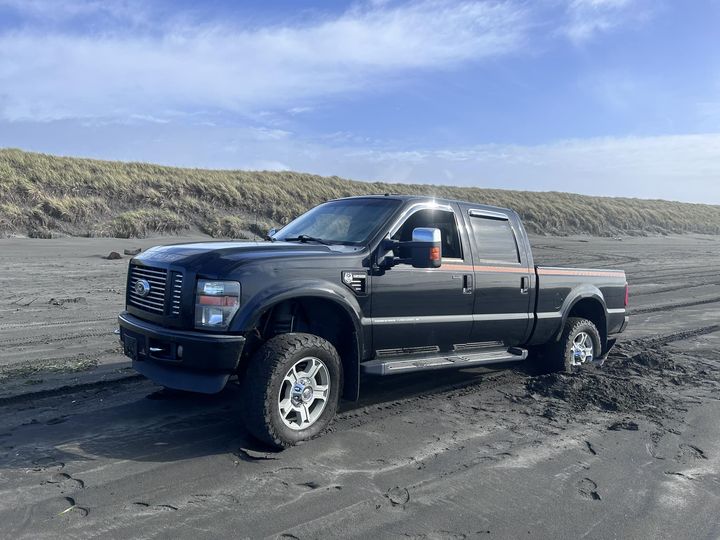
OKAY, the above photo shows possible issues with driving to
close to the surf, while in the photo below, just the opposite,
where dry loose sand can trap even a 4 wheel drive vehicle.
| The upper part of the beaches can also be disastrous |
 |
Copyright © 2019 - 2025 LeeRoy Wisner All Rights Reserved
Back to the Main Ramblings Page
Originated
10-28-2019, Last updated 03-04-2025
contact the author
![]()