Dolly
|
|
Building a
Camper Movable Storage Dolly |
|
Is Storing Your Slide In Camper Inside a Building a Problem ? Do you have a concrete floored RV bay that may be rather tight to get your camper backed into, or the bay's height is not tall enough to get the camper backed into while it is on the pickup? My bay is tall enough but only has 2.5" of clearance on each side of my 1984 8' camper. It is rather hard to get the pickup lined up parallel within the bay to get it backed all the way in without tearing something apart on the camper's sides.
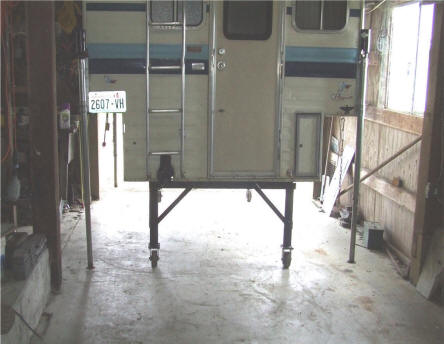
A solution I found was to build a steel framework dolly of angle iron just the size so the camper sits on this frame with dolly wheels under it. Utilizing this system, I can back in just enough to get the camper to where this dolly will have all 4 of the wheels on concrete. Jack the camper up, drive out from under it then wheel this dolly under and near enough under the camper so that you can let it down closely aligned, then move the dolly to where you can finish lowering the camper onto the dolly. Raise your jacks and now you can easily manually push the camper where you want it.
I alternate my camper onto my pickup if it is going to be short term usage, or onto a 3/4 ton pickup bed trailer if I am going to park it in a RV lot for a few months of summer/fall salmon fishing. Aligning it to mount on the pickup is a chore, (more about that below) but I can just push the trailer under the camper and align it a lot easier.
With this dolly on wheels it allows me to get the camper under cover in the winter and yet readily available without a lot of hassle when I desire to use it.
| Here the dolly is built & ready to be put in use | This photo is from the rear & shows the camper on the dolly & in the front of the bay. The camper has just been placed on the dolly |
|
|
 |
This dolly was made of 3/16" X 2" X 3" angle iron as a main frame, 2 1/2" pipe legs, 3/16" X 1 1/2 X 1 1/2 angle cross bracing & 1/4" X 1 1/2" flat bar bracing. And 5" rigid dolly wheels on the rear with swivel wheels on the front. I believe using only the swivel wheels on the front is the way to go instead of swivels on both ends as once you get it lined up you can control the direction, where if both ends were swivels, this could be a problem.
If you had to purchase all the material for this it would run about $150.00.
Building this unit I also had to eliminate the lip on the LH rear side made to accommodate the grey water holding tank as seen in the LH photo above. So the rear cross frame along with a section on the rear, the angle iron was flopped over giving the angle iron lip on the bottom allowing the dolly to be pushed rearward just as if loading the camper on the pickup truck.
| Again the camper on the dolly, but with a front view, notice the narrow opening, but it gets narrower inside when you add the rough sawn 2"X 8" upper floor supports. | Here we have both the boat & camper in place, nestled into the RV bay with just enough room to walk between them. |
|
|
|
Moving this loaded unit around can be done by one person not easily, but doable. The problem if any, is the narrowness of the bay so I have to get it lined up close to start with or jockey it a couple of times because of the overall length side movement on the swivel end is somewhat limited because it can hit the side beams on the overhead if I get too aggressive. But it is a heck of a lot better than trying to do it while on the pickup.
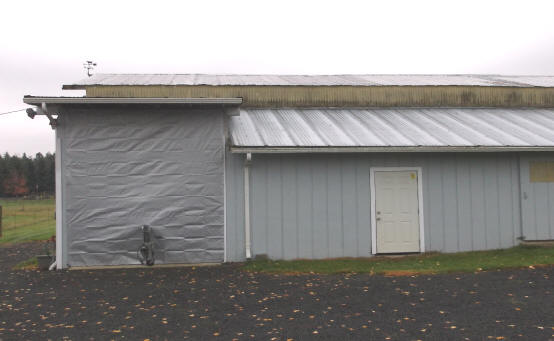
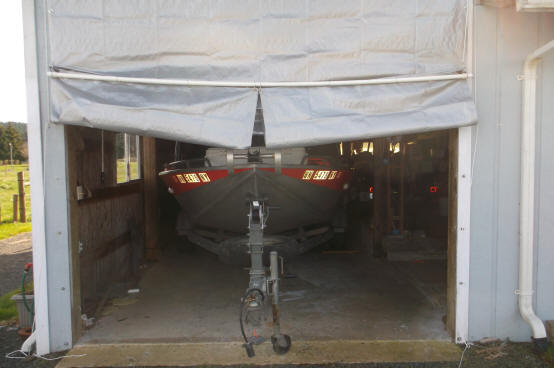
I also have added one more criteria in that I use the same bay for BOTH my camper and boat, but I am hurting for enough length for both end to end, UNLESS I raise the camper enough to back the boat in front of the camper so that my outboard motors nestle UNDER the camper's overhang. Therefore I built this framework on legs 20" high. Then to allow enough room to close the front off. Here my boat trailer tongue protrudes out about 2 feet. So I use a 10' X 12' fiberglass/plastic tarp as a door, and hook the top onto screwed in hooks and slit the bottom enough to allow the tongue to protrude. The overlap of this tarp is perfect (about 3" total). The side are secured using 1/4" hanger bolts. These have lag screw threads on one end and machine threads on the other. These are screwed into the wood wall edges at the locations of the existing eyelets and secured by fender washers and wing nuts.
| Here the tarp door is secured in place for the winter |
 |
To open this tarp door, there are small pulleys at the top outer sides, utilizing 3/16" rope and a hook on the bottom end. About 5' up on the outer wall are installed small boat/flag rope cleats to secure the rope in any position.
A 1" PVC pipe is attached to the bottom of the tarp, through the
tarp eyelets
with the metal pear shaped bathroom shower curtain rod clips. The pipe was
needed to maintain the tarps position horizontally, using 1/2 of a PVC coupler
and a PVC cap to position the two outer clips, otherwise everything wanted to
get squashed toward the center. The other clips just float on the pipe.
This rope hook can then be hooked into the bottom tarp eye, raised up 2 eyes, hooked again, raised another 2 eyes etc. until the tarp is raised in an accordion fashion, high enough to move the boat and or the camper out.
You will notice the cut out in the tarp that was needed because the trailer tongue protruded out too far.
| Here the tarp door is lifted part way up. |
 |
Loading on the Pickup ; I use the same method of loading on the pickup as before, described below, except I push the camper and wheeled dolly out near the front of the RV bay opening, therefore a lot of jockeying the vehicle is reduced.
This loading is slightly different than when loading off grass or gravel in that I do not need wood blocks under the jacks because now it is on concrete.
The rear camper jacks do not really need to have both of them on the ground at the same time to raise it, (as this camper will readily stand on the 2 front and 1 rear jack). Both are needed for stabilization if you unload, lower the camper & are staying in it for a while.
Have the hydraulic jack shafts extended (lowed) so the height that the camper is high enough so it does not drag on the pickup bed. Using the mirrors, try to be as square with the camper as possible. When I get the pickup bed backed under about 1/2 way or more, I get out and can look from the rear to see just where things are. OK, you all know this, but from here on we get different. Now loosen one of the rear jack bleeder valves, raise the jack's shaft enough to bolt on the 5" wheel unit as shown below, attaching this wheel to the shaft foot so it allows the camper to be moved sideways. Drop the shaft so the wheel is back on the 2"X6" & pretty well centered, re-tighten the bleeder, then jack that side up enough to slightly pick the other side's jack shaft off it's 2"X6" block.
Place the other 5" wheel unit under the other jack then bolt it onto that shaft foot. Repeat the procedure of placing this 5" wheel so it is able to move the camper sideways, adjust both of the rear jacks so your camper is level enough but be sure it will clear your pickup bed. If you are not exactly square and aligned for the rear, no sweat, push the rear of the camper sideways to where it will slide into the bed without dragging on the sides of the fender wells or hitting the holding tank or side mounted battery. You can use a small rock, or wooden block under the side of 5" jack wheels to keep the camper from moving back to it's unaligned position. You can not get a lot of movement here because the 2 front jacks may not twist a lot with much of the weight on them. If so you might have to pull ahead then retry the backing process.
Back up, get out, check it again before the final back in. Just be sure that everything on the camper clears the pickup bed. In the photo below the distance moved sideways was about 3", which is about maximum on my unit.
| Note the rock wedged under the tire to keep it from moving back & the distance it was moved indicated by the rust on the 2"X6" |
|
|
These little jewels greatly lessen
the ulcers or heightened marriage discussions and usually speeds up the camper loading
process. This can now be a one person fairly smooth loading operation.
I do not have a lot of faith in
leaving these wheel units on all the time, except when initially backing under the
camper as these are not really good for use when the camper is stationary.
The ones I
used on this initial experiment were rubber tires mounted on plastic wheels off
a wheel mounted metal cart.
I purchased new 5" wheels made of a Phenolic material and larger shaft holes which
required some lathe modifications of being narrowed to fit the bracket and
drilling the shaft hole larger in the bracket. They seem to work much better.
Other than that, you will notice on the upper RH header photo, this camper is setting on a old Chevrolet pickup bed trailer. I use this at times if I am going to leave it in one location for a while. In loading the camper on this trailer it is very easy to manually push the trailer under the camper, watching as you go, so loading it is a snap even for one person. Then just back the towing vehicle to the trailer, hook up and go. Where it gets complicated is if I want to also tow the boat, hence the need to load it on the pickup occasionally.
We have now moved on to a newer camper the same size, but the dolly needed to be slightly modified at the rear to accommodate for a longer water holding tank on one side and a lower battery box on the other.
Copyright © 2012 - 2020 LeeRoy Wisner All Rights Reserved
Back to the Main Ramblings
Page
Originated 04-27-2012, Last updated
11-09-2020
Contact the author