
 |
Building & Installing a Radar Arch
on Your Boat |
 |
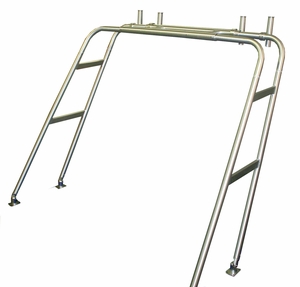
Radar Arch ; You may even see these called other names and it certainly can be used for the basis other things as mentioned below. And once you become acquainted with it, you will wonder how you got along without it. A well designed tower/radar arch unit will be an asset, blending into the size/style of your boat. Plus it should not be so heavy that it changes the hull displacement with the boat at rest (a little bit is acceptable, but not a lot). Therefore aluminum pipe/tubing becomes the more desirable material. They can be made of stainless steel tubing if for a larger boat, or powder coated aluminum pipe for the smaller boats. For the one we will be dealing with here, 1 1/2" 6064 annealed aluminum pipe was used for the main unit, with 3/4" pipe being used for the rear hand rails.
Working on Limited Funds ; Being retired and on limited financial funds, I did a lot of looking. At a regional Sportsman Show, I observed and picked up literature of different radar arch manufacturers. Their prices were probably reasonable, but more than I could afford. I have a neighbor who has a machine shop, is a fabricator, does all types of logging and farming repairs, one of which was bending heavy steel tubing to make cow stanchions.
I approached him with photos and asked if this was something he would be interested in doing in a non-rush time, (boy that was a mistake). OK, I prepaid him to purchase the aluminum tubing, but it took 4 years before I finally shamed him into doing it.
I already had the Furuno radar unit off my previous larger boat that I had sold.
So, with him working from the sales brochure photos, my boat sitting in his shop, and my additional input, we proceeded to get things going. I had already cut and drilled the mounting holes in the base plates and holes for wiring to be pulled through later, and had the radar plate cut to size and made the "rocket launcher" rod holders.
These rod holders were mounted on the top of the rear main bar, and was made from the same 1 1/2" pipe as the main bars. I had already made a flaring tool to expand the upper edge of this pipe, using his 50 ton hydraulic press. These rod holders were made so that they could be rotated up/down for needed angle placement instead of guessing the right location and welding them secure to this bar (and regretting it later). There are four total and the two outer holders were tipped outward slightly to separate the rods when inserted for traveling. They were secured to a small adapter plate that was welded to the rear bar by 3/8" single stainless steel bolts. It was later found that they slipped under the weight of a rod if traveling, requiring a sprinkling of Mt St Helens ash between the two pieces of metal for added friction.
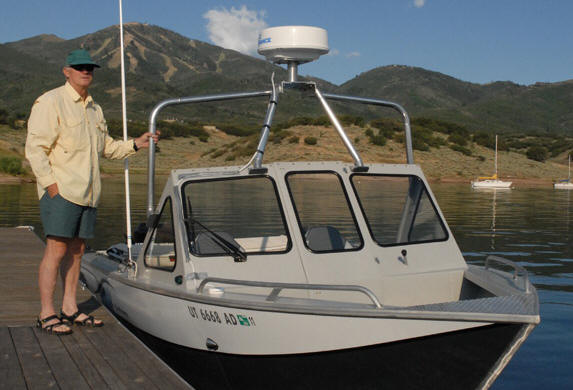
| Here you can see my 2005 18' Northriver Mariner outfitted with a custom built radar arch and other accessories |
|
|
This unit was designed to flow with, and matching the existing angles of the windshield and the convertible top. There were two connecting bars made from the same stock as the main bars that were spaced so that they could also support a short vertical 1 1/2" pipe section designed to hold a landing net or crab/shrimp puller davit. Here, a aluminum base directly below these vertical tubes was also attached to the side deck as a bottom wear/retainer plate. Later these tubes became home for planer board davits.
The rear hand rails were made from 3/4" aluminum pipe and was one of the most beneficial unforeseen assets of this whole project. I hand bent them by hand, using a conduit bender and a propane torch, applying enough heat to help get a smoother and tighter bend than from the bender alone. Knowing that replicating the second one would be beyond my capabilities, so I made the second one slightly longer, and then cut a section out of the middle so my welder friend could then weld it to match the first one made.
The running light was attached to a 3/4" pipe welded upward extension (with a predrilled wire hole in the bar) behind and high enough to clear the radar.
Another
addition was docking lights added to the top front radar crossbar support.
Also a set of amber rear deck lights were added to the rear main bar,
illuminating the boat's rear deck. This was a asset that was greatly
appreciated when prepping gear before daylight.
The base plates were drilled large enough and same size holes in
the side deck so that feeding the wiring through was less stressful, as all wire
pretty well had to be fed in from the top smaller holes. Once all the
wiring was checked out, the upper holes around the wires were sealed with
caulking.
The one thing now was that the VHF radio antenna could not be laid all the way down along the side deck as before, but had to be bungee corded to the upper arch bar when being towed. I did not want to mount it on top of this unit, as I am too old to climb.
Many of these will be powder coated after being made to give some saltwater protection. I did not have these resources available, nor wanted to go to that expense. However I have found that when I made this one, I polished it with a power hand buffer before using, then waxed it with Johnson's automotive paste wax. This may have to be redone later, but it works for me.
Copyright © 2020 - 2023 LeeRoy Wisner All Rights Reserved
Back to the Main
Ramblings Page
Originally started 12-01-20, Last Updated 02-05-2023
Contact the author