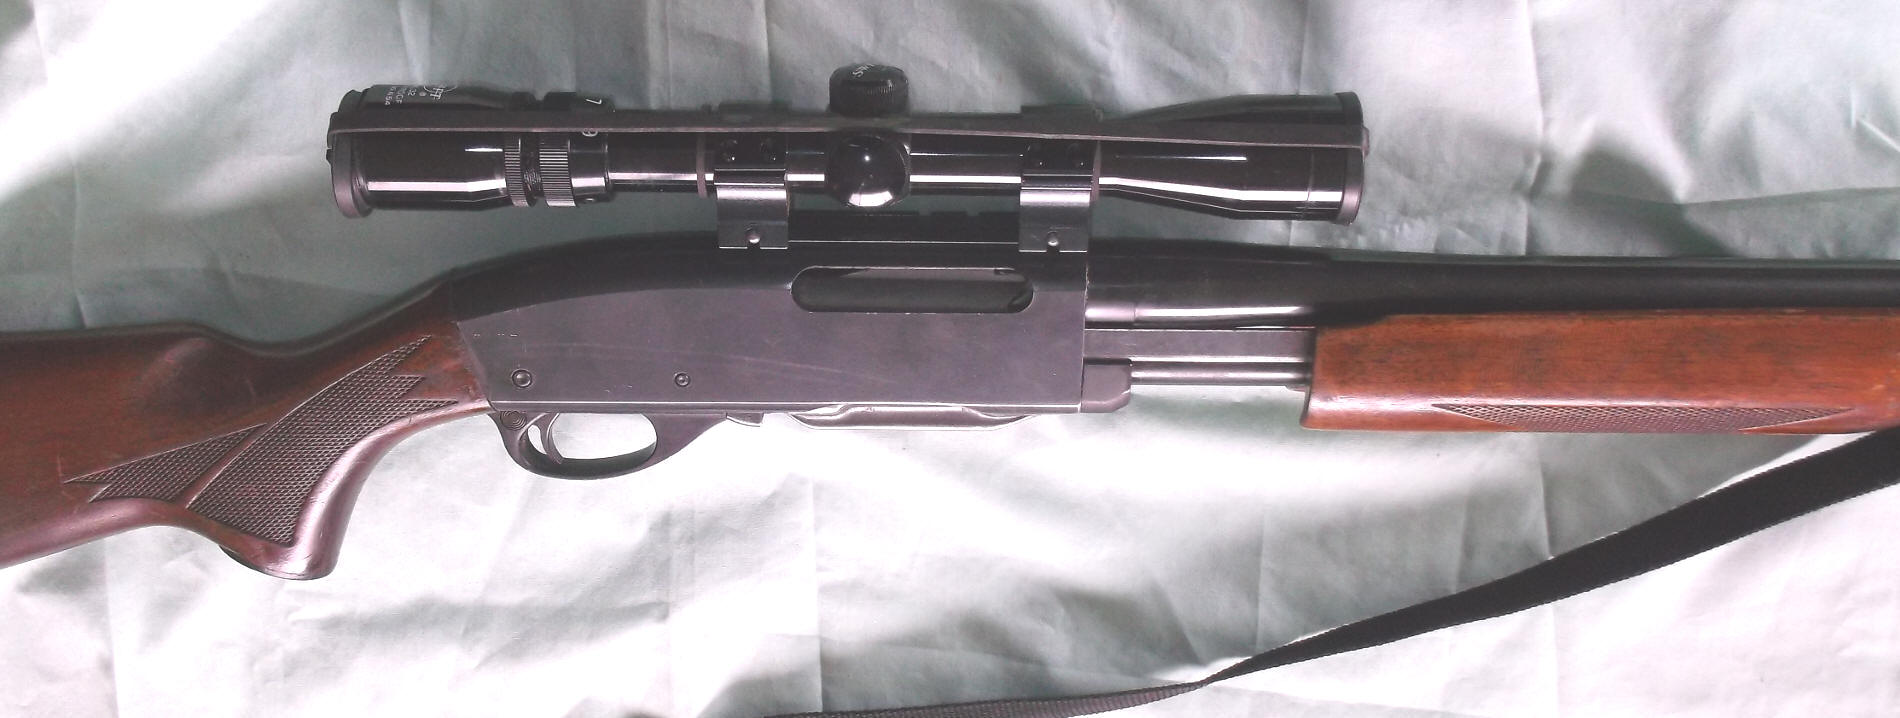
| An early Remington 760 showing the ribbed forearm, no checkering on pistol grip & metal rounded front ejection port cover |
 |
|
Remington 760 / 7600 Pump Rifles |
FIREARMS INFORMATION
Model 760 : The Remington pump model 760 rifle, called the "Gamemaster" was made with a 22" barrel, was introduced in 1952 and was discontinued in 1980. It used a detachable 4 shot sheet metal stamped box magazine. This model was initially produced only in 300 Savage, 30-06 and 35 Remington calibers. In 1953 the 270 Win. was added. Other calibers added later included 257 Roberts, 244 Rem., 308 Win., 243 Win., 280 Rem., 222 Rem., and 223 Rem. Initially the wood was plain uncheckered walnut buttstock with a vertical grooved forearm. These guns were a sales success in that when I purchased a new one in October 10th of 1954 the serial number was 179,000 and the price of $109.50, about $5 above the initial price.
Do not be of the thought that on the shorter calibers (222, 223, 243, 257, 300 Savage, 308 or 35 Remington) that this version is a SHORT ACTION. The firearm is the same as it's longer cased brothers, just the magazine is what was altered. By this, meaning that the magazine's sides cartridge guide indents AND/OR spacers were added to position the cartridge in the magazine to feed properly through this firearm that was designed for a longer cartridge (30-06).
| An early Remington 760 showing the ribbed forearm, no checkering on pistol grip & metal rounded front ejection port cover |
 |
The pump action slid on a hollow metal tube that
was screwed onto a 3/8" bolt at the front of the receiver. This tube had a
stabilizing spacer
under the front of this tube against the barrel. The ejection port cover
was made of metal, left brightly polished, with the early ones utilizing a
rounded forward outer end, while later ones (probably after late 1955 when the
740A came into being) used the same basic shaped plastic but had a
slightly angled downward part at the front of this cover. These early rear sights utilized a 3/8"
dovetail in the barrel. These rear sights were made by Remington and were
distinctive to the 740 and 760s.
The receiver for the standard 760 was not originally drilled and tapped for either a peep or scope sight. No provision for sling swivels were incorporated on the standard 760 rifle, but were available on the ADL (A grade deluxe) which was also drilled and tapped for scope mounts. Initially there apparently was a B grade, which probably had fancier wood. The BDL replaced the B grade in 1953 and had the same configuration as the ADL but with a more highly figured wood. However you may encounter a ADL with higher grade wood that had flaws in the wood, so instead of scrapping it they downgraded the wood and used it on the ADL models. The buttplate was made of cast aluminum.
To reiterate, the 760ADL version introduced in 1953 which was
mechanically the same as the 760, but had deluxe wood, machine checkering, a pistol grip cap
and sling swivels A 760BDL that was introduced in 1966 sported a
stepped receiver rear, RH or LH cheekpiece on a Monte Carlo stock.
Basket-weave impressed checkering was added in the mid 1970s. It also had a
black pistol grip cap and forend tip. Made only in 270 Win., 300
Savage, 308
Win., 30-06 and 35 Remington, with the 300 Sav. being dropped early on. There was a limited run of 760CDL
carbines in 30-06 only and an 18 1/8" barrel..
This model was made only
from 1961 to 1963.
This BDL version was discontinued in 1982.
One confusing thing about the model numbers is that very few actually had the suffix letter stamped on the gun. Also it is my belief that the early Model 760 was just that, and when they made numerous internal changes during that first year of production, that the gun after the changes were made then became the Model 760A.
The ejection port cover was changed from polished metal to a black plastic, and the suspicion was this came about at the same time the 740A came into existence in late1955, because the it's front was also tapered and since these 740/740A/760s shared many parts, (here namely the barrel locking lug block) that this would have been the time to change both. Then it was changed to black plastic in 1960 when the 742 came out.
| Close-up of an early 760 action showing metal ejection port cover, note rounded front | Here is the later black plastic ejection port cover, note the front angle |
 |
 |
| A Remington 760ADL showing the pressed checkering pistol grip & forearm, with a plastic grip cap |
 |
Later, about 1960 a carbine with an 18 1/2" barrel was
introduced but with limited calibers of 270 Won., 280 Rem., 308 Win., 30-06 and 35
Remington. This forearm bracket tube was different than the rifle at
that time, in
that it was composed of two telescoping metal tubes. When cycled to
the rear no metal was exposed on the front of the forearm. There was a
thin neoprene O-Ring between the two to eliminate a rattle.
Shortly after the carbine entered the scene, the older forearm support tube as seen in the top photo below was replaced by the carbine style (bottom illustration below) on all other versions.
| Here on top, showing the custom stocked older rifle's old style forearm tube, with the newer telescoping forearm style below with both actions open. The lower photo the later pressed checkering utilizing white lined spacers on the stocks |
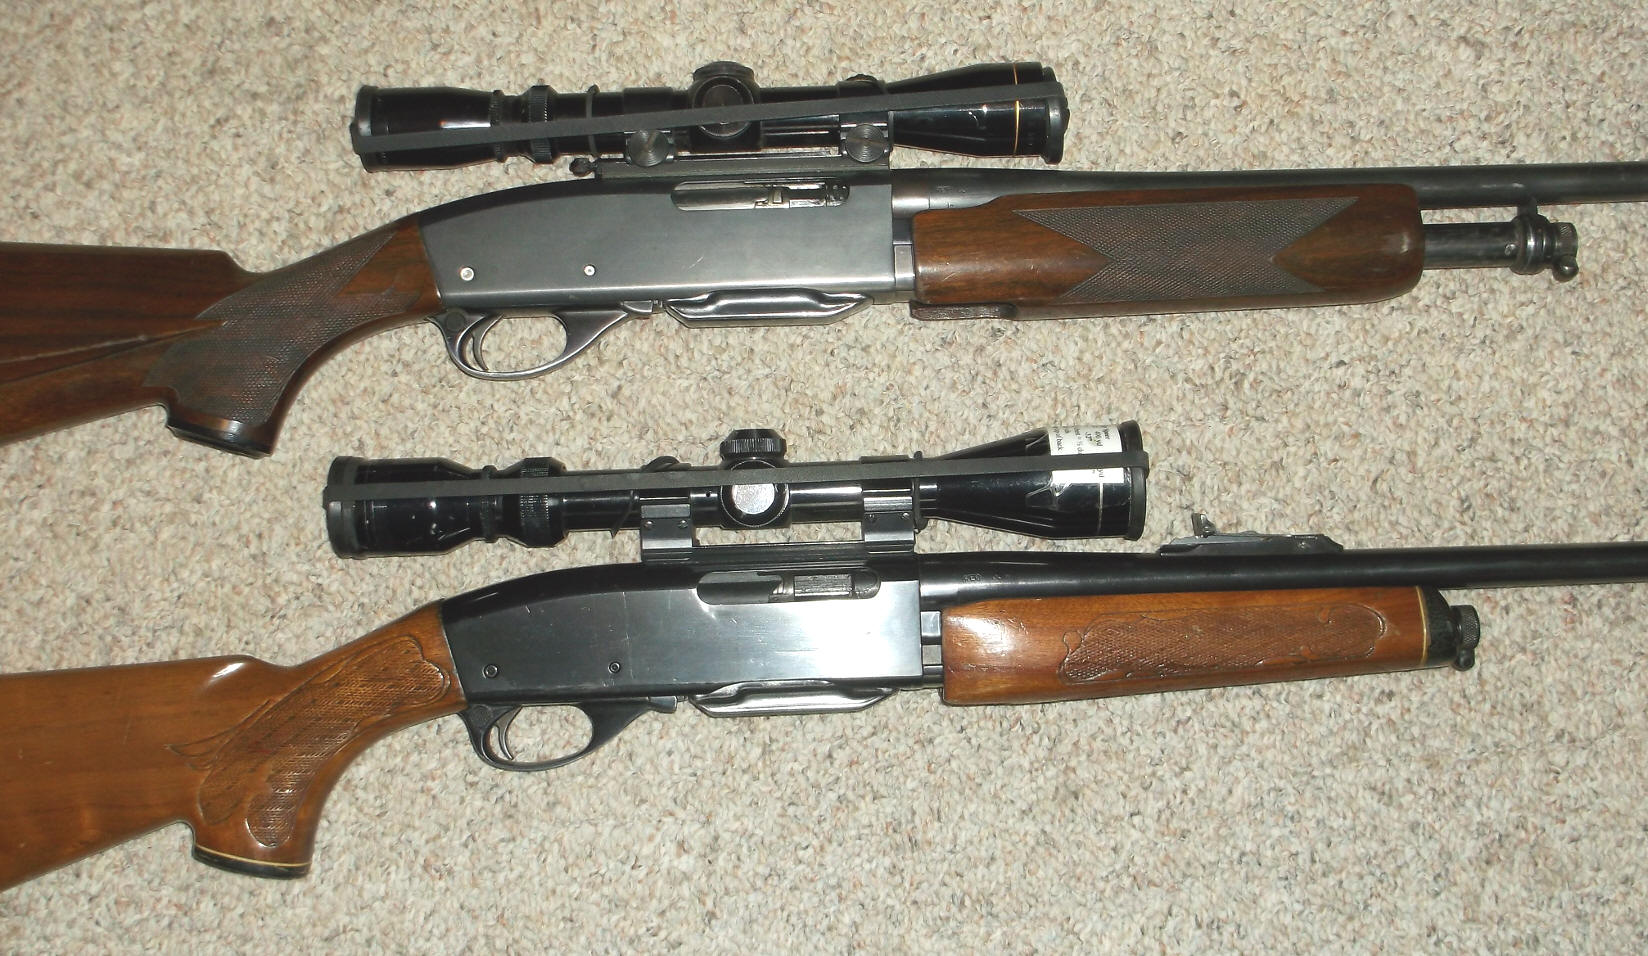 |
What is hard to see on the rifle on top, above is a auxiliary fold down peep sight mounted to the rear of the scope base, hence no barrel mounted rear sight. The lower rifle above uses a Weaver pivot mount so the rear sight can be utilized in a emergency situation.
These guns usually paralleled the 740 and 742 semi-automatics
as far as wood goes, so the impressed checkering on the 742 would have also been
incorporated on the 760 as the buttstocks are the same. Matter of fact the
760 also shared many other common parts, and they started sharing the serial
number block with the 742 at 6,900,000 in November 1968.
Aftermarket manufacturers like Uncle Mikes make sling swivel kits to fit these early guns.
Magazines : These steel stamped magazines were a work of art to the sheet metal stamping field at the time they came into existence. They were designed to hold 4 rounds.
Remington did not own the tooling to make the magazines, but a stamping company made the tooling for consideration in making them. These were stamped out and DEEP DRAWN from a single sheet of steel. Over time, the tooling wore out and the tooling company had changed ownership, the new owners were not interested in either rebuilding this old tooling OR making new tooling. I know this, as I tried to purchase the obsolete 788 magazine tooling from this company also, but they drug their feet because at that time they were still making the 742/760 magazines for Remington, and felt an obligation. Then when the decision came to scrap the 742 tooling, buy the time I found out about it, it had went to the scrap buyer.
The outcome was Remington went to an existing company who was making pistol magazines, who designed cheaper tooling making it differently, with the metal box, but plastic bottom.
Even if you purchased factory spare magazines, sometimes they needed fitting, so they would go in/out easily or locked in place. This could mean usually peening down or filing down the rear latch. Usually the shallow front protrusion was OK.
Magazines for both the 740 and 760 series were all made on the same tooling, so should interchange. The only difference was the 742 utilized a lock open on the last round follower system. They also had a release button on the bottom to override this feature. However it took so much effort that most hunters did not use it, but simply remove the magazine from the gun. It was really a hindrance if you shot the last round and wanted to replace the empty magazine with a loaded one, as you had to first remove the empty one (while under pressure of the recoil spring pushing the bolt unit forward. Not as fast as you would think. The only real need for this feature was when you were cleaning the firearm. With that in mind, many 740/742 users would simply use the 760 as their primary magazine, eliminating all the hassle.
Initially they stamped individual calibers on each, even though, as in these 270 Win. and 30-06 were exactly the same box. This however created a inventory issue as the 270, 280, 30-06 and 35 Whelen all used the same magazine, just a different caliber stamped on it. The difference for the other calibers, that the shoulder dimple was placed in a different location, as for the 223 Rem., 300 Savage, 244 Rem., 257 Roberts 243 and 308 Winchester. The later 7600 magazines on the right, will interchange with the older and corresponding calibers. But you will notice they now stamp all calibers that the magazine can accommodate.
There was at one time aftermarket large capacity magazines available for these
guns, some functioned, some didn't. I have been asked numerous
times by people looking for them, my comment as a hunting rifle, if you can't
hit an animal with 5 rounds, by then the animal would be out of sight or running
so fast you could not hit them anyway.
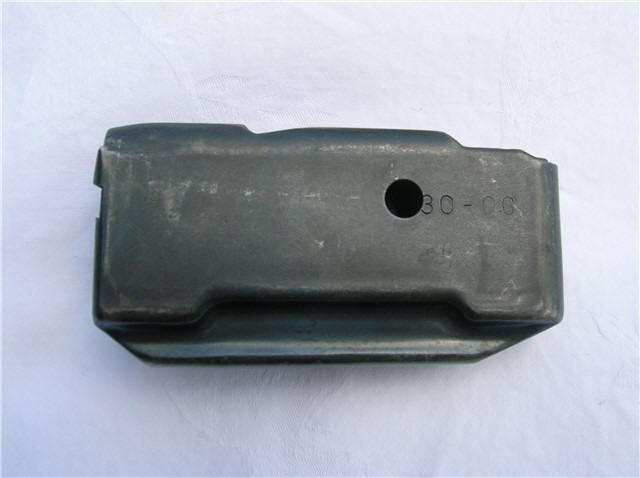
In the photos below, on the top left are the original deep drawn flat sided
magazine (no shoulder dimple), with round hole and caliber stamped ahead of it.
This was probably early enough that the 30-06 was the only caliber made at that
time. Following that on the right top, the calibers were stamped inside a
rectangle. Then later inside a rectangle that had both ends Vee'd out as
in the 270 shown.
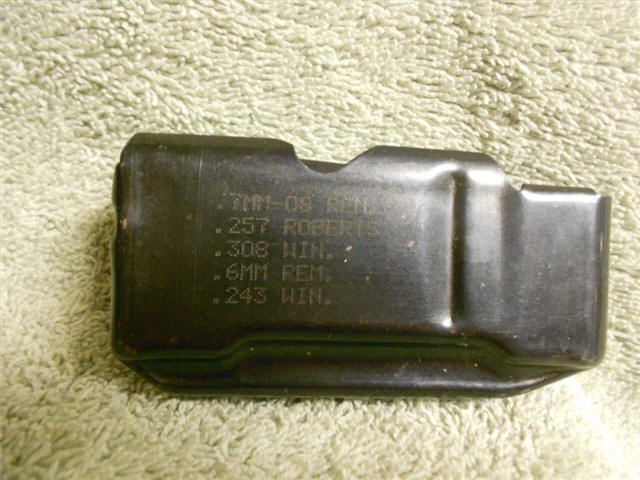
In the next row of photos, on the left is the later deep drawn magazine, with
all the calibers pertaining to that magazine, but instead of stamping, these
calibers were computer stippled after the magazines were finished.
For those who are trying to resurrect Grand-dad's old gun with the exact caliber
stamped magazine, you may have to attend MANY gun shows before you find one of
the caliber markings. As there has been many million of gallons of water
flowing under the bridge since it was made. Usually hunters don't
care what the magazine says as long as it holds the ammo and feeds. And in
practicality, depending on the vintage, the gun may never have had one with a
matching caliber for a very long time.
| Very early 760 flatsided magazine, version (1) | Mid term 760 magazines, note the single caliber stampings. Version 2 on top & version 3 on the bottom |
 |
|
On the LH photo below, the magazine designed for the shorter cased cartridges, the indented guide rib is in the same location as the longer cased 30-06. But there is a spacer inside the rear of the magazine to push those shorter cartridges forward in the magazine, therefore utilizing/cutting down on manufacturing expenses. The shorter yet 222/223 also used another spacer inside the front of the magazine.
|
Late deepdrawn 760 magazines, note the multi caliber
with computer stipling. Version 4 |
Here is the latest 2 piece magazine using a plastic bottom, with all the calibers stamped. Version 5 |
 |
 |
You may see some "2 Shot"
760 and 742 magazines. These were made on original Remington tooling near
the end of the factory run of extruded magazines. They are the same as the
4 shot versions EXCEPT they had indents both front and rear to limit the
follower's downward movement. These were made for some European countries,
OR Australia where center-fire rifle magazines have a 2 shot legal limit
established. They have began showing up from Numrich / GunParts Corp in
early 2022. Some were also sold as a bare magazine box (no spring or
follower). It would be about impossible to readily undo these
modifications without distorting the box to where it would fit the gun.
| Remington 2 shot magazine |
|
|
Sights : Don't ask me to ID which sight would have been used on what year a gun, as I am not a Remington historian, just a lowly retired country gunsmith. However I will try to show photos of most of the different versions. In the LH photo below, you see the original 740 and 760 rear sight. This particular sight has been modified by lowering the rear blade. The RH photo shows the first 742 rear sights. These were screwed onto the barrel using 2 screws, the rear blade and flat spring base was held in place by a cross screw in be front part of the base. The fragile rear blade had a windage adjustment screw and used a blade type notched elevator.
| Remington 740/760 original rear sight | First Remington 742 & corresponding 760 rear sight |
 |
|
In the photos below, the LH sight assembly is again screwed to the barrel (using
the same hole spacing as it's predecessor). The base had a male dovetail
on the inclined top ramp. The upper blade base was secured by a cross
screw pinching onto the dovetail. The windage blade was adjusted by the
blade having 2 small Vee horizontal grooves, mating into Vee ridges of the blade
base and was secured by a center screw buried in the front of the blade.
This screw was notorious for loosening and the blade disappearing.
| Remington later rear sight | Remington late rear sight |
 |
Coming |
Model 6 / 7600 :
There may have been some confusion with the other Remington #6, which was a
Rolling Block single shot rimfire rifle that Remington made from 1890 to 1933.
When Remington discontinued the 760 pump, in 1981 they came out with the
(deluxe) Model 6
at a retail of $399.95, which was then discontinued in 1987. This gun parallels the
Model
4/7400/74 as many parts interchange. The following year the 7600 was
introduced, which is still
currently being made.
This newer design has a newer internal design, while still
maintaining the same exterior configuration. It was designated model
6, and the Model 7600. The calibers available were 6mm Rem. (discontinued in
1985) 243, 270, 30-06, and the 308. A carbine in 30-06 was
introduced in 1988. Again what ever was done for the 7400 was
paralleled in the 7600 as for the wood, improved firing pins, reinforced hardened steel
insert rail in the receiver, scope mounting hole changes, locking lugs and
magazine latch being enlarged. The extractor was changed from the riveted
in style, common with the 740, 742, 760 and the bolt action 700 to a non-riveted
snap in type. This new style extractor was also incorporated into the
model 700 bolt action gun.
The model 6 was the deluxe version (or as the earlier 760 was
designated, where it would have been equal to a BDL grade). The Model 6
had high gloss checkered walnut wood with white line spacers under the buttplate, grip cap and forearm tip.
The Model 7600 (would have been equivalent to the ADL) which was the same gun, except plainer wood,
satin finish, pressed checkering and retailing for $50 less than the Model 6.
The calibers available were 6mm Rem. (discontinued in 1987) 243, 270, 280,
30-06, 308, and 35 Whelen. A carbine in 30-06 was introduced in
1988.
In the spring of 1982 the Remington factory sales reps told us (independent
dealers) that "they" were advertising for the independent dealer and promoting the
Model 6 in all national magazines. They were promoting us, the
independent dealer. They did not tell us that there
was also being made an economy Model 7600. We found out later in the
early fall after we got our shipment of Model 6es, that Remington had sold the
Model 7600s to K-Mart, Wal-Mart etc. at a greatly reduced price as compared to the
Model 6 that they were selling us. The retail customer was not dumb,
as he could buy a new Remington pump or semi-automatic 30-06 from the "marts" for $100
less, he did not care what it looked like, only the price, and was discontent
that we could not match their (the Marts) discounted price on our HIGHER grade guns.
The situation was that the "marts" ordered only the 30-06 calibers,
and the
customer could not understand why we could not sell them a 270 Winchester for the
same price the marts wanted for their 30-06. We were therefore stuck
with higher priced guns on our shelves.
Then in 1983 Remington acknowledged the existence of and then had the 7600s in their catalog where
independent shop owners had to then buy the model 7600's to stay even somewhat
competitive. So the model 6's sat on our shelves and at the factory
warehouse. It took the factory a few years to figure out what was
going on. Beginning in 1990 the high gloss wood of the model 6 was
incorporated onto the Model 7600, basically eliminating the classier Model 6.
As time went on, 1993 and 1994 a Special Purpose gun with non reflective wood, glass-beaded dull metal finish showed on the scene. In 1998 newer versions appeared with synthetic stocked models, glass-beaded dull metal finish. Even later, synthetic stocked models with Electoless nickel dull finish on the metal were introduced.
Model 76 : Then about 1985 there was even a cheaper Model 7600, called the Model 76, and again made in 30-06 only, which took the place of the "older" 7600, but with cheaper walnut stained birch wood with no checkering. Also the metal finish did not have the higher luster of the 7600. These guns also carried Remington's economy name of "Sportsman".
| Sportsman 76 with high "See-Thru" scope mounts |
 |
Gunsmithing These Models :
Barrel code for date of manufacture and information on barrel extension removal
CLICK HERE
If
the hammer is not falling,
or your rifle misfires,
it could be traced to at least 2 conditions (#1 or #2 below).
(1) If someone may have had the
trigger group apart to replace the hammer spring etc., it is possible that the
action bar lock's (#18609) rear tail is ABOVE the tail of the trigger
disconnector bar. The Action Bar Lock is the lever you depress to manually open
the action. Both of these parts are on the LH side of the trigger group, above
and
in front of the trigger. Under normal conditions, the action bar lock has
to raise up behind the LH action slide bar to lock the pump slide and hold the
rotating locking lugs before the gun will fire. With the ABL ABOVE the
disconnector, it will hold the disconnector DOWN, allowing the gun to fire out
of lockup, or not fire if the operator does not hold the forearm tightly
forward.
(2) The early forearms which used the single tube forearm guide, also use a threaded forearm retainer nut very similar to the 870 shotgun. This nut may become slightly unthreaded allowing the forearm to slide forward/rearward on the metal tube, or if you had it apart, it may be that you may NOT have threaded the forearm nut all the way on. If this happens on the old guns, (not the carbines or the newer telescoping action tubes), when you push the pump handle is as far forward as it will go, the bolt may not be totally closed. This is because the older action tube has a pinned in front end cap forming a stop. This then too long forearm nut bumps the end cap, stopping the forward movement of the slide assembly, which does not allow the breech bolt to move far enough forward to lock the action bar up.
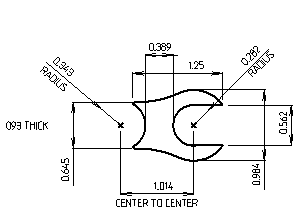
These older rifles that did not have the telescoping forearm tube used a spacer on the front between the tube's end and the barrel. In the illustration below, is a CAD drawing of this part. It would be totally obsolete now, but could be easily made out of 3/32" aluminum or plastic. The real early ones had a round hole on the front, while the later ones before the telescoping type change, was slotted for easier assembly. To make one of these it would be best to drill the holes first and then cut the material around them away. NOTE - these holes are specked out as a radius, so a drill would be twice this dimension.
| Here is a CAD drawing of the old style forearm support plate |
 |
These older tube caps are threaded onto the tube and then a hole is drilled crosswise and a pin inserted so that it will not come apart, loosing it's now locked adjustment. This cap is set in place as a forearm stop, The forearm in it's forward position positions the action bars at the rear to engage the disconnector, locking the forearm in a non-rattling position. DO NOT SCREW WITH IT, YOU DON"T NEED TO DISASSEMBLE IT.
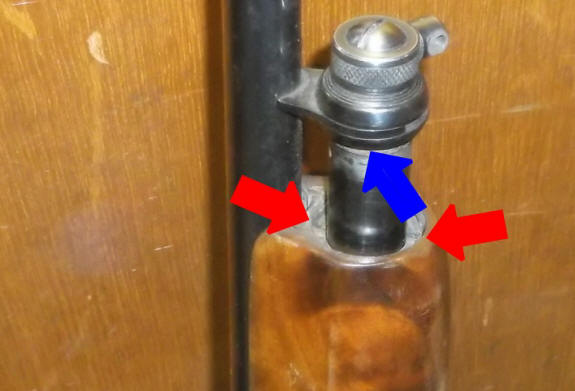
As seem in the photo below, for the older models, this forearm retainer nut may come loose. It is tightened in using a split spanner, (or a medium screwdriver) to rotate this nut tighter. It has two slots 180 degrees apart on the front as seen by the red arrows. If this nut becomes loose, it will bump the front metal end (blue arrow), not allowing the forearm metal to go fare enough ahead to allow the action bar lock to lock the forearm in place, timing it so the trigger/hammer assembly unit functions properly.
| Early 760 forearm lockup & support plate |
 |
To remove the barrel from the receiver, or to work on the internals, on these models you need to remove the action/forearm support tube. These action tubes screw onto a 3/8 NF bolt protruding from the front of the receiver. The tubes have 3/16" holes in them crossways which you use as a spanner hole (using a #1 Phillips screwdriver) to tighten/unscrew the tube from the receiver. You should not have to remove this tube unless you are removing the barrel which is required if you need to get into the action to replace say the firing pin, extractor or ejection port cover.
(3) To remove the newer telescoping
forearm support tube, you need to first remove the screw on the front of the
forearm. With this screw off, you can now remove the forearm itself by
sliding it forward and off the outer metal tube. Note -- it may be corroded, but
should slide right off forward. DO NOT try to rotate it however.
To remove the barrel from the
receiver, with the action bar now positioning the action halfway open, you will
see two 3/16" holes positioned 180 degrees apart. By using a #1 Phillips
screwdriver, (the reason I say this tool is that it gives leverage AND is strong
enough to not bend) you can insert the blade part into these holes and using the
handle as leverage, unscrew this inner tube (Righty-Tighty-Lefty-Loosey) off the
3/8" threaded stud secured in the front of the receiver. You will have to
make many re-positionings of the screwdriver as you will only be able to
unscrew 1/2 a turn at a time.
| Late 760 & 7600 forearm support tube removal |
|
|
)4) To reinstall the barrel/action bar and bolt assembly, you will have to assemble all and lock up the locking lugs into the barrel extension, (forearm tube forward) place the ejection port cover in place and carefully slide this whole unit down into the receiver. If everything goes well the first time, you will be able to have the barrel extension lug bear against the front of the receiver and should be able to be able to slide the forearm tube rearward, exposing the inner tube where you can reverse order re-screw the inner tube onto the threaded stud in the front of the lower receiver.
(5) Now you can pull the barrel, forearm bracket and bolt assembly straight forward and off the receiver. Now you can access the bolt body and head, firing pin, or replace the ejection port cover.
(6) You won't find any specs for the firing pin or spring, as there are
none. If the firing pin is not broken, the length of it is not an issue as
it is a rebounding type, which means when the bolt is locked in position, the
firing pin length/weight/spring tension/ and hammer force are all balanced.
This means that at the farthest forward position the firing pin can be pushed to
and yet be even with the rear of the bolt carrier, it will not protrude from the
bolt face, (safety if the gun is dropped). The force of the hammer
overcomes the light FP spring tension, pushing the heavier than needed firing
pin forward to ignite the primer. The weight of the hammer holds it
forward during firing.
(7) Magazine latches for the model 760
are obsolete, however the 7600 versions
will fit IF you also use the new rat trap latch spring.
(8) The older guns did not have a metal buttstock spacer installed between the receiver and the buttstock. The newer guns you may see this spacer. What it does is take up the pressure of firing, eliminating the chance of the receiver setting back, slitting the buttstock at the joint line. There should be about a minimum of .010" clearance between the rear of the receiver lip and the front of the buttstock. If yours does not, you might fiberglass it or at least place some kind of metal spacer to protect your buttstock.
(9) Remington has also discontinued making extractors for these guns (apparently because they are now obsolete by their standards), extractor #14669 which was 30-06 size riveted type and are the same that had been used on the 700, 740, 742, 760, 788 (all obsolete guns). These extractors are riveted into the bolt, require a special rivet and tool to install. The rivet tool and replacement extractors are currently available from Brownells in Iowa 1-800-471-0015.
(10) These guns use a plastic type ejection port cover, which is obsolete by Remington, but made by an aftermarket business. The 7600 cover is slightly different, but usable if you alter it to be close to the old 760 cover. The 7600 is a bit longer, but that does not hurt operation, however it is .640 in height. You need to remove .040 off the bottom and alter the front end to close to the 760 shape. You can not get it all the same there, but enough to work. But don't cut it so close on the lower forward end that you weaken it. Shown below is the 7400/742, whereas the 7600/760 would be the same but without the slots for the operating handle.
| Remington 7400 ejection port cover on top & 742 on the bottom |
|
|
(11) Sights have changed many times over the years. If yours is one of the early guns (760) with a 3/8" dovetail, any aftermarket 3/8" sight, both front and rear will fit. If your barrel has the sights screwed onto it like the 742s, you loose part of the rear sight, you might be best to try to get a whole new one for the 7400 or even the 700 series, as the screw holes are all the same spacing. The rear screw on sight has been changed 3 times and parts for the early versions are no longer available from the factory. All screw on front sight bases have the same hole spacing, so any later Remington front sight unit will fit, however the height of the blade may be different if off a different model.
Don't ask me to ID which sight would have been used on what year a gun, as I am not a Remington historian, just a lowly country gunsmith.
(12)
About all the newer type pump and semi-auto guns, whether they be rimfire, centerfire or
shotgun use many of the same basic “Fire Control” (as Remington calls the trigger
group) parts. This would be the 552, 572, for the RF, 740, 742, 760, 4, 6,
74, 76 7400 and 7600 for the CF. 11-48, Sportsman 48, 870, 58, 878, 1100, and the
11-87 in the shotguns. They are only supplied in Right Hand from the
factory. You can not simply reverse the RH to make it function as a LH
unit.
For many years there were
aftermarket Left Hand replacement triggers available from sources like Williams
Gunsight Co., Uncle Mikes, Herters, etc. However for some
reason these companies dropped production. The guess is that if THEY sold
you a replacement safety and YOU installed it improperly, that they were
responsible legally because they SHOULD HAVE KNOWN that someone could also done
something else wrong inside the “Fire Control” unit at the same time, creating a
unsafe situation These companies also felt threatened by
lawyers to the effect that they were making a product that altered the factory
design.
(13) Buttstock wood is the SAME and interchangeable for all of the Models 740, 742, #4, #6, 74, 7400, 7600. Forearms from the 7600 should fit the late telescoping style forearms of the 760.
(14) If you as a gunsmith would have to take the barrel extension off to do any rechambering or rebarreling you will need to make a barrel extension wrench. This extension is actually the barrel's locking lugs. This locking lug extension is threaded and timed to the barrel so that the extension, the barrel lug are all indexed for bolt lockup, and correct headspace so everything where it should be, along with being aligned with and indexed so the sights align. This is not something the average backyard gunsmith can handle. There is not any commercially available fixtures available to remove these extensions. If you try to use any other method to remove this locking lug extension, you will about 99% be assured of breaking the extension. Shown below is a photo of the one I made.
You have all the dimensions you need to make these, the OD of the lug extension is the hole diameter. The working end of the slider fits the top locking lugs. The 3/8" hole for the bolt is the hole that the receiver retaining bolt is located in the barrel lug. This bolt does not go all the way through into the barrel lug on disassembly, but is needed in that location for reassembly for re-alignment. The main tool body is .875 thick with the lug engagement slider .500.
| Remington barrel extension removal tool |
|
|
In the above photo, the inner slider is made to fit inside
the barrel locking lugs. The 3/8" bolt locks the slider to the base.
The bolt hole is also aligned with the barrel lug attachment bolt hole. In
use, for removal the base is inserted over the barrel lug extension, the slider
is then slid endwise into the lug recess. The bolt is inserted in just far
enough to lock these 2 parts together, but not into the main barrel lug.
Mark the relationship of the barrel to the barrel lug with a scribe mark on
layout die. This will allow you to reinstall it in the same position.
(14) If you happen to encounter a 760 that originally was a 300 Savage and was rechambered to a 308 or more especially a 30-06, where the bolt will not retract far enough the eject, the rear of the bolt carrier needs to be put in a metal lather and the stop lug/shoulder needs to be removed to match the dimensions of the longer 30-06.
(15) You will not see the receiver rails
become chewed up like the 740/742s experience
simply because the action is operated by hand and not traveling as fast as if it
was by gas pressure.
Remington changed the threads on Feb. 1977, date code (LO), for the 742 and 760, the barrel threads were changed from RH to LH, to help stop the problem of the barrel extension of the 742 (locking lugs) from unscrewing from the barrel during the firing cycle. This was not a problem with the 760, but since many of the parts interchanged, they did the same on both models at the same time. This date code is shown above in the gunsmithing section.
With this change of the threads from RH to LH to facilitate the extension not being backed off when used on the semi-auto guns. But since the 760 and the 742 share many components, this 742 part was carried over into the 760 as a cost cutting situation. This will determine which direction, when you try to remove the extension from from the barrel. You can now put the barrel in a barrel vise, rap the removal handle in the proper direction, then unscrew the extension off the barrel. These extensions are usually on tight and require force to remove even after the initial bond is broken. Once it is off, if the barrel lug is stubborn and resists, you may screw the extension back on part way, do it over again but with the 3/8" bolt thru the lug to take both off at the same time.
The author does not have any source of parts for any of the firearms listed above
Copyright © 2006 - 2023
LeeRoy Wisner All Rights Reserved
Back to the Main Ramblings
Page
Originated 08-17-06 Last updated 04-13-2023