 |
Converting the Old
OMC Dual Fuel Line to
|
Fuel Tank Problems : Most OMC engines before about 1959 used a dual line fuel tank hose with no separate fuel pump. These were a Siamese dual hose with pressure one line coming from the engine into the tank, pressurizing it from the intake manifold, then pushing the fuel from the tank to the motor. The reason I say "Most" in the first sentence is that for a few years prior, you could get the new style vacuum fuel tank on certain larger motors that at that time were used on larger boats using remote controls and could have had stationary fuel tanks.
These old tanks are getting hard to come by, and expensive if the person selling it is knowledgeable. Another problem, they were prone to, if there was any slight leak, the motor would then not perform, if it would even start. The solution is to convert this old fuel system to the newer the single line.
For these fuel line/tanks to work, first you must understand the functioning of a 2 cycle engine. The crankcase of 2 cycle engines are sealed chambers of which alternating cycles of pressure and vacuum occur as the piston moves forward and back inside the cylinder. As the piston travels forward, the crankcase is under a vacuum and the fuel/air mixture from the carburetor is drawn into the crankcase. Then when the piston travels rearward it develops pressure inside the crankcase, the fuel/air mixture is then forced out of the crankcase and through the transfer ports on the side of the cylinder into the combustion chamber above the piston. The ports are placed in a position so that as the piston moves forward the piston covers the port allowing compression to build at firing near top dead center. On a multi-cylinder engine, each cylinder’s crankcase is sealed from the other cylinders.
The secret to making a fuel pump work in this application is to convert the source of pressure for the original pressure tank into a source of pressure and alternating vacuum to operate the fuel pump. The source of power for the old pressure tank is usually supplied by a hose coming off on the intake manifold, (which had check valves) which is usually directly under the carburetor.
Illustrated below is how I did it on a 1958 18hp Johnson. This conversion could also be utilized by making slight alterations on most of the older motors no matter what size.
I happened to find a sideplate with a fuel pump attached off a slightly newer, but possibly a 10hp motor. Apparently these motors later than 1959 but up to the model change in 1963 used just this conversion. All I had to do to utilize it was to drill the mounting screw holes out to match the larger size #10 of the 18hp. The clear, (amber) colored line goes to the fuel filter, then on to the carburetor, while the larger black line is the suction line from the coupler on the other side of the motor.
This conversion could also utilize the later fuel pump of the 6hp up, and newer motors if the mounting base was altered to the newer pump. By this what I mean is that if you are not as lucky as I was in finding this unit, then take the original sideplate, build it up with J_B Weld epoxy, file a flat to mount the new pump. Then drill and tap mounting holes for the new fuel pump, drill a vacuum hole to match the center hole of the fuel pump in this altered sideplate. The vacuum hole does not need to be in any exact location, just so it goes thru the sideplate.
Another and easier method would be to use the later 9.9 (from about 1988 on) remote mounted fuel pump that does not mount by bolting it to a fixed base. These have a hose barb that can allow the fuel pump to be mounted about anywhere, then connected to the source by a line.
One thing to remember is that the cowlings will need to be able to be re-installed, so this can not protrude excessively.
| Right Hand view of this 1958 18hp Johnson after the new fuel line conversion |
|
|
The fuel line coupler mounting holes in the left hand side of the motor are the same as the older dual line. Remove it, replace with the newer single connector. In the picture below the #1 blue arrow points to where the small black line from the filter/sediment bowl connects to the carburetor. The amber fuel line comes from the fuel pump. The #2 arrow is where the original copper pressure line went to the old fuel connector. This old small copper tube suction fitting in the intake manifold was just silver soldered to plug it, reinserted back into the threaded hole it came out of. You will note that the new fuel line connector is in place just under the tail of the #2 arrow.
| Left Hand view of this 18hp Johnson after the new fuel line conversion |
|
|
The fuel filter/sediment bowel does not really need to be
there, but since it was already mounted, I just left it and re-routed the fuel
lines to and from it.
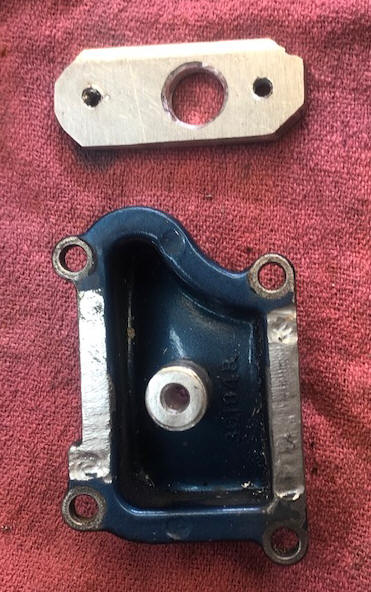
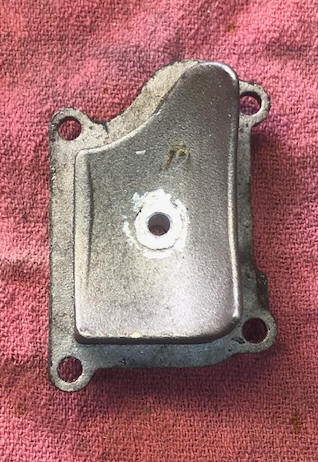
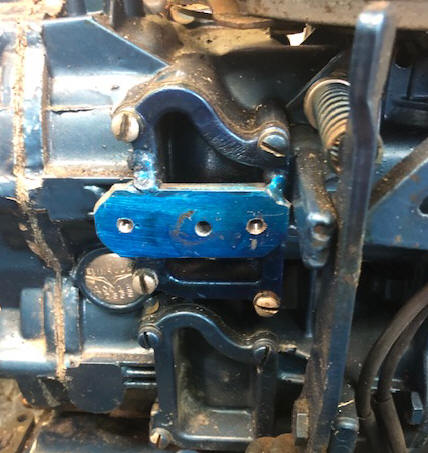
Aftermarket Method : Seen below, I have done on this 1959 motor. Here I made the 1/4" adapter plate, using a new fuel pump gasket as a pattern. The threaded holes are tapped 10-24 with the center hole 3/16". The connector is a piece of aluminum rod threaded to 7/16" X 20 NF and the cover drilled and tapped to accept the rod. The plate was then drilled to accept the center connecting rod. The inside is concaved, so the inner part of the rod was fitted to the inner contour. The plate was installed and Heli Arc welded to the plate and the rod. Then the weld was sanded down to match the plate surface.
| 1959 bypass cover being converted to use by a fuel pump | Here the inside of the bypass cover seen on the left |
 |
 |
| Here the finished fuel pump adapter | Here a OMC fuel pump is unit mounted on the motor |
 |
|
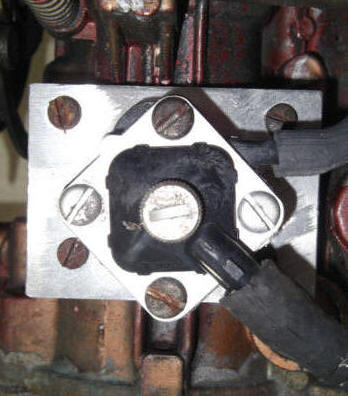
If you can not find one of these bypass covers, one can be made from a piece of 3/16" aluminum as shown below, which converts over to the newer 1965-1985ish #0391667 or Sierra #18-7350 square type fuel pumps shown in the photo below. Shown here, the biteplate screws bolt into the existing holes of the bypass cover and two of the four fuel pump screws are tapped into the biteplate. The incoming fuel line comes into the outer larger plastic barbed screened cover, with the smaller lien going out to the carburetor.
| Here is a conversion adapter plate, using the new style fuel pump |
 |
Another alternative using a Sierra # 18-7353 later fuel pump designed to be independently mounted where you would need to tap into one of the sideplates for a suction (vacuum) source. This would normally be using a 1/8" national Pipe Tap and a screw in barb with hose running to the the fuel pump wherever you can mount it, yet get the cowling cover to close.
Below is how I did it on a 1956 5.5hp evinrude. As you can see, different size motors may vary in how this can be done.
OK now to look
into modifying it to the newer fuel pump type using a single fuel line on a
different motor. I have converted a couple larger OMCs before by just
modifying the upper bypass cover, but this block did not have removable
covers. OK, by using a 1962 5.5hp motor's fuel pump's location, I now
know where to drill into that block bypass area. I made a 1/4"
aluminum adapter plate to fit the newer small square fuel pump, then drilled
a 3/16" hole in the middle of the adapter plate and using it as a drill
guide, by using a fuel pump gasket as a template, I then drilled and
tapped 10-24 holes on each end of the adapter to be used to mount the fuel
pump onto.
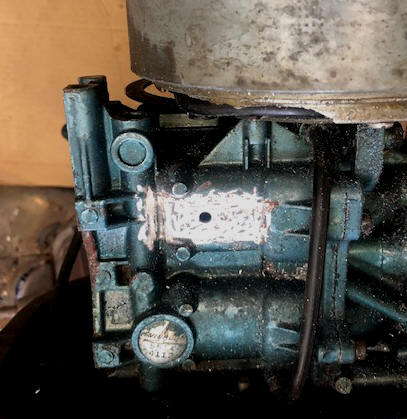
Now I cleaned
all the paint off that block area and using the 3/16" drill bit into
the center (vacuum hole)
for alignment onto the block, going only in until it went through the outer
jacket, (about1/4") then proceeded to generously epoxy (JB Weld) this
plate onto the block. The two attachment screws were screwed into the
plate to where they were even with the bottom side so that not epoxy would
get into the threads. And to ensure I was aligned and no air leaks, I
lightly greased the drill bit to act as a release agent so I could tamp the
epoxy in AND under the adapter.
I then soft soldered the the old line nipple shut on the bottom of the manifold plate. And
last was to replace the old fuel line fitting with a newer style, used one
on the motor plate, and now I can use my newer gas tanks.
| Here you can see the new hole drilled in the block in preparation to it being epoxied on | Here you see the new fuel pump base with gasket in place |
 |
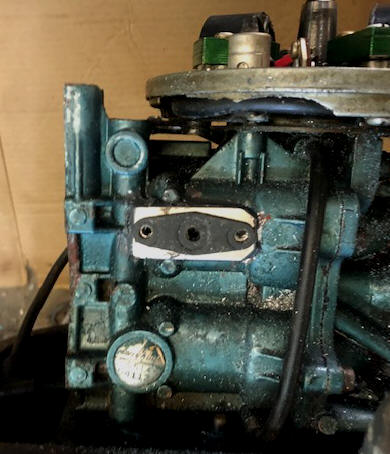 |
The only issue here is that the two fuel pump attachment screws need to be slightly SHORTER than the adapter plate, otherwise they could push the adapter loose from the block.
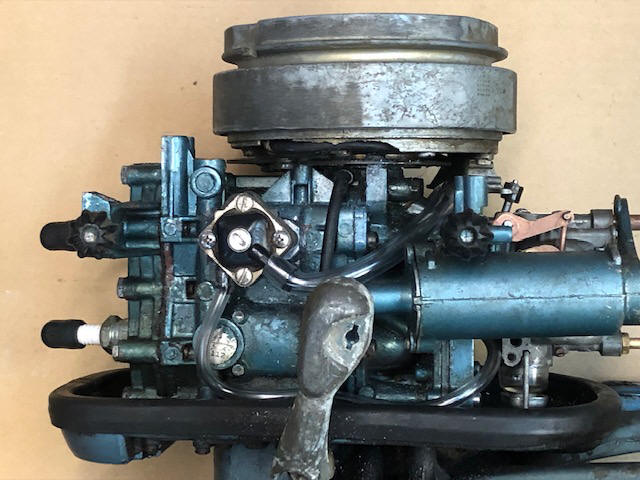
For fuel line I used vinyl tubing, 3/16" for the line to the carburetor and 5/16" from the tank fitting to the pump inlet. Here I did not use hose clamps, by with a heat gun warmed the ends of this tubing and then forced it onto the barbs. Here however I found that my routing the incoming line above the carburetor, proved that it interfered with the carb arm roller, so it had to be rerouted under the carb.
| Here you can see the new fuel pump installed |
 |
Portable boat fuel tanks sold in the USA since 01/01/2012
must be the EPA-mandated "self-venting" design instead of the previous version
with a screw-type vent in the cap.
The new tanks have a vacuum valve in
the tank so manual venting is not required. However if the tank is used
basically as a spare/emergency tank and in warm weather the fuel expands, this
new valve system only opens when the motor sucks a vacuum and does not allow
internal pressure to escape. What happens then is that the pressure builds
to where it then blows fuel out around the quick coupler on the quick disconnect
coupler O-Ring.
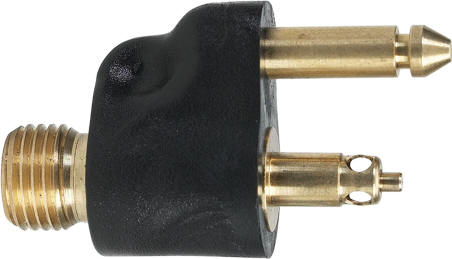
Method : When you do this, you will ALSO have to change the duel line Quick Connector on the motor to the newer single line fitting. However the OMC part number for these is obsolete, but there is an aftermarket part available, Moeller #033400-10 Johnson/Evinrude Male Fuel Tank Connector - 1/4" NPT, that sells on Amazon for less than $15.00. This may take some engineering to make it fit/function as it apparently was designed to fit into the fuel tank, but it is probably the best we have, other than finding a used OMC one for $50.
| Here the aftermarket Moeller fuel line connector |
 |
Alternate Method : In the above conversions, the OMC fuel pumps were used for two reasons, (1) I had used ones, (2) these conversions were before more economical fuel pumps were available. Here is a link to a You Tube of how to do it other ways. https://www.youtube.com/watch?v=Gbq5htJ0U3c
copyright © 2006 - 2023 LeeRoy Wisner All Rights Reserved
Back to the Main Ramblings Page
Originated 09-23-06 & last updated 06-28-2023
Contact the author