|
|
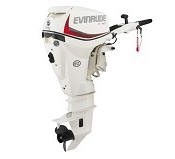
Problems in Converting a 2012 25 HP Evinrude
E-Tec to Long Shaft |
My Dilemma ; OK, being an old shade-tree outboard motor mechanic, normal shaft length conversions are usually pretty simple, purchase a 5" shaft housing extension, new longer driveshaft, shifting rod and water tube and a little assembling and you are off and running.
The motor in question, is a 2012 with less than 25 runtime hours on it. It is a plain Jane, 15" (short shaft) tiller controls, rope start. The boat I put it on is a (a 1980), 14' fiberglass Olympia Tri-Hull. lake/river boat. Some previous owner cut down the 20" transom a couple of inches, so nothing matched. I have done all the interior changes to this boat, but it is now time to flip it over and work on the outside. This being the time to repair/replace the upper cut away part of the transom and make it right, original and efficient as possible.
OK, but there are not a lot of Evinrude dealers in my area, (or one near, that I trust), so at a Portland Sportsman Show in February 2017, I contacted a dealer from there (100 miles from me), and made a request for a price, and if parts were available a subsequent order for the required parts. Time drug on, and I called a couple of weeks later, the receptionist said she would have the owner contact me in a few days. I followed up with an e-mail to him. OK, he did e-mail me and said he was busy, but would get back after the week-end. Still nothing a month or so later. I called again and talked to the lady. They were real busy getting people out for the spring boating season. I told her that I had looked up the part numbers on the internet, but would rather buy local, so she looked them up gave me prices, but the needed housing extension was NOT available. He was nearby and took the phone, listened to my request, yes he remembered our conversation, and commented that even if this housing extension was discontinued that they many times purchased the conversions from Bay Marine and would have her check it out and get back to me. Well by mid May, still no response.
By this time I had went onto the Evinrude E-Tec owners internet forum and was also informed that Bay Marine would have this conversion if anyone would. So a call to them, SORRY they did not list that one ( I know, as I was also on their website). But the owner happened to be passing by and responded to the receptionist that they could try the factory. I told them that I had found that this spacer was FACTORY DISCONTINUED. Well sorry. And good luck finding one at a dealership, considering the new JUST IN TIME inventory program where the dealers can get parts within a few days, so why carry a large inventory and expensive inventory that may never sell.
OK what I found was that, instead of the factory making a short shaft 15", then adding a 5" housing extension to convert to the long shaft 20" or a 10" housing extension to go the the extra long 25", they made the 15" short exhaust housing like has normally been done for YEARS. They then made a whole new exhaust housing for the 20" long shaft motor. Then for the 25" extra long motors, is where this housing extension was used to convert a 20" to a 25".
It seems that for this size a motor, not many boaters wanted the 25" shaft, so the factory dropped that motor from the catalog by simply discontinuing the housing extension. No one even thought that some of us may want to convert our 15" motors to a 20". And all the other parts for the 20" are still available.
My Solution ; Well, I have way too much money in this motor to consider selling it just to get a long shaft motor (which is what my wife suggested), much less being able to dispose of my dilemma at any close a break-even price. Remember the word BOAT = Break Out Another Thousand. Along with that I like the motor. Since I have been a machinist for as long as I can remember and being retired over 10 years, the idea was to build my own copy of this housing extension. First I thought about fabricating one from sheet aluminum, by making 2 halves and welding them together. Second possibly machining one from solid aluminum stock. But the decision would depend on actually looking at what was needed by pulling the lower unit off and inspecting it.
OK, I violated one of my cardinal rules. Without a service manual, I could not figure out how to disconnect the shifting rod so I could remove the lower unit. OK, go to E-Bay and I found a factory service manual for this motor for $23.75. It looks the factory was thinking here, as they hid the shifting rod coupler behind the plastic removable water intake screens on this motor's lower unit.
Once I got the lower unit off, the option of fabricating and welding one soon went by the wayside. But the machining of one from a solid block would be a possibility if done one side at a time.
So with the lower unit off, so that I could get some dimensions, which were sketched onto a sheet of paper, hole sizes and locations in relationship to each other, approximate overall dimensions etc. Then on to my computer CAD program and a few hours transferring the sketches into a dimensioned drawing. Here it was critical to make the center bolt hole bosses small enough to clear the water pump housing, when this housing extension was slid over the water pump.
One thing that is critical on CNC machining is to make sure that was that the size a cutter that was going to be used for this operation as for the inside cuts, the drawn in radiuses needed to be slightly larger than the cutter to be used, otherwise these machines do crazy movements, possibly breaking the cutter if it can't understand how to fit a larger cutter in to the smaller corner. Therefore this housing extension of mine will not be an exact match internally to the factory casting. But that should be of little consequences as the outside will be very close. Mine may weigh a slight bit more than the original castings because it will be thicker on the inside front and rear.
| Shown here is the CAD drawing p/n 5008232 |
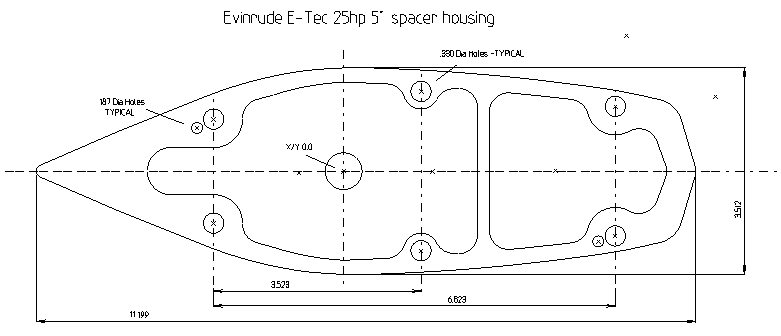 |
Print off the CAD drawing to size, (as seen above) cut out the driveshaft hole in this paper template so it can be located over the driveshaft on the now exposed upper surface of the lower unit. Pressing the location of the 6 attachment bolt holes on the paper gave me a better idea of what changes were then needed as to their locations, along with the general overall inner and outer contours. Now back to the computer and try to make sense of what I had now, as to what I seem to need. A couple of this back and forth process and it seems close as best I can tell. Now the bolt locations are not the critical ones as much as the 2 smaller alignment pin locations. And with the X 0.0 and Y0.0 CAD center being the center of the driveshaft that I can only measure closely there is no way to precisely locate these pin hole locations.
So at this point, I find a 1/8"scrap aluminum plate large enough to make a metal template. I wrote the computer G Code (the best I could remember after being retired over 10 years). My son had bought my business, so memory stick in hand and the aluminum plate screwed down to a wooden 2"X4", I head for his shop. With help from his employee who now runs his CNC machines, I got a aluminum pattern/template made up. But we did not drill the alignment pin holes, because of not knowing exactly where they were needed. So now for the first time, I can get something that actually fits onto the top of the lower unit to get some finalized changes made in the CAD and intimately the CAM program.
To get a more positive alignment, I lathe turned 6 pins that closely fit the 6 oversize attachment holes, so I can check this plate holes to align with the lower unit holes. SURPRISE, I had all 6 locations close enough for all the pins to align and engage the lower unit holes. Now with them all in place, I tapped in the location of the smaller alignment pins with a hammer, Since the pins were slightly rounded on top and the aluminum was soft, I now had a good indent to locate these much needed alignment pin holes. Using these now detents as a drill guide, I drilled them out to the 3/16" holes needed to go over the alignment pins in the lower unit. WOW, IT FITS.
All the inner contours were now OK, but numerous tries were made to get the alignment pin holes relocated on the CAD drawing (for future precise usage) to now match the drilled holes in the template, and those locations were then drawn into the CAD drawing.
Now with this aluminum template laying aligned on the lower unit, slight modifications were needed to the outer contour to match the shape of the lower unit more closely. Again back to the computer, change an arc here, blend some arcs together, move a line there, change a radius on a corner and after at least 1/2 a dozen more changes, and I think we are there. This reverse engineering is challenging at times. What you see from looking at this template, the final finished product will be the same shape as this template, but 5" tall.
And with this part coming out what appears to be successful, I can now justify investing in the material and other parts needed to proceed with the project, as it looks doable on the machinery at hand.
| Shown here is the result of my labors for the first part of this project. Note the extra holes in the aluminum were template where the screws attached it to the wooden base for the machining |
Now, in searching the internet for bulk material, I find that I can buy a block of 6061 aluminum 4" X 6" X 12" for $137.00, plus shipping. The need for 6061 is that it is made of a better aluminum to withstand saltwater corrosion and is used many times in the food industry.
So by using my CAD drawing, I can now precisely locate the 6 bolt holes and the 2 alignment pin holes in relationship to one end. Here I will transfer these precise numbers off the CAD to my manual milling machine which has DRO (Digital Read Out) using the same numbers for locations from a known reference point. Then I can drill the 6 holes, along with possibly drilling out a lot of the excess internal pockets, which would save a lot of CNC machine time and possible broken long end mills if the code is not carefully planned.
The plan is to then make a steel bottom mounting plate using the same reference locations, and again drill the required holes, but smaller and tap them so I can then use these to bolt the now predrilled aluminum block to. Since this housing extension is symmetrical, we can mill down slightly over 1/2 way, then flop it over and do the other side, to remove any chance of run-out (or flex in the cutter) because of the long cutter reach.
PLAN B. Upon thinking this over, making the deep cuts on this 6" chunk of aluminum may be problematic and possibly expensive if something goes wrong, along with taking a lot of time to be sure that all the chips are blown out of the way so the cutter does not get in trouble. But what if I laminate (5) 1" X 4" aluminum plates together after they are machined out to size. It would be easier to machine, cost would be about the same as this material is sold by the pound. Here I would actually have an extra chunk of material in case the first actual run part had a hiccup, as the bar that I will be getting is 6' long, and I only need just less than 12" per plate. I can rough up the sides that will be epoxied together for better adhesion, and I will not have to mill 1" off the 6" chunk to get the 5" height. The outer sides will be sanded, primed and painted anyway, so any slight mismatches can be sanded out.
Now I may have found why they discontinued this housing extension. Possibly to stop guys like me from doing what I intend to do, because of unintended consequences. That being the way the plastic lower cowlings are attached at the bottom, there appears to be the need for a horizontal baffle on the lower part of this 15" exhaust housing to keep water from being forced up under the cowling at the top of this housing extension. This discontinued extension appears to not have this, as it was designed for the 25" shaft which would have put the powerhead considerably above the water turbulence. OK, no problem as if I laminate it, I can add a 3/16" baffle on top and mill a rear "fin" on one of the center sections.
This housing extension is divided at the rear section. The front part is the water intake under the water pump as seen at the base of the driveshaft. Behind the separator baffle is the exhaust cavity.
| Here we see the top of the removed lower unit | Here is the lower unit with my aluminum template in place to now get further more exact CAD modifications made |
|
|
|
Now The Final Work Begins ; OK, now in looking at the motor and photos of the factory 20" shaft motors, there appears to be a small fin off the rear about mid height of what would be my extension. Not sure why, but possibly to curtail any turbulence or rooster tailing.
My fabrication shop owner friend just happened to have a piece of 3/8" 6061 scrap aluminum that he cut to size for me. This will make the top baffle, but to maintain the 5" overall height, I have milled off one half, or 3/16" off the top of two of the 1" plates to compensate for this top plate thickness.
In the upper RH photo below, you see the mounting stud holes being drilled. These locations were taken off the CAD drawings and transferred to my milling machine's Digital Read Out (DRO) where I then duplicated the CADed locations. You will also notice the new 20" driveshaft , longer shifting rod and water tube extension. And my 1/8" template on top as an idea of what it will nook like for all the lower plates when finished.
In the bottom RH photo below, showing the milling fixture, the existing holes were there from some other long ago usage, and for this fixture plate, these holes are of little consequences, as there was enough room to drill and tap the 8mm bolt clamping bolts into for the milling process. It looks like a lot of chips will happen here.
| Here we see the top plates cut & stacked in the appropriate locations | Here we see the plates drilled & stacked in the appropriate locations with the bolt studs in position, & the base milling fixture in the foreground |
|
|
|
| Here are the 6 stud mounting holes being drilled | Now the 3 large holes are also being drilled using 1 5/16" drill |
|
|
|
| Here are all the plates predrilled for the mounting studs & the relief holes inside for easier CNC machining of all 6 plates, with 5 stacked on top of each other, plus the thin template laying on the top of the top baffle plate. And a few of the unthreaded studs shown | |
|
|
CNC Machining Begins ; OK, now we are starting to get really serious. By using the same fixture plate as when the holes were drilled, this ensures compatibility. All plates were bolted onto the fixture plate, using the 6 final stud attaching holes to the motor. Here, the CAD and G-Code was checked numerous times and the plates numbered to ensure no accidents happen.
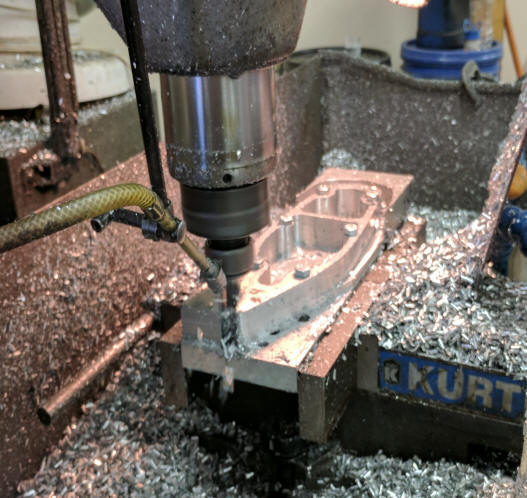
Since there is a lot of material to remove here, and the depth of the cuts, feed rate had to be accomplished by trial and error, breaking one cutter in the process because of chip buildup. Mist coolant was constantly applied to the cutter to cool and lubricate the cutter, along with partly blowing chips away. The depth of cut was limited to 1/4" per pass. Total estimated run time was 45 min per plate, but then add to that, attaching the plate and replacing it for the next run and tool changes, makes each plate about 1 hour run time for each of the 5 plates.
| Here you have one of the 5 plates nearly finished being CNC milled. Lots of chips and scrap compared to the actual finished part. | |
 |
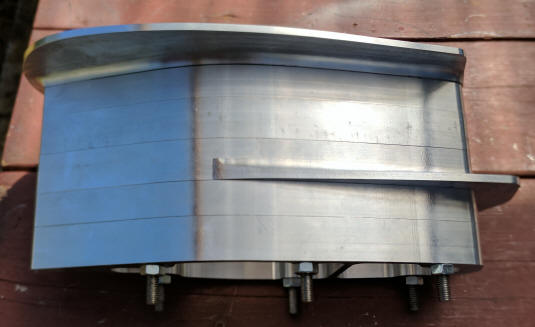
| Here they are all milled, stacked & bolted together in location before final fit/finish & Epoxying them all together | Here is a top view of the stack |
 |
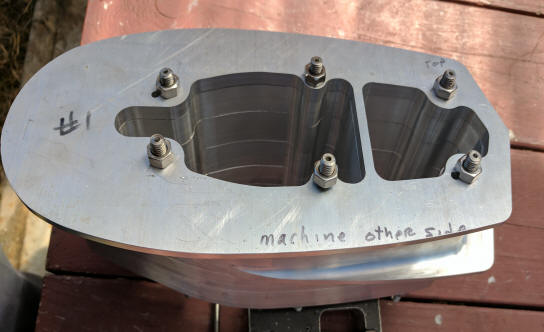 |
| Here you see the finished part, notice the epoxy on the in side joints. | |
|
|
OK, now for the final work and assembly. But the original lower unit was held onto the exhaust housing with (6) 1 1/2" 8MM bolts coming in from below. Using this 5" spacer, bolts would not be the thing to do, so the factory used (6) 8MM studs 6 1/4" long, threaded on each end. These studs were screwed up into the exhaust housing, the extension slid up over the studs with nuts threaded onto the bottom stud threads, holding it on from the bottom. These studs price was $17 each. 8MM is within .002" of 5/16" diameter rod, so I purchased (6 feet) of 5/16" stainless rod, cut them to length and threaded them on my lathe, and chased them with a 8MM X .75 threading die. Even with purchasing the 8MM threading die, I saved $70 here, as my retired time does not count.
These 6 holes were slightly oversize from the studs to ensure things would come together. Then there are two small dowel pins on two opposite corners, to ensure that the lower unit is perfectly aligned into the existing motor lower unit and midsection housings as the 6 stud's nuts are tightened. So more lathe work, making these to be installed as seen in the holes on the above photo.
Then the factory lists flat washers under the stud's nuts. You guessed it, buy locally or make my own. These needed to be stainless steel and standard 5/16" flat washers are too large to fit here, so buy 1/4" washers, put them in my lathe and drill out the hole to 5/16".
Unforeseen Problems ; I had also purchased a new 20" shifting rod, when I ordered the new 20" driveshaft. No big deal as it was threaded on the top end, seemingly to thread into the upper end of the shifting lever in/near the lower part of the block. SURPRISE, to access the upper end of this rod, I would have to pull the complete powerhead as that upper connection was buried inside the upper part of the exhaust housing and lower part of the block.
This motor's design did not follow the old time standard, as this shifting rod coupler is located considerably lower than all the older motors, being low in/behind the water intake screens of the lower unit. Normally this coupler would be at the juncture of the extension and lower unit near the water pump. But with this shifting rod coupler being way lower instead of changing the lower shifting rod, (which is easy), no way as it had to be done from the top. NOT ME, what I did was accurately measure the distance this old shifting rod extended below the original 15" exhaust housing, and did a lot of measuring/calculating with the idea of cutting off part of what was extended below, cut a notch near the new lower end to match that original notch location (in relationship to the end) and add another coupler at this new location. Then using the new 20" shifting rod (that was now not usable as such by me), connect it upside down onto the new coupler. Slide the extension housing up, and using a couple of the screw studs to temporarily hold it in place against the exhaust housing, measure down and mark it at the same distance that I had recorded from the original uncut rod. Now I can cut it off, remove it from the coupler and place it in my lathe to cut a groove to match the existing rod ends, which will now mate with the lower coupler that is behind the water intake screens. Here the rod's length dimensions were critical in order to maintain proper shifting adjustment.
Once this new upper shifting rod coupler is in place, it will never have to be removed when changing water pump or impellers, as the lower one will still function as if the new long upper rod had been installed.
The reason all this had to take place was that the original lower end of the upper shifting rod, passes thru the water pump which acts as a guide and oil seal around it for the gearbox, which if I could just add a rod extension on the bottom, this water pump location prevented it. So in essence, I just moved my new coupler up about 4" and out of the way, and into the cavity of my new housing extension. For reference, this rod was cut off 1 1/2" below the bottom of the existing exhaust housing. In the photo below you see how I made the new extension, plus you can also see the new copper water tube extension.
| Here you see me holding the part of the original shaft that was cut off & how the new shifting rod extension was connected, adding this cut off length plus 5" for the extension. | |
|
|
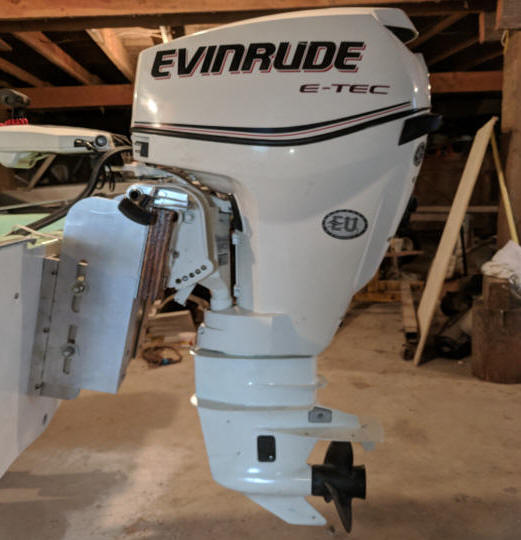
| Here you see the finished long shaft conversion installed on the boat which is using a Jack Plate | |
 |
Copyright © 2017 - 2022 LeeRoy Wisner All Rights Reserved
Back to the Main Ramblings Page
Originated 05-06-2017, Last updated
06-24-2022 ***
to contact the author click here
