Techniques for Bank Fishing Salmon
/ Steelhead on Coastal Rivers
 |
Techniques for Bank Fishing Salmon
/ Steelhead on Coastal Rivers |
|
Here the above title is coastal rivers, well maybe I am off a bit by
including the Cowlitz River in Washington in this article, but the principle is the same for all these rivers.
These fish that we are looking for, tend to be
seasonal, meaning they migrate from the ocean in the late fall and winter, where
weather conditions may vary considerably.
| Here you see a somewhat possible day on the river |
 |
Now, it may be best to consider in fishing any stream/river that you consider that the vast majority of the land it passes through will be privately owned. Therefore I strongly recommend that fishermen get permission from land owners to access the rivers for their own safety, security and peace of mind. Listed below is a explanation of one landowner.
"We have had property along the XXXXX river for many generations and there used to be some nice fishing holes before the last big floods. We’d let anyone fish on our property, but we always appreciated notification when people planned to fish or swim on this property. Times have changed, and we will have to put up “No Trespassing” signs for a multitude of new concerns. People are getting a bit crazy and less familiar. On the other hand, insurance companies are getting crazier and too familiar.
Even though there will be “No Trespassing” signage put in place (much like many neighbors have done) we would like to give personal permission for reasonable access the property on a case by case basis for fishing and recreation. We ask that people stop by, introduce themselves and tell us what their plans are for the day. People granted access will be entering the property at their own risk. There are uncountable hazards associated with the river, river banks, the surrounding environment and wildlife that we have no control over. The land is primitive and wild, and we would like for it to remain that way".
River Flow ; The river flows for the Cowlitz will vary depending on the time of the year and the amount of rain/snow there is plus how fast the snow melts in the upper basin. During the summer time, the flow will be pretty steady, but early winter water will be dumped from Riffe Lake into Mayfield Lake and then out of Mayfield dam creating fluctuations in the flow in Cubic Feet per Second. A flow of 9,000 in the spring to 11,000 CFS will usually raise the water below Mayfield dam about 2'. To find this CLICK HERE for a web link for a 5 day history, Or HERE
River flow on other small rivers or streams, will be dependent on the weather and amount of rain that is dropped in the few preceding days. The Shookumchuck River can be productive in the winter if on the rise and between 350 and 400 CFPS. Lots of rain will "Blow the River Out' as far as fishing is concerned. Short rivers (and timbered watersheds like the Nemaha, and Satsop, Queets or Duckabush) will clear up earlier than the larger/longer, muddier bottomed rivers like the Chehalis take a lot of time to clear up.
Techniques ; There can be many different techniques for catching salmon from the banks of rivers, but the three primary techniques with are variations, are basically plunking, casting and flipping.
Plunking ; Plunking is a term mainly used for casting out into the flowing river and letting a sinker hold your offering near the bottom, hopefully in a migration path of upstream swimming fish. The main choice of bait would be cured salmon eggs.
From the bank, your best bet is to fish the outgoing tide if you are low down in the system. Outgoing tide would produce a heavier current, pushing the fish closer to shore in order to follow the path of least resistance. With Kwikies (Kwik Fish), spinners (if plunking), and wobblers, you'll generally need the current in order for your presentation to work correctly. If the current is slow, or even if it's not, Spin-N-Glos with prawn work very well as they need very little current to work, and it floats.
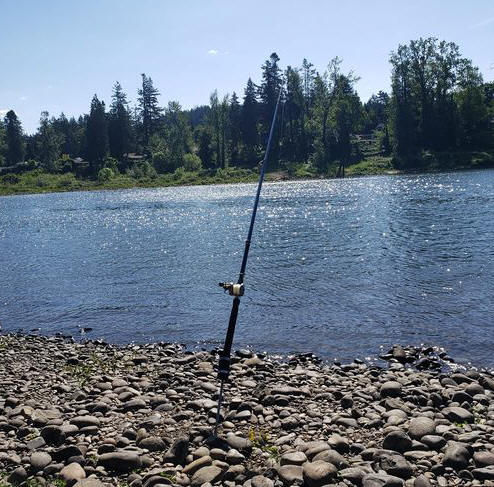
| Here you see a Plunking rig set for either salmon or steelhead | No hurry, I'll wait |
 |
 |
And, depending on river flow and how far upriver you are, sometimes you can fish through the incoming as well.
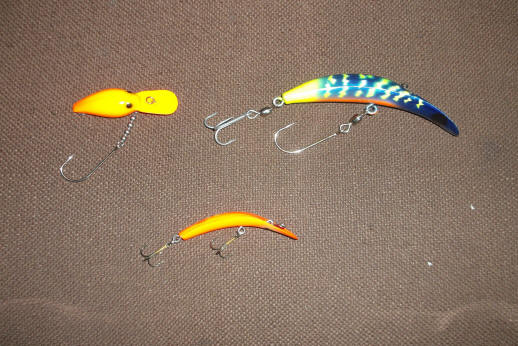
| Here you see some plunking lures for both salmon & steelhead |
 |
If you are fishing a
river where tidal influences occur, don't miss the one hour
before, and one hour after time slot on each side of the tide changes. As a lot of times the best bite
occurs around the tide changes (not always the case). If nothing
happens plunking, and its during slack
tide (or even the tide running) bring an extra rod and cast spinners.
Depending on where you fish and the regulations, you can either fish one, two or even three rigs. One method used by many is to use a Spin-N-Glo as an attractant in a size from size 2 to 0. Tie an egg snelled tie on the single hook, use a leader about 30' long. Thread a Spin-N-Glo onto the leader. This will be your bottom leader to the bait. You can then either use just the Spin-N-Glo alone or add eggs under the egg loop. Cured salmon eggs and or a shrimp tail sure can not hurt. Preferred colors for the Spin-N-Glos seem to be chartreuse, lime green, or orange.
| Typical Plunking set-up |
 |
You can attach this leader to either a 2 or a 3 way swivel, depending on
your preference as to how to attach the sinker. If you want the sinker as a slider use the standard 2 way swivel,
some fishermen prefer to use a
sturgeon slider instead of the 2 way swivel, either way, put the slider on the
line above the mainline swivel/snap If however you want to run the sinker on a
fixed dropper, then use the 3 way swivel attached inline at the mainline snap. Droppers
should be 8-12”, if normal flow is expected, if the tide/flow is considerable,
lengthen this sinker dropper, and of a lighter leader material so if it gets
hung up, the sinker is all you loose.
If you are to use a double rig (more than one lure) then go up the line about 36” and put in another 3 way swivel, which you will attach another leader rig of about 24”, crimp a plastic sleeve or drinking straw about 1 ½ - 2" long on the side eye (this shorter leader and plastic, helps to keep it from tangling in the lower rig). Depending on the fish you are targeting, the hook sizes can vary from a 1/0 to a 4/0 +.
You probably should make up complete spare leader setups, as usually it is easier to tie these up at home than on the river with wet or cold hands. This takes away from valuable fishing time also.
This method tends to work best in pools with slower moving water, where the fish tend to congregate, after going thru fast moving water and as a resting place before heading on upriver. Now here is where you normally do not need to cast clear across the river, as the fish tend to follow the shore more than you think. You will find that fish seem to be the most aggressive after just entering a pool. Chinook salmon will come up and mouth a plain Spin-N-Glo, so you have to be ever watchful of the rod tip. Coho on the other hand will probably strike it.
The Spin-N-Glo does a multitude of things. It is buoyant and helps hold the bait up off the bottom. It has a bright color, which can help attract the fish. But most important it has the rotating spinner blades, that give off a vibration, which the fish can feel, thereby attracting them to a possible wounded baitfish.
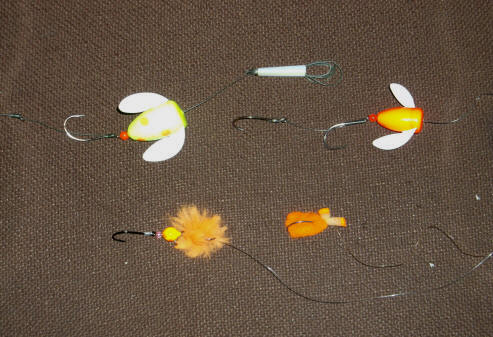
In the photo below, on top is a large #0 Spi-N-Glo for salmon and a smaller for either salmon or steelhead. Both are tied with two hooks and the front hook uses a egg loop tie. between the hook's eye and the Spi-N-Glo is a small plastic bead that acts as a bearing, allowing the lure to rotate better. The LH Spi-N-Glo's color is chartreuse with red dots and is called the "Clown", the color in this photo is washed out because of the cameras flash. It has white wings.
On the bottom of the photo below, are two casting lures, on the left is again two smaller hooks as above, but tied with a corkie between the two hooks, (one hook buried in the yarn of this photo) this corkie creates a slight amount of floatation, which helps raise the hooks off the bottom and keep it from snagging up. On the right is a single egg loop tied leader that has some yarn AND foam as floatation. This foam is simply 1" soft foam that has been spray painted on each side with the color of your choice, (here is orange), then using a metal tube as a cutter (in this case a sharpened 270 Winchester fired case with the head cut off). This again creates a slight amount of floatation. My steelhead fishing partner of many years ago used these and called them "Shrimp Flies". Any of these lures could also use eggs or shrimp looped into the egg loop tie. To learn to tie egg loops, CLICK HERE.
| Here you see a couple Spi-N-Glos, casting & flipping lures |
 |
Most plunkers use a rod holder set into the river bank
which could be as simple as a forked stick, or in a metal rod holder, even a section of PVC attached to a 1.2" metal rod that is
sharpened on the lower end. I have found that when you make up one
of these, you may not be able to find a sandy bar, but it could be a gravel bar
instead. Here you may want to weld a cross bar onto the
upright to give you some sort of push part with your foot. Otherwise you
may have to bring along a large hammer or find a big rock to drive it into the
gravel with. You should also consider getting a little bell to attach to your rod tip as a
signaling device, as many times you may get complacent and not be attentively
watching the rod tip 100% of the time.
Then there is the question of scent. Do I use it or not? Well, salmon and steelhead have a very good sense of smell. In my mind it sure does not hurt to add some egg scent, maybe on a freshly cast out egg roe, there is enough scent, but after it has soaked for a while you have lost part of your attractant.
If you are new to the game, then the easiest way to learn is to watch others around you. You don't have to be a rocket scientist, just watch others if they are near & make mental notes as to what they are using and how they are using it.
Casting
Lures ;
You will have to experiment as to whether you start reeling immediately or wait until the lure has sunk to a desire depth. Also you will have to determine just how fast you reel back in. Remember that all reels are not using the same gear ratios, so if one reel retrieves at a proper speed, another may be faster or slower.
Cast closest to you first, progressively moving away each time. This allows you to not spook a nearby fish by casting over them.
| Here you see some casting spinner lures for both salmon & steelhead |
 |
The thing about this type of fishing is that when the fish hit the lure, they hit it hard enough that you are fully aware of what is going on.
Casting
Eggs ;
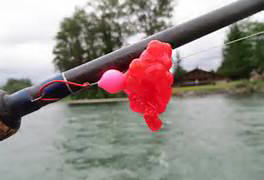
In the photo
below, a corky is tied between the two hooks which acts as a partial float,
keeping the eggs off, but near the bottom. In this particular photo the
amount of eggs would probably be more the size for a salmon, where a steelhead's
rigging would be more between a dime to quarter sized. Here the eggs are
held in place on the front hook by being placed under the "egg loop" knot.
Also some will slip a small amount of yarn under the egg loop of the rear hook.
Then as seen in the RH photo below, willpower and determination
can prevail to whomever is committed.
|
Here a normal steelhead/salmon bait with a corky & small cluster of eggs. |
Addicted |
 |
|
In the photo below,
notice all the debris in this river and the water risen considerably, but
about the perfect color.
|
Here a nice upriver Coho caught on drifting
a red corky and pink yarn with a small dime size cluster of eggs. |
|
|
Casting will probably be best accomplished by a spinning outfit with a rod of 8’ 6" or 9’ plus. Here is one area that the rod and reel should be matched as you will be flailing it quite a bit.
| Casters working a run above a hole below the Cowlitz River barrier dam |
|
|
Bobber or Float Fishing ; A variation of casting would be Bobber/Float fishing. Here you use a bobber that holds you lure, (eggs, jig, etc.) just up off the bottom (or at any depth for suspended fish). This method has become very popular in recent years.
You may have to adjust the bobber height on the line from the bait, until you find the right depth of the water for the particular drift you are doing. You can cast a little farther with this type of fishing than the flipping and then allow your line to pay out on the lower end of your drift, to cover slightly more water if conditions exist. On this type of fishing you want the line to the bobber as straight a possible, so you may have to “meld” your line to take the slack out of the line and to keep the side or current pull off.
Here the float will have to designed to suspend a specific weight under it, be it a sinker or sinker along with a jig, even eggs or a shrimp. Most float will be marked in ounces, designating what weight they will float.
Some may simply attach the float securely to the main line above the lure, OR it can be a slider float on the mainline, but limited to the depth it will allow by a adjustable "Bobber Stop" above the float. This method allow for better casting and lure depth adjusted by the placement of the bobber stop. In the photo below you can see what is entailed, however everything has been condensed to show in the photo below. In this photo, there is a additional stop bead above the float, this being a corkie simply to add a bit more contrast for it being more visible.
In selecting your float, they come marked in how many ounces they will float, (not what they themselves weigh). When using floats, the higher it floats (to a degree), the better sensitivity you have AND the better you can see it. When using floats like shown in the photo below, try to have it float with at least some of the black showing, or go to a larger float. When in doubt, try your combination in a rain water barrel BEFORE you get on the streambank.
Using this method, you can add about any lure, from eggs, shrimp, worm or jig, however this would not be ideal for a spinner or plug. Your leader will be tied to the swivel below the sinker. Leader length can be up to you, and depending on water clarity, but for off color water start at about 18", as longer length decreases the ability to cast well and can increase tangling during casting.
| Here you see a 1/2 oz. float set up as a slider above a 1/4 oz. egg sinker |
|
|
In the photo below if you look close at the eye of this jig, you will see another heavier leader tied behind the regular knot. This is just a section of a heavier leader tied tightly behind the regular knot. If you get where the jig will not ride in a horizontal position, tie this extra knot, pull it tight and cut off the tails. This can help prevent the regular knot from sliding rearward, loosing the balance with the jig.
| Here you see a method of retaining the leader knot in the balance point of the eye |
|
|
Flipping ; This is a term many fisherpersons may not be familiar with. It can be more productive than the methods as long as there is sufficient current to allow a good drift. This method is a valuable technique to learn because it works on any stream that holds salmon or steelhead.
One of the most effective set ups to use is a glass/plastic bead on top of a 1/0 to 3/0 hook with a piece of chartreuse yarn on the egg loop of the hook. This simple rig has a proven track record for taking more salmon of all species than probably any other setup when used by knowledgeable fisherpersons.
Another variation used for Chinook salmon is to rig using two single hooks. Once again in size 1/0 to 3/0 tie an egg snell with two octopus style hooks about 2 to 3 inches apart. In between the two hooks place two of the smallest size little corkies with florescent chartreuse, orange or red being the favorite colors. Once again, always use a piece of florescent chartreuse yarn.
Some fishermen may even use Coho flies for this technique.
The above setup is then attached using about 4 to 6 inches of a lighter leader running up to a sinker. This then acts as a breakaway if you get hung up. Also some fishermen prefer the surgical rubber tube lead on a three-way swivel. The longest leader you can handle seems to result in more hook ups. But you need to be able to control the flip.
The technique is a little more complicated then just throwing the hook upstream and letting it bounce downstream. You don’t use the reel at all when using this technique. For a right handed person, hold the rod in your right hand. Strip off enough line so the lure doesn’t hit the ground when you hold the rod pointing straight up with your right hand. Now with the left hand strip off more line so when you extend your left arm while holding onto the line, you can still hold the lure off the ground. Now just flip the lure out, lower the rod tip and let go of the line. The lure should flick about 15 to 20 feet in front of you depending on your rod length. You don’t need to cast very far at all. Usually a 45 degree cast upstream is a good starting point. Salmon run up river along the edges for the most part. 10 to 20 feet from shore is usually plenty far.
Casting upstream a little bit, starting at about 45 degrees, varying it as you go, you need enough weight that you can feel the weight bouncing along the bottom. As soon as the lure hits the water lower your rod tip to just above the water level by a foot or two. Not too much that it will hang up though. NOW THIS IS THE IMPORTANT PART!! As the line swings downstream in front of you, you want to slowly sweep the rod with the current, keeping the tip pointed low and toward your line entry point on the water. At the same time, with your left hand grasp the line at the rear guide, and as you allow the rod to follow the current, slowly pull the line in to take the slack out of your line to the lure, so you will have constant very slight tension on the line. You may have to reach up with your left hand and get another grip on the line, pull it in as before. When you get to the bottom of the drift and you are about ready to pull it out, you might want to move the rod tip toward the bank, then give it a slight jerk. This jerk will at times set the hook if the fish has just picked up the line on the last of the drift, and has it running thru his open mouth, but has not actually hit the lure. This is the method of catching sockeye in Alaska, in or near his mouth.
The idea is to keep the line all the way to the lure as perpendicular as
possible to the bank. This insures that when a fish hits, instead of momentary
slack as the lead bounces past the fish and then you feel the bite, you feel
the fish immediately. Imagine if you cast your lure and weight upstream and let
it dead drift down without any "pull." The lure would be pulled
downstream below the sinker as the sinker kept on grabbing the bottom.
If a fish
hits the lure, you wouldn’t know it until the sinker bounced 4 feet down to the
fish, then four feet past the fish until the line tightened up. By then the
fish will be long gone! KEEP LIGHT BUT CONSTANT TENSION ON THE LINE BY DRAGGING
THE LURE SLOWLY TOWARDS THE BANK. Keeping a constant "pull" on the line is the key element in
the flipping technique. As soon as you feel something different from the bottom
you have bounced by for hours, set the hook!
Better to look foolish, than to lose the fish you have been waiting all
day for. Most of the time though, the
fish will tear your arm off because you only have 15 feet of line out…if you
keep some tension on the line.
You can vary where your drift is in footage from the bank by varying your spot
you are casting to. It is advisable to
cast closer to shore on the first casts, move your casts farther out on
your next casts. By using this method
you will not be fishing OVER the closer fish and spook them. You will in this
manner cover all the water starting from closer to farther out from one
location.
It will prove very beneficial for you to use premium ultra sharp hooks like the Gamakatsu, VMC, or Owner type hooks. Your hook up ratio will at least double by the use of ultra sharp premium hooks. They also punch a very small slit through the fish’s mouth that helps keep the hook from backing out. This technique can be used in about any river where the water is flowing at a fairly decent pace. It also it the exact same technique used to catch sockeye when they start running up the Kenai and Russian Rivers in Alaska. It also has proven effective for silvers and pinks as well.
Any type of rod can be used for flipping. The light well balanced rod allows you to fish much longer than a traditional heavy outfit with a spinning or baitcasting reel. The longer the rod, the more water you can cover effortlessly. Of course in crowded conditions a shorter rod is way more practical.
In the lower states, versions of this method has been called "Flossing" and you will could get into great debates as to whether it is legal and / or ethical. The riotous say anytime the fish does not voluntarily take a lure in the mouth, it is snagging. They also say that if you use a long leader that you are flossing. How long is long? In my estimation, there IS a difference between flossing and snagging. I have taken many sockeye salmon in Alaska by this method and with them being hooked in the mouth.
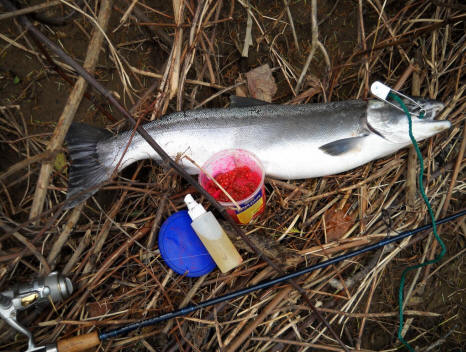
| Here a bright coastal river Coho caught on drifting eggs |
 |
Some Final Pieces of Advice…
Use the best gear you can afford. Make sure the drags on the reels are good because these fish may well test your gear to the limit. When adjusting the drag, don’t just pull on the line above the spool.
Also always re-spool with fresh line every year, or at least swap ends. Its amazing how strong fresh line is. You could land a 20 pound Chinook on 10 pound test, maybe not easily, but it can be done. As an example, take your rod and tie the line to a hand scale. Pull on the rod so you have a good bend. You’ll be surprised how hard 5 to 10 pounds of pull will bend your rod if it doesn’t break it first. The main reason for fresh line is that line gets weaker when it is stored, specially if exposed to sunlight and coiled tightly on the spool. It is the only thing connecting you and the fish. Also abrasions on a 20 pound line will quickly turn the line into a 10 lb rating! Every time you go out, cut off 4 to 5’ of line and retie, then check it after every fish. The best method is to run the line through your fingers, as you can feel any slight abrasion where you can not see it. Line is cheap in comparison to lost fish. Also keep your hooks sharp. Check the hook point on your thumbnail, if it slides off, it is DULL, sharpen it until it digs in with the slightest contact.
Also learn to tie good knots. Some of the Puget Sound Anglers chapters have made "knot busters", these are simply a recording fish scale that is set in a frame with a small leather covered spool that has a hand crank attached to it. The procedure here is to tie your favorite knot to hook or swivel eye to a section of line, then wrap it onto the spool, overlapping or wrapping around the anchor screw head. Keep winding the spool until something breaks. This will make a believer out of you. For a link to my article on how to tie strong knots, CLICK HERE.
Copyright © 2000 - 2021 LeeRoy Wisner All Rights Reserved
Back to the Main Ramblings Page
Originated 10-10-00, Last Updated
05-11-2021
Contact the author
For